The word Schema is widely used in the field of databases to describe the main structure of any database. It can provide you with the inner details of your database like data types, file names, tables, etc. In MongoDB, Schema is said to be a JSON object that not only expresses the database structure but also the data it contains. The Schema gets generated with the insertion of data into a database and provides you with a detailed view and understanding of your data. This guide helps you understand the Schemas in MongoDB, their creation and display in MongoDB.
Create Database and Add Records
Assume you are using the newly created “test” database in MongoDB. When you start looking at all the existing databases of the MongoDB using the MongoDB command line utility like CLI, you will not find the “test” database in the list via the “show dbs” instruction. This is because we haven’t added any records to this database yet as MongoDB works in this way. While the built-in databases that are used for configurations are always there to be displayed. Therefore, there will be no schema for “test” database records for now.
To display the “test” database in the list of databases and create its schema, we need to insert at least a single record in the database collection. Therefore, we use the collections that work like a table in MongoDB to insert a record using the “insert” function. Thus, this query should be executed with the “db” keyword, followed by the new collection named “data” and the “insert” function. The record must be in a key-value format of dictionaries like the JSON format to add the documents or records in MongoDB. We add the first record with 3 main fields while the third field which is “Details” is a document, an array of more fields. The execution of this record insertion query returns the acknowledgment message on the MongoDB shell.
After adding the first record to the “test” database, we insert another record with the very same format of document insertion in MongoDB. The output shows the acknowledgment as “true”.
After performing the necessary insertions, we are here to list down the databases once again using the “show dbs” instruction which is listed in the following illustration. The output list of databases shows that the “test” database is now in the list and occupies 72 Kilobytes of space.
Display the Records
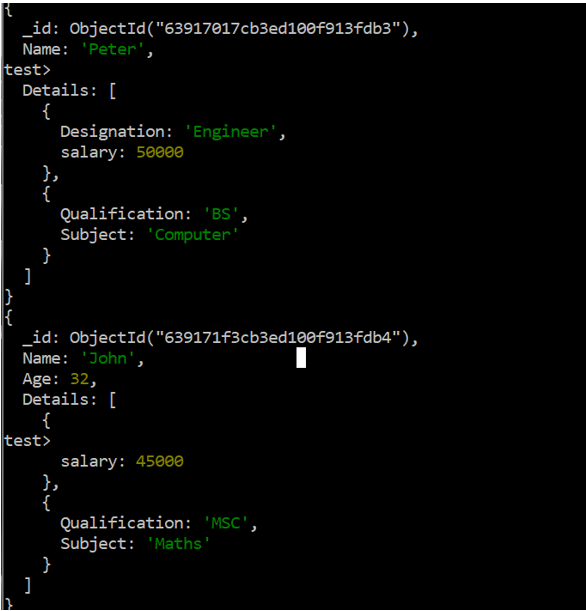
To confirm that the insertion queries work well and the data are perfectly added to the database, we need to use MongoDB’s “find()” function along with the “forEach()” function that prints the JSON format data on the Command Line shell of MongoDB. The following command displays both the records of the “test” database that are just added to it:
Check Schema in MongoDB CLI
Let’s check the schema for the “data” collection of a “test” database that was created in the previous illustrations. For this, you need to create a new schema object named “test” using the “var” keyword, i.e. creation of an object variable. This object gets the schema details from the “data” collection using the findOne() function of MongoDB.
After that, we need to run a “for” loop in the MongoDB command line utility to iterate all the keys of a “data” collection for the “test” database. For this, we use the “test” object variable as a reference to get the keys for a loop. The “print” function statement is utilized to display each field of a “data” collection as a “key” along with the type of that particular key (field).
Upon the execution of this “for” loop query, we get the 4 fields or key names of a “data” collection which are displayed along with the types of data that they hold. This is called the Schema information of a certain database. Now, you cannot access this information for a particular database while working on another database.
Check Schema in MongoDB Compass or GUI
Let’s have a look at how to get a Schema view in MongoDB Compass or GUI tool. For that, you must have the MongoDB Compass and Server installed properly and connected with a particular host. When you refresh the “Databases” option which is listed at the left corner of the MongoDB Compass, you will see a new “test” database and its “data” collection which are listed there. Tap on the “data” collection to see the record as a document that we just inserted in it. Two records are displayed in a proper document format.
Hit the “Schema” tab from the menu bar of the “test” database. Now, use the “Analyze” button in green color to see the overall scheme for a “test” database within a GUI tool. It displays all the data fields and the values of the “Data” collection for a “test” database with extra information like key types, etc. The key “_id” is a built-in object ID for the “data” collection. The Schema displays the “Age” key along with its 2 values and its “int32” type.
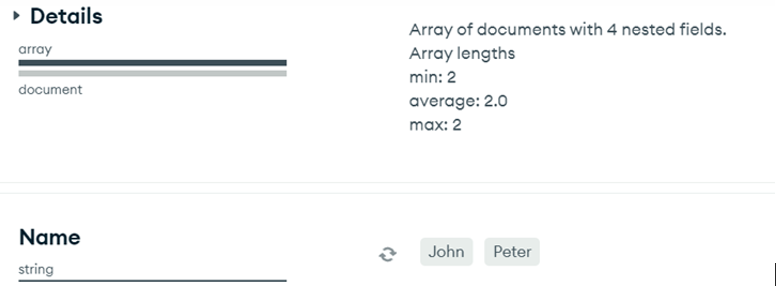
The “Details” field is specified as an “array” type while its data is in “document” format. The details show that it has 4 nested fields. The “Name” field is specified as a “string” type key along with its 2 string values.
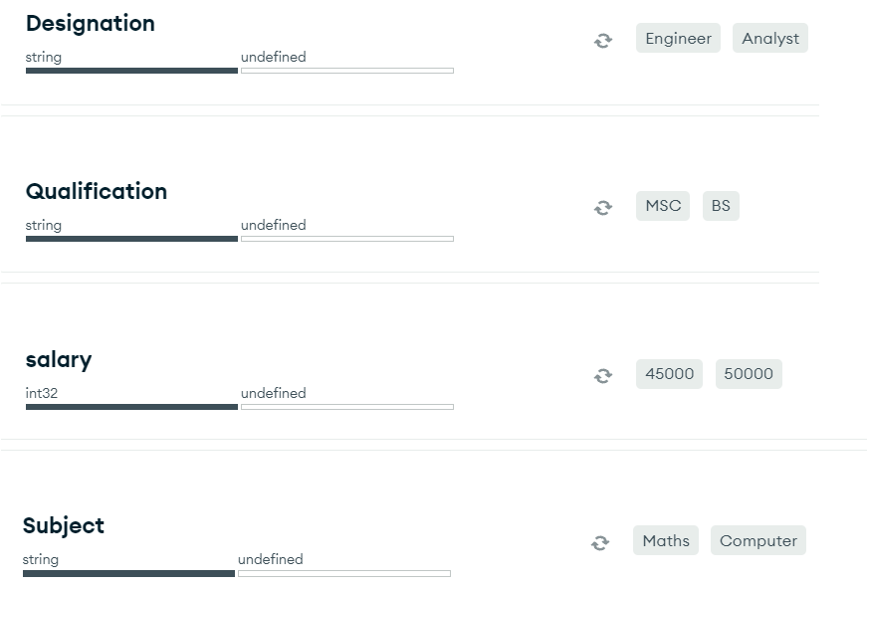
When you expand the “Details” key field by tapping on it, it displays its nested fields along with their Schema information. You can see all 4 key fields – Designation, Qualification, salary, and Subject – listed there along with their key types. Also, the data that these nested keys hold is displayed in front of each field.
Conclusion
The purpose of this guide is to deliver the simplest way to understand Schemas in MongoDB. For this, we took 3-4 main steps in a MongoDB CLI like creating a database, inserting records into it through collections, displaying the records, and creating a variable to display the Schema. We also utilized MongoDB’s GUI tool named “Compass” to get the information regarding the particular Schema for a database and looked at it in detail.


