We know that Python Flask is the web application framework to get the simple applications up and running. We also know that MongoDB is a popular NoSQL database that is suitable for handling the unstructured and semi-structured data. Using MongoDB with Python Flask is the preferred combination for developing the online web application because of its adaptability. Before getting started in building a MongoDB Flask application with MongoDB, there are some prerequisites. We need to have an installed Flask and MongoDB running into the system, and pip should also be installed within the system.
Create a Directory for Python Flask and MongoDB
The first step is to create a separate folder in our system where we can access the Python Flask driver in MongoDB which is called “PyMongo”. Here, we define the “Flask MongoDB” folder using the “mkdir” keyword.
Once the folder is created, we can use the “cd” command to move toward that “Flask MongoDB” folder.
Now, we are in a separate directory of our system where we can easily install the flask along with the “PyMongo” driver to perform the MongoDB operations. To accomplish this, we must take all of the steps that are listed in the following thoroughly.
Install Python Flask and MongoDB in the Specified Directory
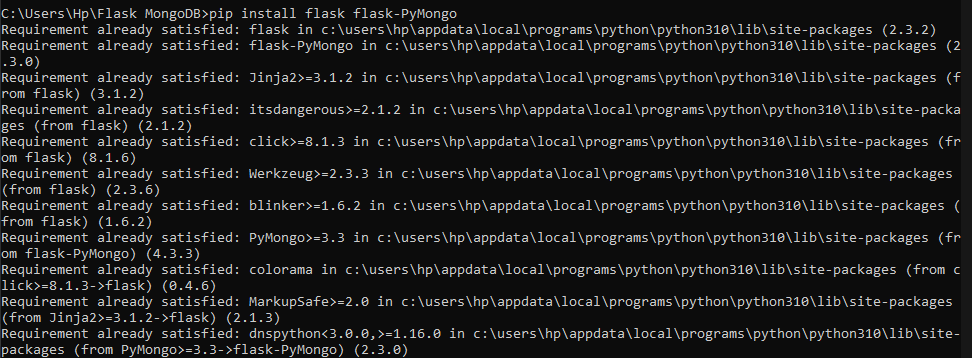
Now, begin with the installation process. We need to first make sure that Python Flask is already installed in our system. Then, we can get the “PyMongo” quickly. If, in case, Python Flask is not installed in our system, we can use the following command where the Python Flask and PyMongo are installed simultaneously:
We use the pip package manager of Python to install Flask and “PyMongo” in the provided folder. Upon starting the installation, the results are displayed as follows:
Build the Python Flask and MongoDB Application
We successfully installed Flask and the flask-PyMongo in the “Flask MongoDB” folder in the prior section. Now, we need to build the Flask application in the same folder. We create the “main.py” file where the following script is provided to create the Python Flask application.
app = Flask(__name__)
@app.route("/")
def message():
return "<p>Flask PyMongo Tutorial!</p>"
app.run(debug=True)
In the previous script of “main.py”, we pull the Flask class from the Python web framework’s Flask module. Then, we define the “__name__” variable which sets up the application’s root path and determines the current module’s name.
Next, we use the “@app.route(“/”)” route for the URL path of the web application which, in our case, is http://localhost:5000/. The message() function is deployed and simply returns the HTML message when the user visits the given root URL.
Lastly, we enable the “debug” mode in the script which is useful during development since it offers more thorough error messages and automatically updates the server when modifications are made to the code which enables a more efficient development process.
When we execute the “main.py” file using the Python keyword in the terminal, it starts the Flask development server like in the following output. We can see the following URL in the output where the Flask server has started. Now, copy that server and run that into the web browser:

When we run the URL of the flask server on the Chrome web browser, it shows the message that we called in the application to print as seen in the output:

Insert a Document into MongoDB Using the Python Flask Application
Prior, the Python Flask application was successfully running on the server. Now comes the MongoDB operation where we can first establish the connection within the Flask with the MongoDB server and then create the database and collection to insert the document. Here, we use the same “main.py” file where the lines for the MongoDB operation are added.
from flask_pymongo import PyMongo
app = Flask(__name__)
app.config["MONGO_URI"] = "mongodb://localhost:27017/NewDatabase"
mongo = PyMongo(app)
@app.route("/")
def message():
mongo.db.users.insert_one({"name": "Jermy"})
return "<p>Flask PyMongo Tutorial!</p>"
app.run(debug=True)
In the “main.py”, we import the “PyMongo” class from the flask_pymongo module after the “Flask” class which simplifies the working with MongoDB in Flask applications. Then, we add the line that sets the MongoDB URI for establishing the connection to the “NewDatabase” database that runs on the localhost at port 27017.
The MONGO_URI is a configuration variable that specifies the Flask-PyMongo where to find the MongoDB server. Then, we provide a “PyMongo” object by sending the Flask application as input. The MONGO_URI parameter is used to initialize the MongoDB connection. Next, we use the “insert” query of MongoDB to insert one document into the specified collection of the defined database.
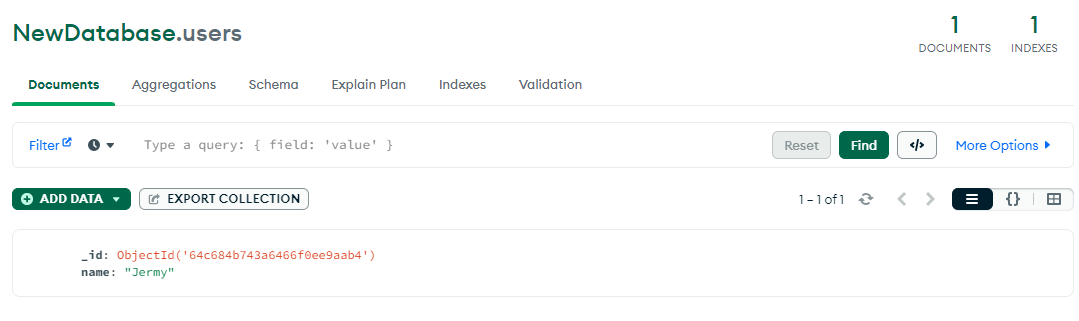
We execute the same file again in the “cmd” and reload the server. Then, open the MongoDB compass where the “NewDatabase” is created below, as it didn’t exist before.

The collection is also created with the one document that we inserted into the Flask file. We can view the document with the field and its associated value in the MongoDB Compass.
Find the Document of the MongoDB Collection in Python Flask
Next, we use the “find” operation of MongoDB to print the document that we inserted into the specified database collection. The following code looks similar to the earlier example with the addition of a loop that prints the database-inserted document and a minor modification in how the database object is accessed:
from flask_pymongo import PyMongo
app = Flask(__name__)
app.config["MONGO_URI"] = "mongodb://localhost:27017/NewDatabase"
db = PyMongo(app).db
@app.route("/")
def message():
db.users.insert_one({"name": "Alex"})
name = db.users.find({})
print(name, type(name))
for item in name:
print(item['name'])
return "<p>Flask PyMongo Tutorial!</p>"
app.run(debug=True)
Let’s begin with the message() function where we insert a new document with the “Alex” name into the same collection of the “NewDatabase” database using the “insert” query. Then, the “users” collection’s whole catalog of documents is obtained using the find() query. We store the results in the “name” variable.
After that, the “name” variable is printed along with its type using the print() function. Next, we call out the “for” loop to loop through the documents that are obtained from the query.
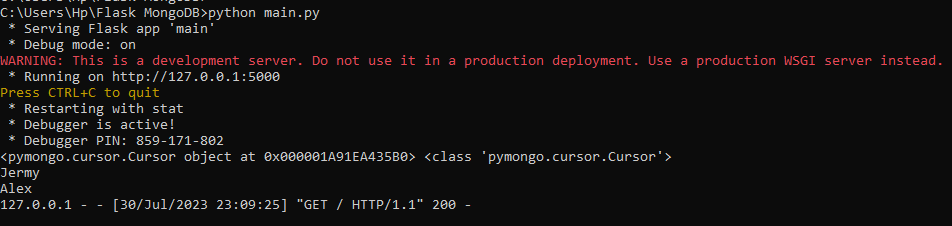
Again, we save the modifications and then build the “main.py” file from the command prompt. Then, reload the server at which the Flask application is running. The values of the document’s field are displayed at the command line.
Conclusion
We covered the steps to use MongoDB with the Python Flask. Once the installation of the MongoDB driver is installed in the Flask framework, we can integrate MongoDB with the Flask application as demonstrated briefly in the article. Here, we only run the “insert” and “found” operations of the MongoDB, but we can apply more.