Prerequisite
To implement the phenomenon of backup in MongoDB, we first need to add MongoDB Database tools, as at the time of MongoDB database server installation, they were not installed by default. You need to install them additionally. So that we can easily make use of the mongodump feature in the command-line interface, for this purpose, we will download the MongoDB database tools from the Official download page of MongoDB. The main part of creating the mongodump is to part to the MongoDB database server; we need to form a connection. This has the following steps:
- Go to the system properties of your PC, and navigate towards the environmental variable.
- Select the option “edit” and then add a new path.
- This path is the directory of the bin folder of the tool installed in the MongoDB folder in the drive of your PC.
- Following these steps will automatically make the tools enabled. Otherwise, backup and restoration in MongoDB are not possible.
Implementation
After entering the MongoDB control, we will first enlist the databases we have created.
Above all of them, demo and second are the user-defined databases, whereas the rest of these are created by default. We will select a database for which we want to create a backup. We will go with “demo.” For the backup commands, we need to come out of the MongoDB interface. So press Ctrl + C.
Backup All Data
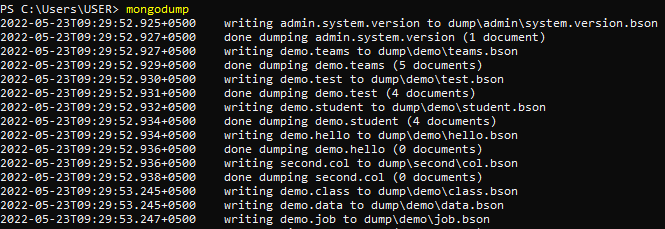
If you only use the keyword “mongodump” without any argument in the terminal, this will form an instance with MongoDB on your system through port 27017. After this creation, a backup of each database and each collection will be created. As we have displayed all the databases above, so now we will use this command to see the backup of all the data inside the database. Write this command by exiting MongoDB and using the simple user domain.
On the execution of this command, you will see that timestamp with Date is mentioned to back up each detail regarding the database. Along each date and time, the database name is mentioned. Within the database, we also have the collections of certain databases, so a backup of them will also be created showing the number of documents as well, in each collection. This image is a cropped one, as the output is long enough to cover a large space.
In response to each database, MongoDB displays that the dumping process for each database is done. The backup of files is done in a file with the extension of bson.
Backup With Arguments
Creating a backup with arguments deals with defining the specific database or the collection name in the command along with a path.
Backup Specific Database
To create a backup for a particular data, we use a different approach by mentioning the path on which we want to create a backup folder. In the below command, we have used an –out feature, which is used to add a specific path. This feature will make a folder automatically when you execute the command with the same name you will mention here. So we have used a short path here that is directly in the hard disk C.
The output describes the details of each file inside the backup folder. Each database will have a separate folder, and all the collections of respective databases will be mentioned there. You can check the folder by going to the C drive; the first folder will be the backup folder. Inside this folder, there are three further folders with the names of the databases we have created.
Backup Specific Collection
To create a backup for the specific collection, we will first switch to the desired database, in which we have created the collections on which we want to create a backup. So we have selected “demo.”
To see all the collections, we will use the command mentioned below.
All the collections created in the demo database are displayed. So we will choose a specific collection to create a backup. So first, come out of the MongoDB interface.
On the user, the domain uses the following command to create a backup of a collection at a specified path.
This command will bring the details regarding the “data” collection. The database name and the collection name are mandatory to be mentioned, as the collection is present in a specified database. The –out feature will play the same role in creating and saving the backup files. It will display the path name where the backup folder with the .json extension is created. The data collection has 4 documents.
Conclusion
Summing up the whole article, we tried to elaborate on the working of the backup feature in MongoDB by making use of mongo database tools. Once you are done with embedding the path with the server connection, it is not difficult anymore to back up your files present in MongoDB. We can create a backup of all files collectively. We can create a separate backup for the database only and similarly for a specific collection as well. We have explained each type with an example, so you may have no queries regarding the creation of a backup file.


