In MongoDB, verification entails confirming a user’s identity and any related rights before allowing them access to carry out a given activity on the database. Lacking authorization, anybody with access to the MongoDB instance could be able to read, alter, or delete information with no limitations, constituting a serious security concern. Therefore, this article will elaborate on the method of setting up MongoDB Authentication.
Enable Authentication in MongoDB Configuration File
Starting with the first step of this guide, you must ensure that the MongoDB has been successfully installed and configured on your system. Without this step, authentication is not possible. After a successful installation, navigate within the “bin” folder of the MongoDB destination folder and locate the “mongod.cfg” file within it. This file contains the settings for configuring the MongoDB server on your system. Therefore, it usually required administrative rights to alter or update it. So, open the mongod.cfg file with administrative rights to update it.
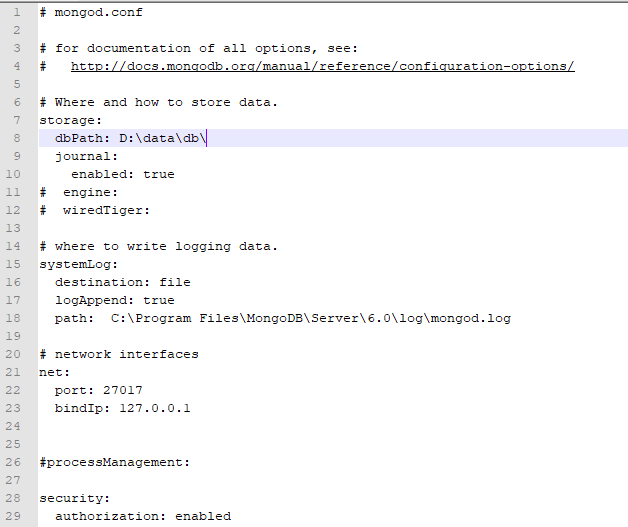
After successfully opening it at your end, look for the option “security” and make sure that its authorization is already enabled. If not, update it to “enabled”.
Check Data Directory Path
You must verify that the data directory D:\data\db\ already exists on your system. If it doesn’t exist by now, you ought to create one. Note that the data directory will be used to store the database information from now on.
Specify Data Directory Path
If the data directory is already set up, check that the MongoDB settings file (mongod.conf) has the proper path given. In the configuration document, look for the storage part and adjust the dbPath parameter to the appropriate path. In our case, the correct path is “D:\data\db\”. Save this file and close it for now. Restarting the MongoDB server after applying edits to the configuration file will make the changes effective.
Create Admin User
Now, it’s time to connect to your MongoDB instance without authentication (if you can) and generate a new administrative user with the required privileges. For this, we will be employing the MongoDB shell tool that has been downloaded separately from the site. This “zip” folder comes with two files. Double-tap to open the mongosh.exe, which is the basic MongoDB shell.
After opening the MongoDB shell, it will ask for the MongoDB connection string, i.e., name of the database to be used for user creation. It is recommended to use the “admin” database, which has more rights than any other database. So, switch to the “admin” database by simply adding the keyword “admin” and pressing “Enter”.
After successful entry within the “admin” database, it’s time to create a new admin user in it. For the creation of an administrative user, MongoDB provides the createUser() function to employ within the “db” instruction. It contains a total of three parameters. The “user” parameter holds the name of a user to be created, i.e., replace <adminUser1> with the username of your choice. The “pwd” parameter holds the password for the user to be created, i.e., admin1234. You can set the password according to your preference.
The “roles” array specifies the rights of the admin user. To grant full access to the “adminuser1”, we are setting its role to “root” and specifying the db as “admin”. The acknowledgment { ok: 1 } indicates the successful creation of the admin user.
user: "adminuser1",
pwd: "admin1234",
roles: [{ role: "root", db: "admin" }]
})
Restart MongoDB
After successfully creating a MongoDb admin user, it is recommended to restart the MongoDB server to properly apply the authentication settings. To do this, exit the MongoDB shell and open your system’s Command prompt. Navigate to the “bin” folder located in the MognoDB shell folder and open it using the “cmd” tool.
MongoDB Authentication
Now, it’s time to authorize and connect with your MongoDB. To do this, you should use the admin user generated from the previous step. To authenticate, the connection query string should start with the keyword “mongosh” followed by the parameter “—authenticationDatabase”, which is used to specify the authentication database i.e. “admin”.
Along with that, the parameter “-u” has been used to specify the username for user authentication in the “Admin” database; in our case, its “adminuser1”. The last parameter “-p” is used to add a password for user authentication.
After executing the connection string, the system will prompt you to enter the password and you have to enter it correctly. If the password and username are correct, you will successfully authenticate and access the MongoDB shell, as shown in the image.
Create Additional Users and Roles
After connecting to the MongoDB test database with a user “adminuser1” successfully, you are now able to create users and assign different roles to them. This is not limited to the working database, you can also create users for other databases.
For instance, we are using the “createUser()” function to create another user named “james” in the new database “myDatabase”. We set the password for this user as ‘James123” and limited its role to read and write access for that specific database.
user: "james",
pwd: "james@123",
roles: [{ role: "readWrite", db: "myDatabase" }]
})
Test Authentication
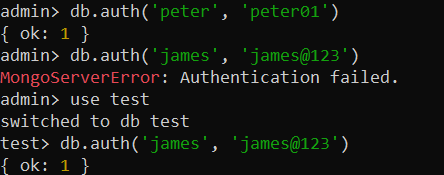
It’s high time to disconnect from your MongoDB server for a while and reconnect with it using the newly created user’s credentials. This is to guarantee that the authentication was successful. Using the “admin” database, we have authenticated “peter” but the authentication for “james” is unsuccessful because it was created using the “test” database.
After switching to the “test” database, we have authenticated the “james” user, as shown in the attached image.
db.auth('james', 'james@123')
use test
Conclusion
This guide has demonstrated a clear and concise method to set up any MongoDB authentication. To illustrate this process, we have provided several query examples, like creating a super user, assigning it a password and rights followed by the use of it on databases.


