What is memset() in Arduino
The memset is a function used in Arduino programming that can store a specific number of bytes taken from a given value to its destination. Using this function, we can copy one byte of value to the destination memory block byte by byte.
Now we will discuss the use of memset() function in Arduino programming.
memset() Syntax
memset() Parameters
The memset() function has three parameters:
1: Destination
Destinations indicate the memory location where the memory block value will be set byte by byte. Any type of value can be set here in the form of byte. Previous value will be replaced by n number of bytes. If n is greater than the size of the destination object, the output behavior will be undefined.
2: Value
This is the source point from which character will be copied to the destination memory block. Here the value is in integer, but it will be converted to unsigned character before it is copied.
3: N_Bytes/Length
This indicates the number of bytes which are to be set in the destination block. The memset() function will take specific N bytes from a given value and store it inside the destination memory block.
How to Use memset() in Arduino
In Arduino we used memset() to set data from n bytes of given value to destination with specified number of bytes. memset() copies or replaces given n value bytes to each of the first n characters in the destination block.
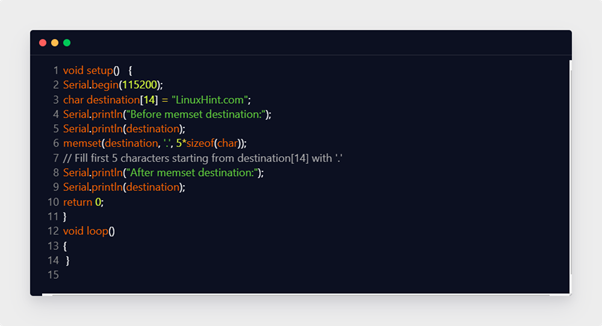
To get more understanding about memset() function we will take an Arduino sketch and try to copy a n byte to our destination array.
Serial.begin(115200);
char destination[14] = "LinuxHint.com";
Serial.println("Before memset destination:");
Serial.println(destination);
memset(destination, '.', 5*sizeof(char)); /* Fill the first 5 characters starting from destination[14] with '.' */
Serial.println("After memset destination:");
Serial.println(destination);
return 0;
}
void loop()
{
}
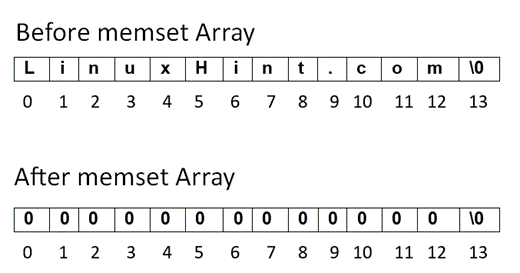
In the above example we have declared the character array destination. Size of the char array is 14.
In the next line after declaring the char variable, we have printed the output of the destination array on the serial monitor as “Before memset destination”.
After that we have executed a memset() function which will replace the destination array with the first five characters with the value “.” And the rest of the array will remain as it is. Here the value multiplied with sizeof(char) will determine the number of bytes to be replaced in the destination memory block or array.
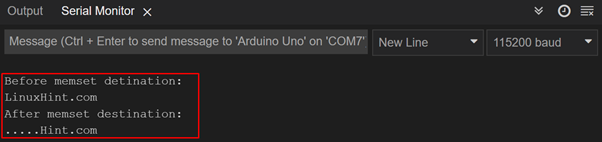
In line 8 we printed the output of the destination array after applying the memset() function on the serial monitor. Pictorial representation of memset() function can be given as below:

Output on serial monitor is shown in figure below:
How Do I Empty an Array in Arduino
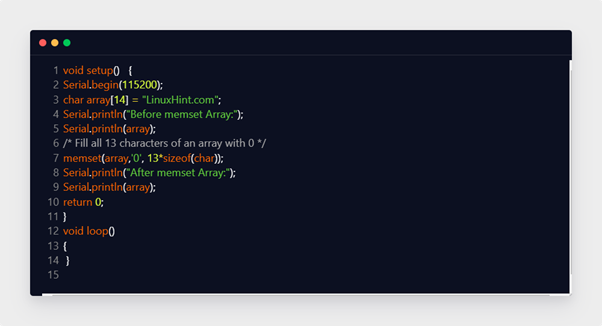
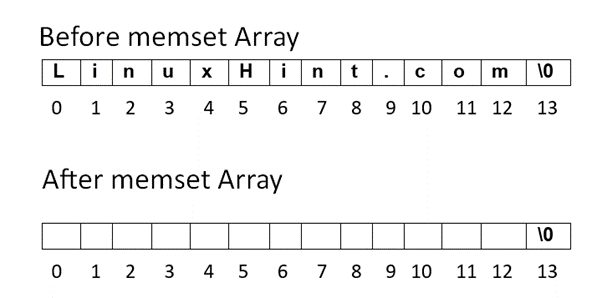
To empty an array in Arduino we also use the memset() function. Only difference is now we will copy 0 or null to n bytes of the destination memory block. Once all the characters of the array are set to 0, the array will be empty. Let’s take an example sketch and replace all the characters of an array with 0.
Serial.begin(115200);
char array[14] = "LinuxHint.com";
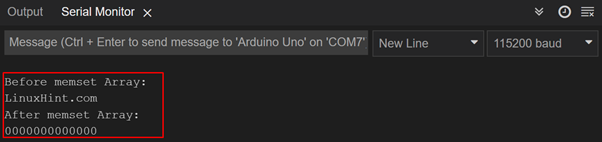
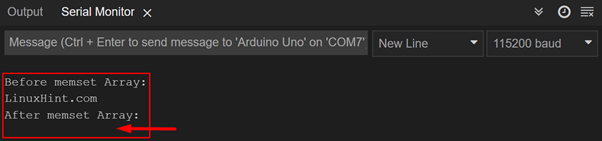
Serial.println("Before memset Array:");
Serial.println(array);
memset(array,'0',13*sizeof(char)); /*Fill all 13 characters of array with 0 */
Serial.println("After memset Array:");
Serial.println(array);
return 0;
}
void loop()
{
}
In the above code first, we have initialized serial communication by defining baud rate after that we defined a char array “LinuxHint.com” with string length of 14.
Next, we printed Array on the serial monitor before applying the memset() function.
In line 7 the memset() function is defined which will replace all the char array values to zero byte by byte. Alternatively, we can say that our array is now empty containing no byte values. Below is an illustration of all the code which will give better understanding.
Output of Serial Monitor
Alternatively, we can also replace any Array entities with null or zero. This is another way of emptying an array without displaying null characters in output. We just have to change the memset() function value which is to be copied to ‘\0’.
Conclusion
In this article, we have learned how the memset() function is used in Arduino programming. The memset() function in Arduino can set or replace any array values byte by byte. Further we discussed how this function is helpful in emptying an array. Using this function, you can optimize overall code performance.