Creating Table of Contents in Markdown:
A table of content can be created in a document using the native Markdown syntax. This tutorial will help us learn the generation of the Markdown table of content.
For the practical implementation of the markdown scripts, we need a tool that supports the markdown language. We have picked the Visual Studio code for the compilation of example codes. After launching the tool, we created a new file and set its type to “Markdown.” To open the preview window, just hit the “Ctrl+Shift+V” keys. Now we have a “Markdown” file and a preview window corresponding to it.
The tool for compiling the script is set now. The creation of the table of content would commence afterward. In the markdown file, we first created a header. For the creation of a header, we are required to add a hash (#) symbol. Adding a single hash (#) refers to the first level heading. After the hash symbol, a space must be given before writing the text of your header. The text we have specified for our document’s header is “Table of Contents.” This will create a heading with h1 size at the top of our webpage.
Then we skipped some lines before writing the next script. Now we will create a list of content headings available in the document. For creating a markdown list, we have two choices: whether to create ordered lists or unordered lists. For list generation, we have to write a numeric value and add a dot (.) immediately after it. Then, after a space, mention the list items. For the list items here, we have to create markdown links that will direct us to a specific section of the document when we click on them.
So, we added the first list item with the numeric value “1” and then to create the link to a section of the page, we first wrote the heading title within the square brackets followed by round braces that will hold a hash (#) symbol and the title of the heading to which it may direct the user. You cannot give any tab or space in the round braces when adding links to part of the document. Instead, you can use dashes (-) wherever needed as a replacement for spaces. So, for the first list item, we have added the link as “1. [Introduction](#introduction).”
The text in the square bracket will be displayed as it is and when we click it, it will scroll to the part of the document where it will find the same heading text that we have provided in the round braces. The second list item is appended as “2. [Topic 1](#topic-1).” Here, “Topic 1” will be rendered as is and the “#topic-1” will be embedded as a section link. The third list item has the text “3. [Topic 2](#topic-2).” And the last item has it as “4. [Topic 3](#topic-3).”
Now we would create subheadings with the same title as mentioned in the list section link. To create the subheadings, we have to use double hashes (##). After the symbols, put a space and then inscribe the heading title, which should be the same as defined for the link in the list above. If we add a different title, the link will not work. So, we added the first subheading after inserting the hashes as “Introduction.” For the second, third, and fourth headings, the titles are “Topic 1,” “Topic 2,” and “Topic 3” respectively.
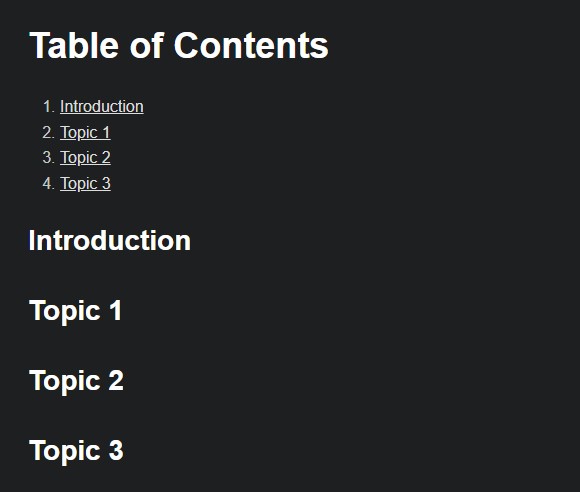
The preview window shows us the corresponding anticipated outcome for this markdown script, where a table of contents is generated with 4 list items and their reference headings have been displayed below them.
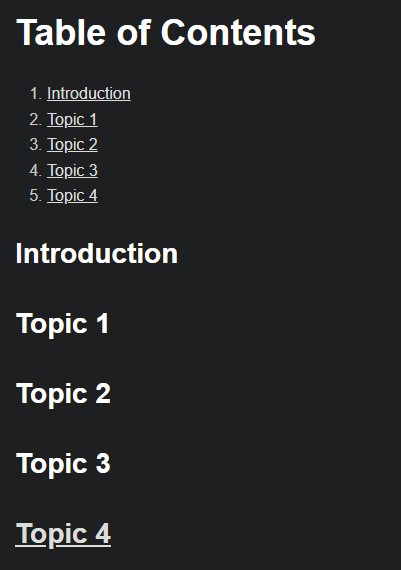
All these are textual contents. We can also add an external link as a heading in the table of content. We will follow the same pattern which we used in the previous list item creation, except for one thing. We will add a link to the website with the section link in the round brackets as well. For this, we have first created another list item as “5. [Topic 4](#topic-5httpwwwyahoocom).” You can see that we haven’t added any dots in the website name.
Now we need to create a heading corresponding to this link. So, we added double hashes and space, and then here we will not simply write the text for the title; instead we will create a link. First, we would write the link text, which we inserted the same as specified for the new list item “[Topic 5].” Then we inserted round brackets immediately after the square parentheses and wrote the complete website link as “http://www.yahoo.com”.
This will add another heading to the table of contents, but it is a link, not just a plain text.
You can see that the last heading has been underlined, which represents indicates that it is a link. When we click on it, it will open the specified web address in the browser. Here we have provided the “Yahoo.com”. So, it will open Yahoo in our browser.
We have successfully generated our table of contents in markdown, which has some headings and a list in it. Now we will see how we can add subheadings to the main headings of the list.
From the content list we have generated previously, we have chosen the 2nd list item, which has the title “Topic 1”. To create a child list, we have to enter two spaces in the line next to the parent list item. After giving the spaces, we numbered the list as “1.” Then we used the square brackets to specify the titles, followed immediately by round brackets to provide a link to the specific part of the document. So, we added two child list items as “1. [Sub-Topic 1](#sub-topic-1)” and in the next line, the second item is “2. [Sub-Topic 2](#sub-topic-2.)”
Then, moving to the content part of the document, we have added two new sub-headings. For creating sub-headings with level 3, we have to add 3 hash (#) symbols followed by a space and the text of the sub-heading. We have specified the same titles which we have mentioned for linking the sections in the list. The first subheading has the title “Sub-Topic 1” and the second is “Sub-Topic 2.”
In the snapshot of the preview window below, you can see that the subheadings have been successfully appended to our markdown table of contents.
Conclusion
The table of contents (TOC) can be generated manually in a markdown document. In this guide, we worked on markdown’s capability of allowing the generation of a table of contents manually. We have executed the code snippets and elaborated on all the syntax used and steps that need to be carried out. We learned to make a simple table of contents with a markdown list and headings. Also, embedding external links in the headings of the document makes it comprehensive for you.


