The numbered list is also known as the ordered list. The numbered lists are those lists in which the items which are entered into the list are numbered, and these numbers are rendered in a sequence when displayed in the output. We will explore this numbered list, which we can create in Markdown, in this article with a full explanation. Now, we will show you how to create these numbered lists in Markdown in this article. We will create many numbered lists in the article and will explain in detail how these numbered lists are created in the “Markdown.”
Example 01
When we have to select the software on which we will perform the markdown’s code, then “Visual Studio Code” is the best tool for this, and we are also using this software here in this article. We have to open the text file as well as the preview window in this software. When we have opened the new text file, it shows an option for selecting the language. We simply select Markdown there.
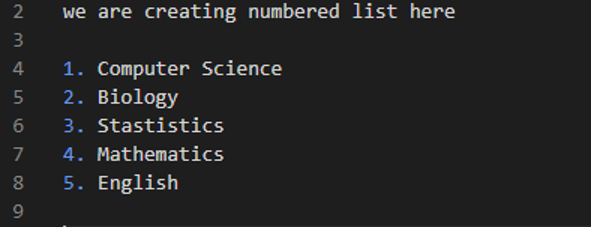
After this, we move towards the right corner, and from the icons that are present in the right top corner of this text file, we just open the preview window. Now, we have the text file and the preview window of this Visual Studio Code in front of us. We have to type the code in the text file. So, we have entered numbers and a dot to create the numbered list here. We write “1.” and then add “Computer Science.” Then in the next line, we write “2.” and also write “Biology” there. After this, “3. Statistics” is added, and then comes “4. Mathematics”. In the end, we added “5.” and wrote “English” there.
Note that we have entered all numbers here with a dot, and the dot “.” must be added while creating the numbered list. Here, the numbers of the numbered list are entered in the sequence starting from “1” and ending at “5”. Now see the preview window and check the outcome of this code.
We have already opened the preview window. In this preview window, the numbered list or the ordered list is displayed as it is entered in the text file, which is also shown above. The sequence of the numbers in the numbered list is displayed as we have written in the code, which is from “1” to “5”.
Example 02
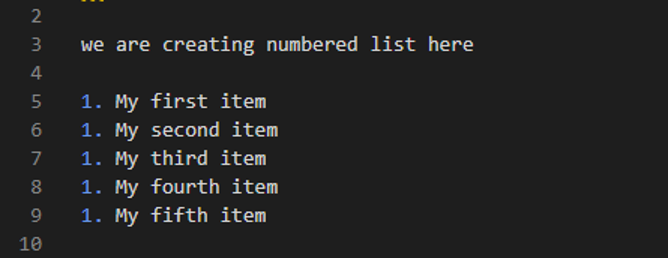
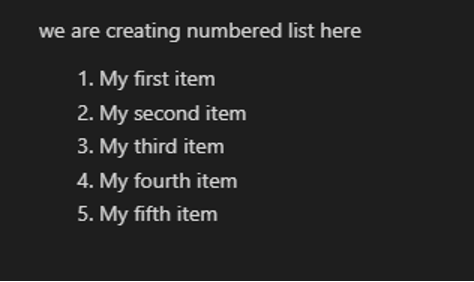
In this example, we are again creating the numbered list. But in this example, we don’t add the numbers of the numbered list in a sequence. We simply add “1.” to all the list items which we have added to this numbered list. All of the items begin with “1.” Look at the preview window and check how it displays this numbered list where we have added all “1.” with all the list items.
Note the numbers on the list in this outcome. As we have added all “1.” to the list in the code above, the numbers that are shown here are different. It renders the numbers as “1, 2, 3, 4, and 5”. This is because when we have added the same number to the numbered list, then it only checks the first number and adds the remaining list’s numbers in a sequence. The first number here will show the first item number, and all other numbers will be generated automatically by incrementing “1” to the above item number.
Example 03
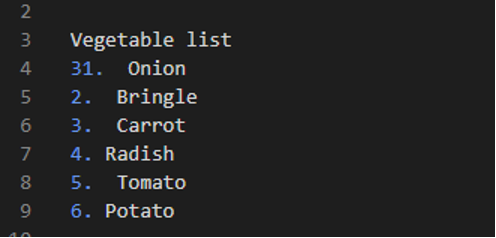
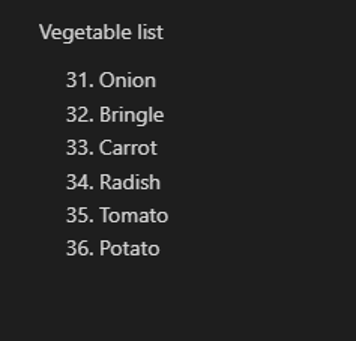
In this example, we are creating the “Vegetable list”. We start the list with the “31.” number and write “Onion” there. After this, we write “2.” and add “Bringle.” Then we start by inserting the list numbers in a sequence. We place “3. Carrot, 4. Radish, 5. Tomato, and 6. Potato” as the numbered list items here. This code adds all of the list items. Note that we have added “31.” as the first item number and then we write the list item numbers from “2” and onwards. Now, see the outcome and check how it will be treated with these numbers that we have added here.
The numbered list is shown in this outcome and the list item numbers are shown here starting from “31” and then incrementing “1” in this number, and the next item number onf this list is shown as “32”. Then we have “33, 34, 35” and so on. It doesn’t consider all the list numbers, which we have added to the code above. It just checks the first item number and then generates the remaining list item numbers automatically by incrementing the first item number by “1”. As you can see, we have inserted “31, 2, 3, 4, 5, and 6” in the code above, but in the outcome, the first item number appears as it is, and the remaining numbers are changed in this outcome. Here, the numbers on the numbered list are “31, 32, 33, 34, 35, and 36”.
Example 04
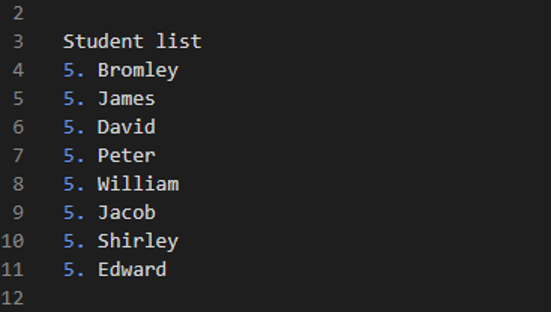
Now, we have one more example and also the last example of this article. We are generating a “Student list” here. The student list contains “Bromley, James, David, Peter, William, Jacob, Shirley, and Edward”. Also, note that we have inserted the numbers of this numbered list starting with “5” for all the items here. Now, move to the preview window and check the result of this code.
Note the numbers on the result list. As we added “5” as the last number in the list above, the numbers displayed here are not the same as the above code. It renders the numbers from “5” to onwards. It just considers the first number when we add the same number to the numbered list and adds “1” to the numbers in the numbered list sequentially. All numbered list numbers are generated automatically by adding “1” to the preceding item number. It starts the numbers of the numbered list from the number which we have added in the code and then generates the remaining numbers depending on the first number with an increment of “1”.
Conclusion
The “markdown numbered list” is explored here in this article. We have explained that Markdown provides a facility for adding different lists. We can easily add the “Numbered list” in the markdown. We have explained that when we have to create a numbered list in the markdown, then we must add the number and dot at the start of the item on the list. We have also explained that it generates the list item numbers by considering the first number and then generating the remaining numbers by incrementing “1” to the first item number and so on. We have created multiple numbered lists in this article.

