“Providing links that direct the reader to a particular section of the document is a very beneficial and important technique to save the time of the user. This technique not only saves users time but also engages more readers on the webpage. Markdown enables us to create links that refer to some particular section of the same document just by clicking on the link.”
This guide will make you capable of generating such links in your document.
Creating Links to Particular Sections of the Document in Markdown
In this tutorial, we will see how to create a link to a particular section of the same document in the markdown. So that by clicking on the link for that particular section, you can easily access it without having to navigate through the whole document to find it.
Before we begin working on the subject matter, first, we need to find a tool with the appropriate environment to implement the markdown script. There are a variety of tools that support the markdown language. In our case, we have found Visual Studio Code as the best software for compiling the markdown scripts. Hence, we downloaded the software and installed it into our system. Once the interface is launched, create a new file and select the file type as “Markdown”. Add the “Markdown All In One” extension into the tool and then press the “Ctrl+Shift+V” keys to open the preview window. The preview window will render the anticipated output of the script written in the markdown file.
Now we will initiate by learning to create a link in markdown. Link generation is a very easy method, like the rest of the markdown concepts. The syntax to create a link in markdown for a section of the same document is provided below:

This syntax has two parts. The first portion holds the title of the link, and the second portion stores the link of the particular section. To write the title of the link, we have to use the square brackets “[]” and write whatever label you want your link to be shown with. The link to the specific section of that document can be added by using the round brackets “()”. Within the parentheses, insert a hash (#) symbol, then write the name of the particular section as you have titled it in the document. If the title you want a link for has spaces in it, then you would add dashes (-) to replace the spaces while putting it as a link reference.
Now let’s implement it in VS Code
We have created a markdown heading in our file. To create a heading, we have to use the hash (#) symbol and then put a space before writing the heading title. This will create a heading with h1 size. So, we have added the hash (#), and after the space, the title of the heading is identified as “Section 1”. To move to the next line, we simply have to press Enter. Here we will write a paragraph. Markdown doesn’t provide any special syntax for writing a paragraph, you just have to write the text, and it will be shown as a regular text paragraph.
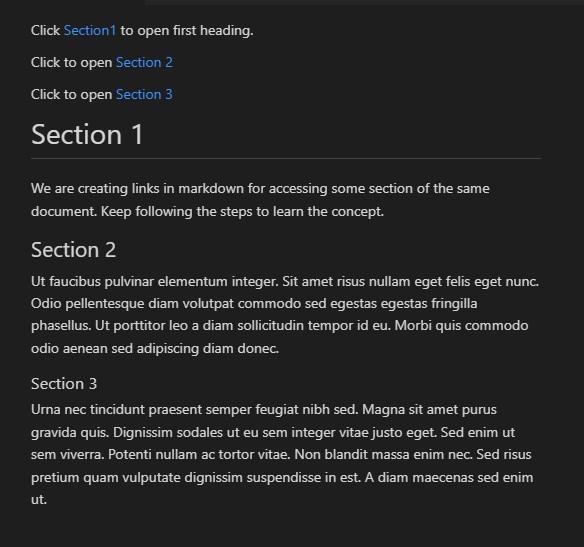
We have added some text for creating a paragraph under the first heading, which is “We are creating links in markdown for accessing some section of the same document. Keep following the steps to learn the concept.” You can see it in the snapshot of the script attached below:

Corresponding to the applied markdown script, the preview window displays a header with h1 size titled “Section 1,” and below it, a paragraph is rendered.

Now to create a markdown link for scrolling to this section of the document, we will exercise the markdown link syntax specified above.
You can add the link anywhere in the document that best suits your requirements. For our illustration, we are generating a link at the top of the page so that if the user wants to jump to a specific heading, the link will take him/her there instead of navigating through the whole document.
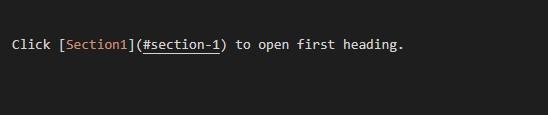
So, we started the process by first adding the normal text as “Click,” and then we started the square brackets. Between these braces, the title for the link is specified. We have added the link label as “Section1”. Right after the square brackets without any space, we have inserted the round parentheses. Here we will add the reference of the heading to be opened when we click the link. First, add the hash (#) symbol and then write the specific heading’s title. Since the name of the heading, which is “Section 1” in our instance, has a space, while mentioning the heading in the link place, we cannot add spaces. So, to replace the space, we have inserted the dash (-) symbol between the two words as “#section-1”.
As we have added text before generating a link, we can also add it after the link. So we wrote it as “Click [Section1](#section-1) to open the first heading.”
In the preview window, you may observe that the string which we have added in the square brackets is shown in blue color, which depicts that this is a link. The reference to the document’s section we have provided is embedded in this string. So, when you click on it, it will take you directly to the part of the page where the heading is “Section 1”.

So, when we click on it, it leads us to a particular section of the document with a specified header.

Now we will create links for some other sections of the document, but first, we have to create different headings.
Below the paragraph of the first heading, we left a blank line and started writing on the line next to it. For creating the 2nd heading, we have used double hashes (##), space, and the heading title as “Subsection 1.2”. Then we added a sample paragraph for this heading.

For adding the third heading, we have inserted 3 hashes and titled it “Section 3,” and appended a sample paragraph for it as well.

Then we created links for each heading. For the second heading, we wrote it as “Click to open [Section 2](#section-2),” and for the third heading, “Click to open [Section 3](#section-3)”. We have added all three links at the top of the document.

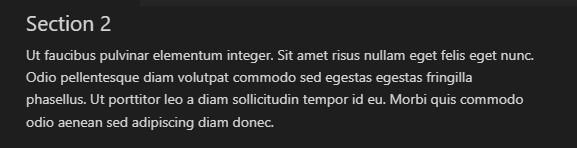
If you click on the “Section 2” link, it will open the section 2 heading on top of the page.
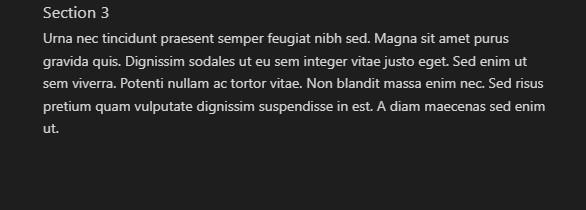
Similarly, clicking on the link “Section 3” brings us to the part of the page containing the “Section 3” heading. As displayed in the image below:
As a whole, our created document looks something like this:
Conclusion
Markdown provides us with different techniques to add links to our documents. Inserting links for quick access to a particular part of the page is one of the best practices to facilitate the user. In this article, we have elaborated on this concept with a very detailed explanation of the markdown script. We have created sample headings and also put paragraphs into them. For each heading, links were generated. We have also rendered the anticipated outcome generated on the preview window for every link we clicked.