Indentation, or indent, is a strategy that is utilized to appoint paragraphs or other logical sections in the code. It enables the code to be organized. Markdown offers several options for implanting indent spaces.
After practicing the techniques that will be discussed in this article, you will be able to implement the concept in your workspace.
Adding an Indent Space in Markdown:
In this guide, we are inserting indent spaces between lines or paragraphs. An indentation or indent follows a paragraph or other logical unit in code. Indentation doesn’t change the performance of code in Liquid as it does in other scripting languages. Although unnecessary, it is essential for comprehensibility. Your primary objective while coding is to convey your message to the intended system. But it’s also crucial to write code that other programmers can readily read and comprehend. Markdown text lines may need to have an indentation added. Markdown skips empty spaces by default. Three techniques are used in this article to add indent spaces to text lines, phrases, or sentences.
Example#1: Adding Spaces by Using “ ” in Markdown
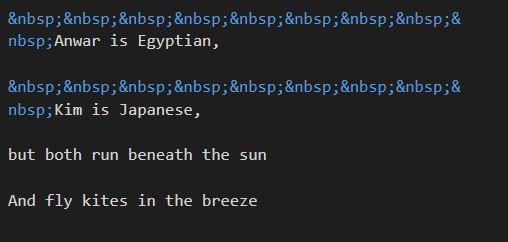
In this example, the poem’s first stanza will be written with the left-alignment format and spaces added using the character “ ”. The no new line space is what it is known as. Its stands for “No Break Space.” By pressing the “space” key on our keyboard or the “tab” key, we cannot add intended spaces to text lines in Markdown. By default, these spaces are ignored and just provided with a single space. Consequently, we have a character in the markdown that makes it simple for us to add more spaces. This “nbsp” is used to add multiple spaces between the texts. Essentially, the generated output will replace each “ ” in your Markdown source with a space. Therefore, if you use “ ” four times before a paragraph, the paragraph will appear to be indented with four spaces.
Let’s begin with the instance. We are utilizing the Visual Studio Code tool to implement the Markdown script. The tool is then started and by selecting a new file with the file type “Markdown” is created. The scripts will now be generated for it.
We will first add a heading to our code. The (#) sign is used to insert the heading into the markdown. Markdown allows us to add a single heading by using a single (#) symbol with a space. The heading in this instance is “writing a poem’s stanza,” which can be written by first using (#) adding space with the space bar, and then writing the header text. If we use the (#) sign, we must add a space; otherwise, the text will not be shown as a heading and will be treated as normal text.
Now, the header “writing a poem’s stanza” will be displayed. This is essentially the script’s header section, therefore we used a single hash symbol instead of a double one if we wanted to add a second heading, but we didn’t add a second heading here.

You will now see in the preview window that the text lines are simply displayed as a poem’s stanza. Due to the use of “ ” the first two lines display empty spaces before the text, whereas the last two lines display exactly as they are because “ :” was not used with this line.
Example#2: Invoking “ensp” and “thinsp”
Using the two characters “ensp” and “thinsp,” Markdown provides a method to add indent spaces. Similar to how “nbsp” is offered in the text, these two characters will also provide many spaces. This “ensp” which stands for “en space” is referred to as “half-width space”. The “thinsp,” which stands for “thin space,” is a small area. We could describe it as “thin space,” meaning that the area is rather small and has a thin structure.
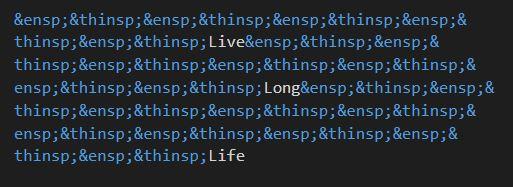
In this sample, increasing spaces is accomplished by combining “ensp” and “thinsp” and using them together in a code. We must add the (&) symbol before writing ensp and thinsp without giving space, and the terminator sign (;) is used at the end of both. For getting space, we utilize these two characters together in the form of “  ”. In script, entering “  ” once will result in a single space, typing it twice will result in double spaces, and similarly, spaces will be printed however many times these characters are typed. The inscription “Live Long Life” is printed in the script with several spaces added between each word. The first word we’re printing is “Live,” and before it, we added five spaces by using the character “ensp; ” It will print five spaces before printing “Live,” and after it, we type “ &thinsp” seven more times before typing “Long”. It will print “Long” by adding seven more spaces before then, and finally, if we use the same character ten more times before typing “Life”, it will add ten more spaces before printing “Life”.
The phrase “Live Long Life” will be displayed in this image by having several spaces between the three words. By pressing the space bar, we cannot add these kinds of lengthy spaces; instead, a single space will be printed.
Example#3: Adding Many Spaces to a Text by Using the HTML “pre” Tag
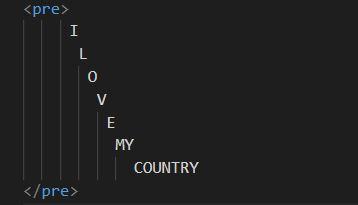
Markdown can also be used to add more space to text because HTML has the “pre” element for this purpose. This tag is also usable in Markdown. Specially formatted content that is to be displayed precisely as it is written in the HTML file is displayed by the “pre” element. By applying this tag, we can also stylize the format. HTML elements are used between this symbol (<>) and the backslash (/) that must be used before closing the tag. In this instance, we are printing the phrase “I LOVE MY COUNTRY” in vertical form. To achieve this format, we entered spaces from the keyboard, but if we had not used the “<pre>” tag, the phrase would have appeared in one continuous line, which was not what we intended.
Now that we have a preview, we can see that it will provide the results that we are looking for. By utilizing the “pre>” tag, the script is displayed with all the spaces that we have included in the script. If this tag is not used, the result will be displayed in a single line.
Conclusion
Markdown gives us several options for inserting indent spaces between lines of text, phrases, or paragraphs. In this article, we’ve given you several options for inserting several spaces. In the preceding examples, the three methods ( ) ,(  ) and the HTML element (<pre>) are used. We learned how to add more spaces and print text in an expressionistic format with left or right alignment, more vertical or horizontal spacing, or all three.


