The Syntax for Highlighting the Text
![]()
The Syntax of Highlighting the Text Using the Tag Mark
![]()
Example 1: Utilize “==” to Highlight the Text of the Paragraph in Markdown
In this illustration, the entire paragraph’s text will be “highlighted” by the use of “==” at the beginning and end of the paragraph. Text is typically a set of words or characters that people can understand. Text can be added, viewed, edited, and added to in a text editor or word processing program on a computer. In essence, markdown is a plain text format that makes the internet easier to navigate. Therefore, the primary goal of markdown is to make plain text easily accessible without tags; however, there are ways to add text modifiers, such as italics and bold, etc. The text we need to highlight in markdown is colored above the text in a paragraph, indicating that it is being “highlighted”. We can highlight a single word, a single sentence, or the entire paragraph in markdown.
Let’s see how to use the “highlighted text” in a markdown presently. To do this, we are implementing our snippet using the tool “visual studio code,” often known as “VScode”. Installing Visual Studio Code is the first step. Once installed, open it and choose a new text file. We must first choose the extension because we must work with markdown. We select the “plain text” option at the bottom on the right side to add the Markdown extension, as you can see in the image below.
![]()
When selecting the plain text, a search bar with the option to add extensions will show at the top. If you choose Markdown from the search bar, an extension will be provided, which you can then install. The file will now have the name “Markdown highlighted text,” which is the next stage.
Let’s move on to our snippet now. We must first provide a heading for each heading by using the “#” sign in “markdown”. In Markdown, the first heading is created using a single “#” and a space, followed by the text for the heading. The “#” and “heading” must have space between them for them to function properly.
![]()
We are now adding our second heading, “Highlight the text of the Paragraph,” which is created by utilizing double quotes “##” as shown below.
![]()
After that, we will go on to the third subheading, which is “What Is a computer?”. Because this is the third time we’re giving a heading, we’re using the symbol “#” three times. In markdown, the third heading appears “###” with the title heading.
![]()
Using “==” at the start and finish of the paragraph will highlight the complete paragraph, like in this example. If putting space between “==” and text in Markdown leads the text to not be highlighted, we are not doing so. The initial word of the paragraph is written without a pace and an equal symbol, as shown in the figure below. Similarly, we write the last word, and an equals sign without a space, just like in “==A Computer…….program==”. This will truly highlight the text, with the color “Yellow” being used as the highlighter.

Let’s examine the displayed output image. As we can see, there are three headings fist “Heading”, “Highlight the Text of the Paragraph,” is the second heading, and “What is a Computer?” is the last heading. Now in the next line, we can see the text which we wrote by using “==” is now “highlighted” with the color “yellow”.

Example 2: Use “==” to Highlight Specific Words Within the Paragraph’s Text
Similar to the previous example, in this illustration, we will highlight a few certain words from the text paragraph rather than the entire text paragraph as in the first example. The approach we’ve used here is the same as what we did in the prior case.
Beginning with our example in this scenario, there are two headings. Using “#,” we can add headings in markdown.
We are now adding our first heading, “# Heading 1,” as seen in the image below.
![]()
Next, by adding two “#” marks, we’ll add our second heading. Our second heading of the code is “## User_friendly” if there isn’t a space between the “#” and the heading’s “first word,” the results won’t be correct.
![]()
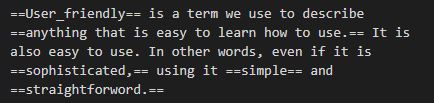
Coming to its main part, we are now emphasizing a few words in the paragraph. To accomplish this, we add a “==” before and after the word. Some phrases and words in this code are highlighted. These include “==User friendly”, “==anything that is simple to use==”, “”==sophisticated==”, “==simple==”, and “==straightforward==”. As can be seen, there is no space between the equals sign and the beginning word because doing so would not highlight the word. Now let’s look at the output.
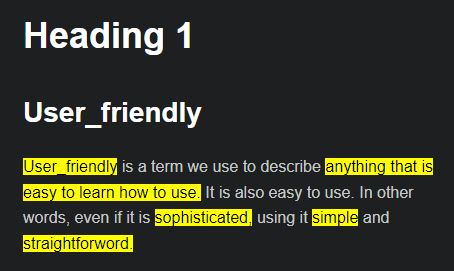
Consequently, the output image shows that our code was executed successfully. The image presentation includes two headings, “Heading 1” and “User_friendly”. Within the displayed paragraph, all the words where we have used the double equal symbol “==” will be highlighted. The highlighted words were indicated by the yellow color.
Example 3: Utilizing the “mark” Tag to Highlight the Text
In this example, we’ll use the tag “<mark>” to highlight the content. Despite being an “html” element, the “<mark>” tag can also be used in Visual Studio code to highlight text. It functions in markdown the same as “==” does. Therefore, this element will highlight the text in both markdown and html.
Let’s begin the example now by adding the heading, which is not necessary but is used to make our code more presentable. By using “#,” we are adding the heading “# Highlighting the text”.
![]()
After that, the sentence is highlighted by adding the tag “mark” in front of and at the finish of it. The tag “<mark>” is used to emphasize the phrase “Benefits of fruits”. We use the symbol “/” to close tags just like we would use “</mark>”; therefore, we are now closing our tag. Let’s examine its results.
![]()
The output image displays a single heading that is “highlighting the text”. The highlighted text is displayed in the following line, which is done by using the “html” element “mark”.

Conclusion
We discussed how to highlight text in markdown in this article. Markdown gives us two options for highlighting text. The first is to use double “==” at the beginning and end of a word, phrase, or paragraph, or to use the tag “<mark>”. We addressed how to emphasize a paragraph’s entirety in the first example, and in the second, we demonstrated how to emphasize specific words or phrases inside a given paragraph. And in the final instance, we used the “mark” tag html element to highlight the text that works in both markdown and html. These simple methods will make it easier for us to complete our tasks.