This article will make you learn the creation of different headings in markdown.”
Example # 1: Creating H1 Header in Markdown
For the first demonstration, we will see the creation of “h1” headings in markdown. For creating headers, markdown provides us with very easy and simple techniques. We will walk through these techniques one by one in this tutorial.
The first technique to create an “h1” header in markdown is by using the hash symbol with the text. The syntax for using the hash technique is given below.

As the syntax describes, we have to use the hash (#) symbol followed by a space and then write the particular text you want to create a heading with. Here the single hash (#) refers to creating the “h1” heading.
We have opened the Visual Studio Code tool to compile the markdown script on it. A new project is created with the markdown file type to script the examples on it. Then just hit the “Ctrl+Shift+V” keys to open a preview screen.
Now we can start writing the markdown script on it. So, we made our first h1 heading in markdown. We have added a hash (#) symbol, and after this symbol, we have to give space; if you don’t add a period, it will be displayed as regular text with the hash (#) symbol. Let’s see what we get if we don’t add a space after the hash.
So, write a text with a hash (#) without any space as “#without space its outcome’s a regular text”.
When we don’t give a space after the hash (#) symbol, the markdown detects it as regular text and displays it on the preview screen as it is. You can see it in the snapshot attached below:
To make it a heading, we must have to insert a space right after the hash (#) symbol. So, we will now create an h1 heading with a hash symbol. We have added a hash (#), then a space is inserted, and the text for the heading is provided then. The string we have written here is “This Is Our First Heading in Markdown”. You will notice that when you add a space after the hash symbol and then write the text, the color of the script turns blue, which indicates that we are creating a heading in markdown, but when you don’t add space, it all appears with the default text color which is white in our instance.
So, when we see the preview window, a heading has been displayed with an h1 heading size. Also, a line has been generated under the heading string.
Another technique to create the first level or h1 header in markdown is by adding the equal signs (=) in the line beneath the text.
We have written the text as “We Are Creating a Header with Equal Signs” and then pressed enter to move to the next line. On the next line, add the equal sign (=). You will see that after adding 3 equal signs, its color turns blue, which means the h1 header is activated. We have added the equal signs up to the length of the text, but if you add just three consecutive equals, it will yield the same output.
The outcome generated from the above markdown script is illustrated in the snapshot below.
Example # 2: Creating H2 Header in Markdown
We may need to create a subheading or a second level (h2) header in the markdown. Like the first level heading, markdown enables us to create a 2nd level header by facilitating two different techniques.
The first technique is the usage of the hash symbol. For the first heading, we used a single hash, whereas, for the second heading, we are required to use two hash (#) symbols.
The syntax is specified below:
The syntax is the same as for the first header, with the exception that we have to use two hash (#) symbols instead of a single for the second level header. Then after inserting the space, the text for the subheading is provided.
For implementing the technique, we have added two hashes in the markdown file, which indicates that we are going to make a level two header. Then we added the necessary space, as mentioned in the above instance, that not adding a period will generate a simple text and append two hashes with it. After the space, the text string is specified as “The double hashes refer to level-2 header”.
This gives us an h2 heading on the preview window.
The 2nd method to get the h2 heading is by using the Hyphens (-). We have to write the string for the heading and then in the next line below the text, add the hyphens.
We have inserted a text for the subheading as “We have added Hyphens to create level-2 header”. Pressed enter key to jump to the next line of the script where we have added hyphens.
Here we got our 2nd level heading which can be appended in the illustration below.
Example # 3: Creating Other Headers in Markdown
Like first-level and 2nd level headers, we can also create other headings in markdown. For instance, we can make h3, h4, h5, and h6 headings. We will create each of these headings one by one here.
First, we will make an h3 heading. This can be done by adding the three hash symbols (#) and a space before the heading text. Here the text we have generated is “Three Hashes for the level-3 heading”.
The h3 or level-3 heading is put on view in the preview window.
Similarly, we will make a level 4 heading. The same pattern will be followed, but instead of adding three hashes, we will insert 4 hash symbols this time. The text we have defined is “The level-4 heading”.
You can see the size of h4 is smaller than the header.
The 5th heading level markdown supports h5. For this, we have added five hashes (#####) and a space before the text.
This is the 5th level header in the markdown, which is h5.
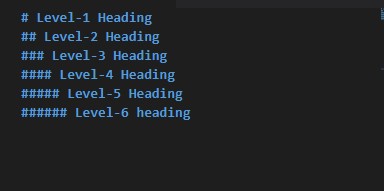
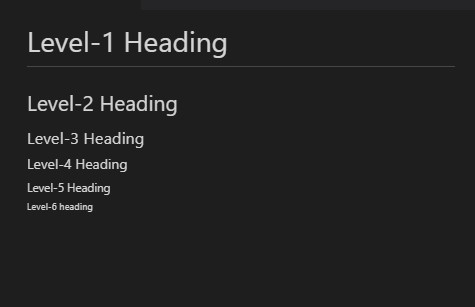
Now we will see it all from level 1 heading to level 5 in a single script so you can get a better idea of the size variations.
We have created all the possible heading levels in the markdown.
The below-provided snapshot presents the heading levels with different sizes, which can be generated in markdown.
Example # 4: Creating Header With Bold or Italic Text
We can create a header with either bold or italic text or even both. For making any text bold in a heading, you just have to put two asterisks (*) before and after the text.
We have created a level 1 heading with a single hash and made some text bold using asterisks as “To make the Text **Bold** use two Asterisks”. Here we have added asterisks with the word “Bold”.
You can observe that the word “Bold” is bold using the asterisks in the header.
Now to italicize and also to bold the text in the header, we have to surround the text with 3 asterisks on each side. You can see it in the script image given below.
The word “italic” is italicized and bold in the header, which is exhibited in the output image below.
Conclusion
Working with the headers is an important yet easy technique in markdown. This article demonstrated the concept of creating different headings in markdown using various methods. We have generated 4 examples in this guide which were all based on headers in markdown. We have learned to make headings with different size variations so that you can use them according to your task. Also, we explained how to make the text in the heading bold or italic in markdown when needed.


