“Markdown is very easy and simple to use. We have to utilize this Markdown language for doing tasks that can also be done using HTML. But in HTML, we have to utilize a lot of HTML tags, and in Markdown, we don’t need to put any tags, making the code complex and difficult to understand like HTML. When we add the text in Markdown, then we can also make the text bold. Bold means to make the text “thicker”. When we make the text bold, then it will appear thicker and heavier than the simple text. The Markdown provides two methods for making the text bold, and we will learn both methods in this guide in detail. We have also made the text or paragraph bold in Markdown here and will explain how we can do this.”
Techniques for Making the Text Bold in Markdown
We may utilize two techniques that help us in making the bold text in Markdown. These techniques are given ahead:
-
- By putting two (**) at the start of the text or paragraph as well as the end.
- By putting two (__) at the start of the text or paragraph as well as the end.
The best technique for making the text bold in Markdown is the first technique that we have mentioned here. The best way is to utilize the asterisks in Markdown to make the text bold. Now, we will use both techniques in Markdown and will show how to use these techniques and what the results that we get after applying these techniques in Markdown are.
Example # 01: Using asterisks (**)
To execute the Markdown codes in this guide, we are using Visual Studio Code. Both the text editor and the preview window must be opened to view the Markdown codes and the outcomes of those codes. We must enter the input into the text editor, and the output appears in the preview window. We don’t need to run or debug that Markdown code because the output will render automatically on the preview window. Now, we are typing some lines on the text editor, and then we insert two asterisks there and put “My BOLD Text” and then again use two asterisks. Now, this text turns blue and also appears bold here. Now, check the preview window and see what we get in the outcome of this line.
Here, see that the text “My BOLD Text” appears thicker than the remaining text because we have utilized asterisks with this text. Also, note that the asterisks do not appear here in this outcome. Just the text is shown in bold in this preview window.
Example # 02
We can also make some words bold in a paragraph. Here, we add a paragraph and then apply the asterisks method to some words to make them darker and thicker than the other text. We add “DARKER and HEAVIER” inside the asterisks, and the “BOLD” word is added inside four asterisks, and then the last word, which is “MARKDOWN,” here is also added in between four asterisks. So, these words which we have added inside the asterisks will appear in bold.
Here, you can see that all words appear in bold, and the asterisks are not shown here in this output which we have added above in the input.
Example # 03
We can also make the whole paragraph bold. For this, we have to add the whole paragraph inside the asterisks, as shown below. We put two asterisks and then wrote the whole paragraph. When this paragraph is completed, then we add two more asterisks at the end of this paragraph so that the entire paragraph’s text turns in blue and also appears in bold. Now check the result of this code below.
The whole paragraph which is shown in this output appears in bold, and no asterisk is displayed here in the output.
Example # 04
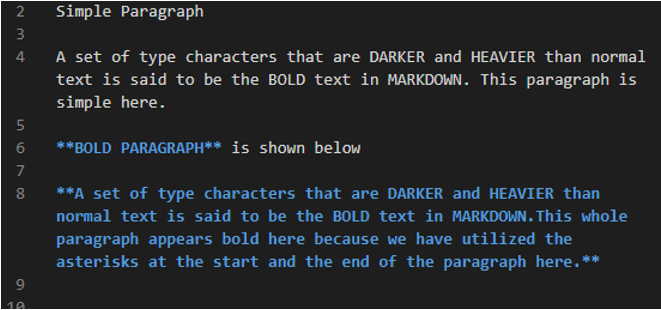
Now, we will show the simple as well as the bold paragraph in this example to show the difference between both paragraphs clearly. We first add the paragraph without placing an asterisk at the start or the end of the paragraph. Then, we put the text “BOLD PARAGRAPH” inside asterisks, which means it will display thicker or bold in the outcome. Below, we have added the paragraph in between asterisks. We add two asterisks at the start as well as the end of the paragraph.
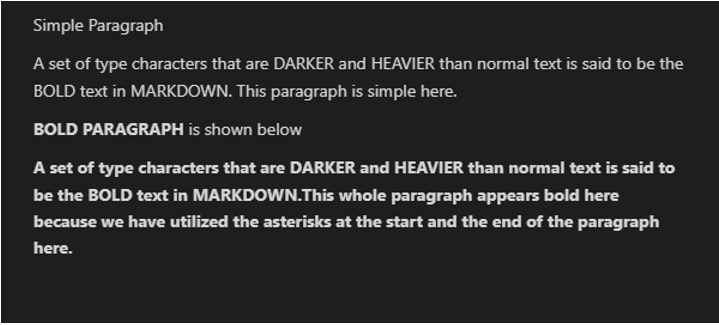
The first paragraph in this outcome is simple, but the second paragraph is thicker or bolder than the first paragraph. The difference between both paragraphs is clearly shown in the image below.
Example # 05: Using underscores (__)
Now, we will utilize another method and will show how the underscore technique works in Markdown. As we type a few lines in the text editor, we add two underscores, write “Here is the BOLD TEXT,” and then add two more underscores. This text now appears bold and changes to blue. Check the preview window right away to see the result of this line.
The text “Here is the BOLD TEXT” appears thicker than the other text. Also, observe that the underscores are absent from this result. In this preview window, only the text is displayed in bold.
Example # 06
We can bold certain words within a paragraph. Here, we create a paragraph before using the underscores technique. The words “DARKER and HEAVIER” words are inserted between four underscores. Also, we put two underscores before the word “BOLD” and two underscores after this word, and the “MARKDOWN” is then inserted between four underscores as shown. Therefore, the words we placed inside the underscores will be bold.
As you can see, all of the words that we have added inside the underscores are bold, and the underscores that were inserted above in the input are not visible in this output.
Example # 07
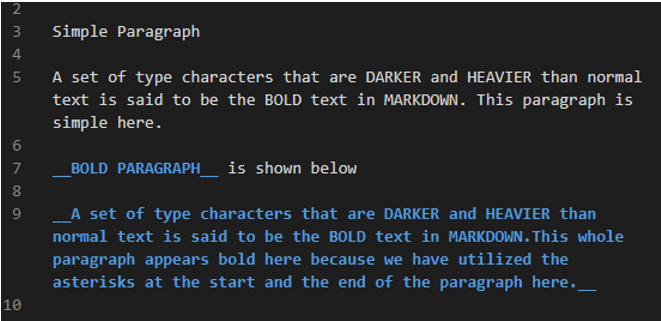
To properly illustrate the differences between the two paragraphs, we will now present both the simple and the bold paragraphs in this example. First, we insert the paragraph without adding an underscore at the beginning or end of it. The text “BOLD PARAGRAPH” is then enclosed in underscores, indicating that the result will make it appear bolder or thicker. Between underscores, we have put the paragraph below. In the beginning, two underscores are added, and also two underscores are added at the end of the paragraph.
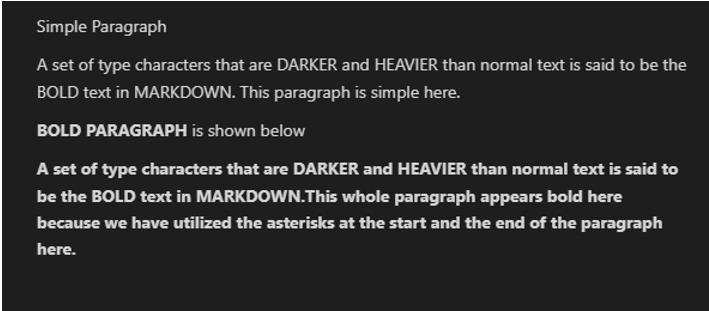
The first paragraph in this result is not in bold, but the second paragraph is thicker or bolder. The screenshot below demonstrates how the two paragraphs differ from one another. We can easily see the thicker or bolder paragraph as well as the simple paragraph in this outcome.
Conclusion
The information about the “markdown bold text” concept is written in this guide. We have explained two techniques here which are the “asterisks and the underscores techniques,” that help us in making the text thicker or bolder in Markdown. We have also explained that the asterisks technique is the best technique for making the text bold in the Markdown, but we have explored both techniques in-depth here and have also shown multiple examples with the results in which we have made the text or the entire paragraph bold or thick and have also shown the simple as well as the bold text or paragraph in this guide.


