This guide is related to labels in Kubernetes. This guide offers comprehensive detail on everything related to Kubernetes. Using examples and the included screenshots, we will discuss about the labels in this guide in the right manner. The key-value pairs which are known as labels are appended to various objects, including pods and nodes. Users only have access to labels without a prefix. Resources can be grouped and categorized in a variety of ways using labels. We will seek the label creation step-by-step in Kubernetes.
Prerequisites:
Our system must be an Ubuntu or Linux operating system. Check that your system’s operating system is the latest version of Ubuntu. The Windows user also must install the Ubuntu operating system in parallel using a virtual machine. Through the virtual box setup, we can install Ubuntu or Linux virtually and act at any time. We must know about Kubernetes, the kubectl command line, pods, and containers for usage. For Kubernetes to execute the label processes, all of this is essential.
First, we configure the labels in the system at the very first point. Follow the steps to learn the configuration as well as the usage of labels in Kubernetes in this article.
Step 1: Kubernetes Dashboard
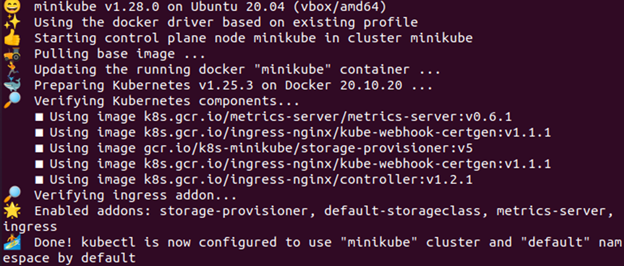
We begin each step by launching a Kubernetes Minikube container on local machines. We execute the following command to start the minikube:
Press enter. The command is executed and the minikube is successfully started as a Kubernetes container as shown in the following screenshot:
Step 2: Create a Configuration File of the Pod
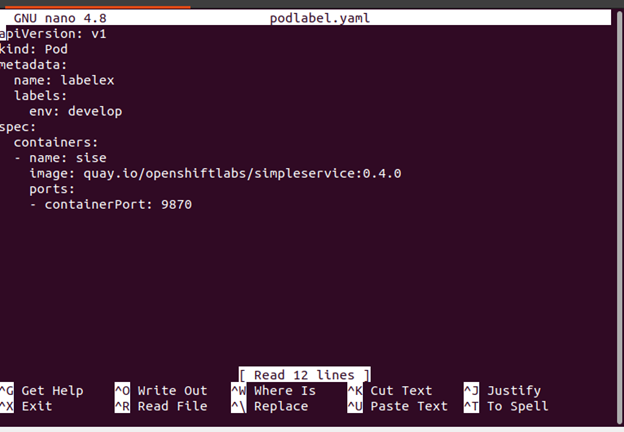
In this step, we create a configuration file in YAML to describe the specification of the pod in this file. We run the following command:
As a result of this command execution, the podlabel.yaml file is successfully created. This is the configuration file of the pod. The name of this container is labelex. There are many more specifications for this container, as we can see in the following screenshot:
Step 3: Deployment of Pod in Kubernetes
In this step, we execute the command to deploy the pod’s configuration file in Kubernetes. The command is run in the kubectl command-line tool:
After the command execution, the deployment of the pod is done successfully, as we know that the name of the container is labelex. The output is attached in the following:
![]()
Step 4: Label Verification in a Pod
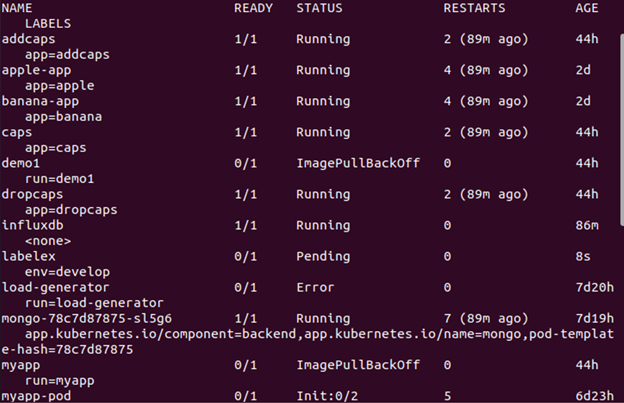
We know that pods are deployed in Kubernetes, so we fetch the results of all pods for pod verification in this step. We run the following command here:
Following the command execution, the output is displayed on the terminal as shown in the following screenshot which shows a list of pods with labels and names. This command returns a different attribute related to pods like name, ready, status, restarts, and age. Execute the relevant command in the terminal:
Step 5: Create a Label for the Container
In this step, we learn how the pod labels are assigned in Kubernetes. We run the command for label creation in Kubernetes:
![]()
Following the execution of the command, the pod named “labelex” is successfully labelled in Kubernetes. The name of the label is “owner=kalsoom” for this pod in Kubernetes.
Step 6: Rename the Label of the Pod in Kubernetes
In this step, we discuss how we can rename the label of a pod in a Kubernetes cluster. We can run the following command:
When we run this command, the label of “labelex” pod in Kubernetes is successfully renamed to “owner=bibi” as shown in the attached screenshot:
![]()
Step 7: Get the List of All Running Pods in Kubernetes
In this step, we fetch the list of all running pods with labels to verify our pod and label in Kubernetes. We run the following command:

The command to run the labeled pods is successfully displayed after the command execution as shown in the attached screenshot. In this list, we can see the pod that we created recently in this article. Since the pod’s name is “label”, the label of this pod is “owner=bibi”. The environment is “development” and the ready function is 0 as in its original state. This command’s status is “Pending”, and the age of this pod is also mentioned. As a result, we have a list of the labeled running Kubernetes pods with relevant examples.
Step 8: Filter the Running Pods in Kubernetes
In this step, we discuss the pod filtering in Kubernetes. Here, we learn how to retrieve an individual pod with a label from a long list. We run the following command for the filter:
![]()
The selector keyword is used here to filter the pods list based on the label that is assigned to them. We filter the pods whose label is “owner=bibi.” After the command execution, the pod named “labelex” is fetched through this command. This labelled pod is pending in Kubernetes.
Step 9: Fetch a List of Pods in the Kubernetes Cluster
In this step, we only retrieve the data or list of pods in the Kubernetes cluster that have the “environment” label and the “develop” value. We run the following command:
![]()
This command searches through all pods in the cluster and returns only a list of those that have the “env=develop” label. Following the command execution, the output which contains the name, namespace, status, and other details of the respective pods appears, as shown in the previous screenshot.
Conclusion
We conclude that labels play a vital role in the Kubernetes cluster. With the help of labels, we attach the tags to the pods. We can easily obtain the pod details by simply calling the labels and obtaining all relevant pod details. We assume that you are all not bored with this topic. You can also create, delete, or modify the labels for your running pods in Kubernetes applications easily with the help of the examples.