How to Reset the Linux Mint Root Password
In this example, we’ll demonstrate one of the simplest ways to change or reset the passwords on Linux Mint. Linux offers us a variety of alternative options to reset the root or user password. The user root passwords are commonly forgotten. It commonly occurs, particularly if you haven’t logged in as the root user in a while. But don’t worry because we’ll provide you with the simplest method to reset your password again.
Let’s begin its practical implementation. First, we start the Linux Mint system and then restart it by clicking the “Start” button to open the menu. Next, we click the “Power” button at the bottom-left corner to access its choices.
Now, after pressing the power button, a session with the “suspend,” “restart,” “cancel,” and “shutdown” buttons will appear on the screen. Since we want to restart our system, we press the restart button.
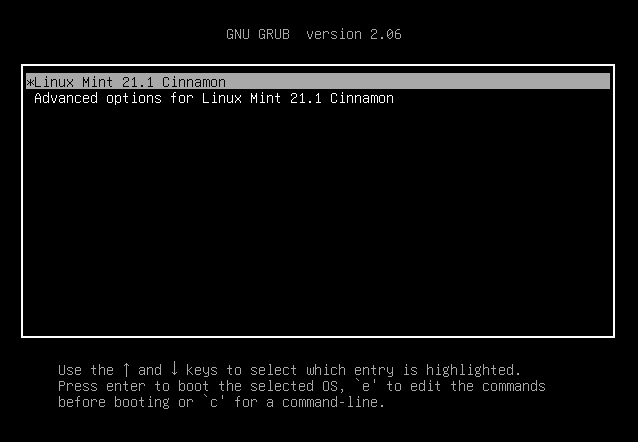
To access the “GNU GRUB” boot menu, you must now press the left “shift” button at the beginning of the boot press. You can press “ESC” on the keyboard at the GNU GRUB prompt if it cannot be enabled by holding down the shift key. The following image shows how the GRUB menu appears on the screen after holding down the shift key. Additionally, the window displays the GNU GRUB version, which is “2.06,” as well as its entries:
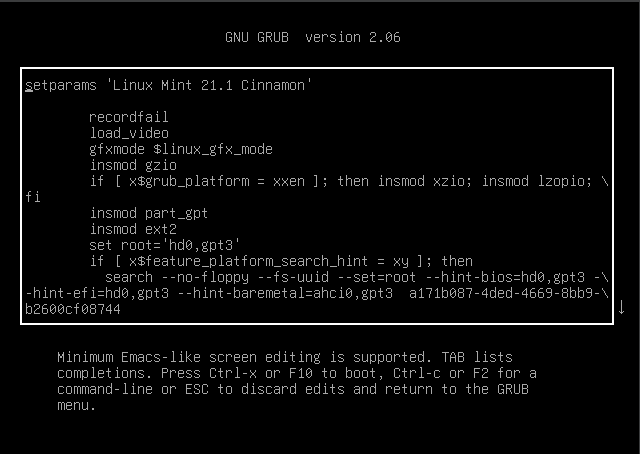
To edit the commands, hit “e” at the default option in the following step. The edit mode, which you can see in the following image, is entered when we press the “e” key from the keyboard. You may now edit the commands here.
After switching to edit mode, we use the keyboard’s arrow keys to navigate to the end of the line that begins with Linux. The following graphic demonstrates that we obtained the line that originates from Linux:
Now, we type the command at the end of this Linux line. First, we type “rw”. Then, we type “init” after a space. The term “init” refers to initialization. Simply said, init’s task is to create the processes from the scripts that are stored in the /etc/inittab configuration file which is used by the initialization system. After “init”, we type the equals symbol “=” and then the “/bin/bash”.
After entering the command, you must now boot your computer by pressing the “f10” key or “Ctrl-x.” After pressing the key, as shown in the following screenshot, we are now inside the root shell.
The “passwd root” command is entered to update the root password. On Linux, the “passwd” command is employed to modify the user account passwords. A common user is only able to modify their account’s password. Any user account’s password can be changed by a root.
As noted in the following illustration, the root shell now prompts you to enter your new password after you execute the previous command. For instance, if we want to use “123” as the password for our Linux system, we type “123” and then press the enter key. The shell subsequently requests us to input a new password again. We type “123” once more before hitting the enter key.
Retype new password:
Our root password for Linux is now reset after pressing the enter key which prompt the “password updated successfully” statement to be displayed on the window as an output.
Now that we have an access to the root shell, we can also change the user password. In this section, we will do just that. But to do so, we must enter the general username for our system. In this case, the user name for our system is “Omar”. Now, we enter the password command, “passwd”, followed by the user’s name, “Omar”.
After running this command, the shell prompts you to create a new password. Enter the new password using the same instructions as in the preceding part, then hit “Enter”. The next time it prompts you to enter a new password, simply type it in again and hit “Enter”.
Now that the password is updated, the output is presented along with the “password updated successfully” message.
Changing the User or Root Password Through a Command on the Terminal
We’ll explain a different method of changing the password on Linux in this section. To change or reset the password, we use a command on the terminal. First, open the terminal. Then, input the password command, which is “passwd”, into the terminal screen.
The system prompts for the current password after running this command, so we entered it. For instance, if the current password is “123,” we must enter it and then press the enter key.
Current password:
After that, we are prompted to provide a new password. We type it in here before pressing the Enter key. The new password is then required to be entered a second time.
Retype new password:
The update of password notification will appear on the screen as seen in the image below once the new password and the password you typed again have successfully been matched.
Now that we have another user with the name “guest”, we use the sudo command in the following section to change their password. To do this, type the following commands into the “sudo” terminal, “passwd”, and “username”, which is “guest.” In our case, our other user is called “guest”. So, we type “guest” after typing “passwd”.
Therefore, when we run this command, it asks to input a new password. Here, we add the new password as we did in the previous step. After entering, it asks us to retype the password. If we do so, and the new password and the retyped password match, the password is updated.
New password:
Retype new password:
The changed password message is now visible on the terminal.
Conclusion
We covered how to reset or modify the Linux Mint password in this article. We used two distinct approaches to password change. First, we reset the root password or modified the user passwords using the “GNU GRUB” boot menu. In the second approach, we updated the password by executing the “passwd” command in the Linux Mint terminal window. We also changed the password for another user using the sudo command.


