What Is Kubernetes Storage Class?
There are two nodes in Kubernetes: master and worker nodes. The Kubernetes server runtime`s state is maintained by a master node. All client nodes use the master node to configure and manage the Kubernetes containers on call. The master node is manufactured from different components like API Server, Scheduler, Registries, and storage.
The Kubernetes Storage Class is included in the Storage Kubernetes component. The Kubernetes storage class is a mechanism that allows you to provision the persistent volumes (PV) on a dynamic basis in a Kubernetes cluster. Kubernetes Storage is divided into different classes that administrators define, and we use these classes in the pods for different purposes. Storage Classes can also specify the properties of storage components in Kubernetes. These properties are speed, type of file system, quality of service levels, backup, etc.
Now, let’s understand this topic better with the help of some executed commands.
Prerequisites:
Make sure that the latest version of Linux and Ubuntu is installed on your system. Kubernetes is installed on your system. You must have an idea on how to work on Linux and Kubernetes and how to install the libraries in Linux which is related to Kubernetes. If you use Windows, install the Virtual Box, create a virtual machine, and run the Linux virtually on your system. You must have information about the kubectl command line which is used in Linux.
How to Use a Kubernetes Storage Class
To evaluate the “classes” of storage that they offer, the administrators of Kubernetes can use a Storage Class. Kubernetes Storage class is used to define the different types of storage types and these storage class types allow the different end users to request the specific storage class types for their respective work demands. Here, in the following session, we explain the whole process of how to use the storage class in Kubernetes with the help of the attached screenshots of relevant examples for a better understanding. We explain the whole topic in different steps.
Step 1: Start Local Kubernetes Machine
At first, we run a command to start a local Kubernetes cluster on which we create more pods and perform our tasks. In Kubernetes, minikube is used for local process handling related to containers or pods. Type the following command:
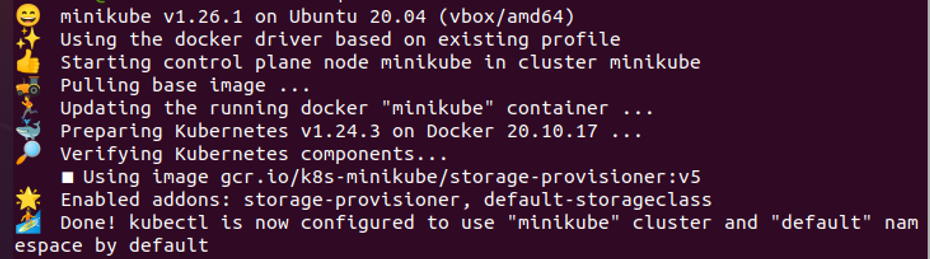
When the command is executed, the previously-attached screenshot result appears. This assures us that the minikube container is successfully created in our Kubernetes and that we could easily perform our operations on it. Carefully read the previous information related to minikube initialization.
Step 2: Check If the Storage Class Is Installed in the System by Default
In this step, we learn how to check that any predefined or default storage class is installed in our system. For verification, we run the following command:
With the help of kubectl, we get a storage class in the command; sc stands for storage class. A screenshot of the command and the accepted result is attached to this step for better understanding.

As we can see, this command gives back a variety of parameters with accurate data including Name, Provisioner, Reclaim Policy, volumebindingmode, AllowVolumeExpansion, Age, etc. We only came up with one name for the storage class because we concentrated on it. The name of the storage class is “standard with default status”. The default status shows us that this storage class has a predefined or default value.
Step 3: Description of the Standard Storage Class
In this step, we discuss the default storage class of Kubernetes. Standard is always the default storage class. In the absence of a PVC specification from the user, this storage class is deployed to provide a PV. Now, see the details about storage type. Run the following command:
After this command execution, the details about the standard storage type appear, as we can see in the following attached screenshot:

The output of the command in the preceding screenshot shows that it has different parameters and indicates that this is the default storage class.
Step 4: List of Storage Class in Kubernetes
In the last step, we get the list of storage classes again to know how many types of storage classes are running in our system. We run the same command again to show all storage classes in the system. Run the following command:
When this command is executed, a list of storage classes appears. We get the standard storage class in the following screenshot. The provisioner of this storage type is “k8s.io/minikube-hostpath”, the ReclaimPolicy is “Delete”, the VolumeBindingMode is “Immediate”, the AllowVolumeexpansion is “false”, and the age of this storage class is “110d”. This command gives us this type of storage class data.

We can also delete and change the type of storage class according to our needs. Kubernetes provides us with a facility for all of these to improve the efficiency of our work.
Conclusion
Here, we conclude that the StorageClass feature makes the lives of every user easier since every node has its storage class type, and every user can perform their tasks easily. We explained in detail about the storage classes and how we can use them. We also discussed about the storage class types. The types of storage classes are different. This Kubernetes framework provides us with this type of facility in which the users can delete and change the storage class type according to their workloads. You can practice these commands on your system for better understanding.