This article focuses on startup probes. The role of the startup probe can preclude other probes sequentially. It is essential to additionally use the startup probes alongside the liveness and readiness probes. The workload cannot be modified by the startup probe on its own. In this article, you will review how Kubernetes evaluates the application health status through startup probes and configure the health checks using startup probes.
What Are Kubernetes Probes?
Probes are also called health checks which are the technique for Kubernetes applications to provide monitoring of the internal state of the application using information. They let your cluster identify the running pods (containers) that monitor the health of an application and make sure that only the healthy Pods serve the traffic.
Applications can become unreliable for a variety of reasons such as temporary connection loss, configuration errors, and application errors. Developers monitor their application health using probes. Probes help the developers to get to know about the application status, resource utilization, and bugs. It’s easy to fix the application problems, resource management, and organization of resources effectively by monitoring the application information.
Probes are used to detect the following:
-
- Containers that haven’t progressed yet and can’t serve the traffic.
- Containers that are overloaded and can’t serve the supplementary traffic.
- Containers that are completely dead and not serving any traffic.
What Are the Types of Kubernetes Probes?
There are three types of Kubernetes probes. These include:
Liveness Probes
It is responsible to restart the container if it detects a deadlock and is unresponsive.
Readiness Probes
It is considered a door keeper for incoming traffic. This probe is responsible to tell that this Pod is ready to receive the traffic.
Startup Probes
It is responsible for the application which is deployed inside the container. It indicates if the application started successfully.
What Is a Startup Probe?
Kubernetes can determine whether your software, which executes within a container inside a pod, has properly started using startup probes.
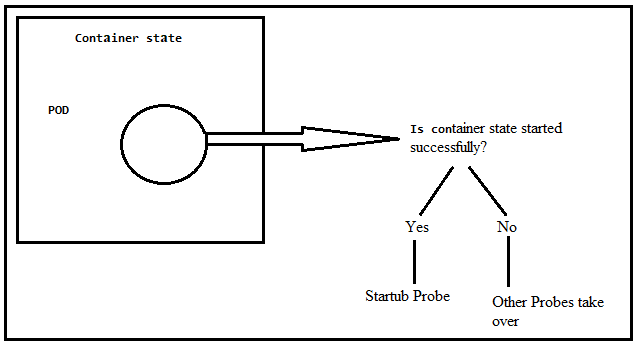
As you can see in the following figure, the application inside the POD<Container is the core of the whole setup because when the application is not running, there is no point in keeping the Pod and container. A startup probe tells whether this application has started successfully or not. If the application starts successfully, the liveness and readiness probe can be started. But if the application does not start successfully, there is no point to start the liveness and readiness probes. The liveness and readiness health checks are disabled until the startup probe is configured successfully.
Key Points of Startup Probes
-
- For the application, protect the slow-starting container with the help of a startup probe which proceeds longer to start.
- Disable the liveness and readiness probes through the startup probe when the application start time exceeds.
- The startup probe provides a mechanism to load a large data, configures and migrates the files.
Prerequisites of Creating the Startup Probe
Before working with the startup probe, prerequisites are a Kubernetes cluster with two nodes that are not acting as hosts and kubectl command-line software that must be configured to communicate between clusters. If you haven’t created a cluster, you can use the minikube to create a cluster. There are other Kubernetes playground options which are available online that you can use to create a cluster.
There are four basic Kubernetes techniques that are supported by startup probes:
Exec: Executes a command within the container. The zero code indicates success and the other codes indicate failure.
HTTP: Check the health of the application using the GET request command. The HTTP probe is considered healthy if its response is within the range of [200-399]. If your application does not support an HTTP server, create your HTTP server inside your application and respond to the liveness probe.
TCP: Kubernetes opens the connection between a specific TCP port and a container. If the connection is successful, it accepts the traffic. Otherwise, it fails to create a connection. TCP port works on behalf of HTTP probes when the HTTP probe is unable to work.
gRPC: Determines whether the probe is successful by sending a gRPC health check request to a port inside the container and using the response.
The success criterion for the probe and how frequently it is verified are controlled by a few fundamental variables:
initialDelaySeconds: Specifies the amount of time that must pass between the time that the container starts and the first time that the probe is used (Default: 0, minimum: 0).
periodSeconds: Defines how often the probe is checked after the initial delay (Default: 10, minimum: 1).
timeoutSeconds: Indicates how long to wait for the probe to complete and be marked as failed after the time is exceeded (Default: 1, minimum: 1).
failureThreshold: Kubernetes requires the minimum succeeding failure for the probe to be considered unhealthy if it has succeeded. The container is only restarted when repeats are unhealthy (Default: 3, minimum: 1).
How to Create a Startup Probe
Startup probes are made by adding a startupProbe discipline within the spec.containers part of a pod’s distinct. The exec approach is used in the straightforward startup probe example that is shown in the following where the command runs inside the container:
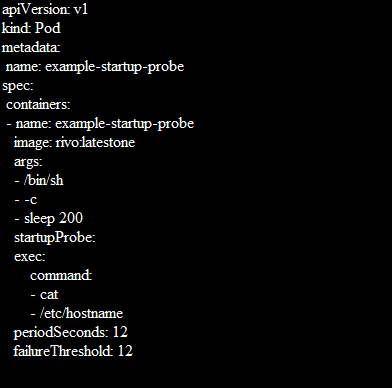
Path:/healthz is the health endpoint of applicexample-startup-probation. The failureThreshold: 12 is the Kubernetes tries in case the probe fails. The periodSeconds: 12 is how often the inspection is conducted.
Using kubectl, add the pod to your cluster with the following command:
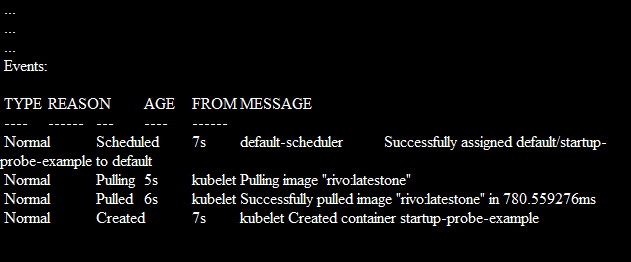
The container starts and runs normally. You can validate this by its details which are displayed in kubectl:
How to Protect the Slow Starting Containers with Startup Probes?
Through the following formula, you can find long enough to cover the worst-case startup time:
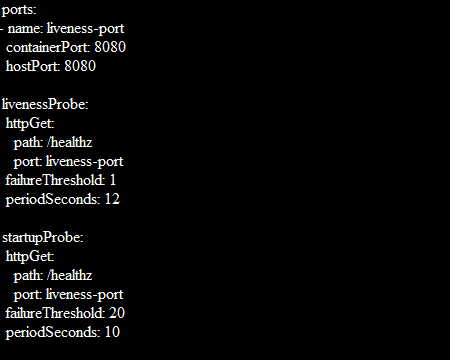
The maximum starting time for the application is 3 minutes (20 * 10 = 200). Once the startup probe succeeds for the first time, the liveness probe proceeds over to offer a fast response to the container deadlocks. The container is terminated after 200 seconds and is subject to the pod’s restartPolicy if the startup probe never succeeds.
Conclusion
The Liveness, Readiness, and Startup Probes for your containers which are deployed under Kubernetes containers must be configured appropriately if you want to maintain a healthy Kubernetes cluster. This post concentrated on the startup probe, which is crucial since it allows your containers to notify the Kubernetes when they start up and are prepared to be evaluated for liveness and readiness. It’s good to add a startup probe when you are using liveness and readiness probes. Otherwise, the container may get restarted before they finish initializing. This article implements the basic configuration setup of the startup probe and describes the parameters that can be used by probes.