What is runAsUser in the Kubernetes Environment?
The runAsUser is one of the security context fields specified in the configuration file which specifies the user id to provide the security privileges for a certain container or pod. The value of the runAsUser field determines that all the processes in the container will execute with the specified runAsUser id.
The security context is used to define the access control settings or define the user privileges for a certain container or a pod. The main security context settings include user id, primary group id, supplementary group id, seccomp, AppArmor, Linex Capabilities, etc. The security context setting is not limited to these things, there are a lot more settings included.
However, in this article, we are aiming to guide you on how to define the security privileges for a certain user so that the process can be executed by using that user’s id instead of the admin user. So, let us move to the next section to check to learn how to define the security context setting for a container or a pod.
Prerequisites
Before you begin, make sure your system meets the prerequisite needs so that you do not end up with any errors while using Kubernetes as a general user. The list of the prerequisites is given below:
- Ubuntu 20.04 or any other latest version
- Minikube cluster to interact with nodes
- Kubeclt command line tool to interact with the cluster in the Kubernetes environment
If you have all these tools installed in your system, you are ready to use the Kubernetes environment as a general user.
Specify the runAsUser Security Context for the Kubernetes Environment
In general, all the commands run or work has been done in the Kubernetes environment with admin privileges. If you need to change the security privileges of the user, you can change the user rights by enabling a certain user to have access to the system. This can be done by following the process given below.
First, we need to make sure that the minikube cluster is up and running successfully and for that, we will be using the following command:
This will start the minikube cluster if it has not been started previously or ensure that the minikube is in active mode.
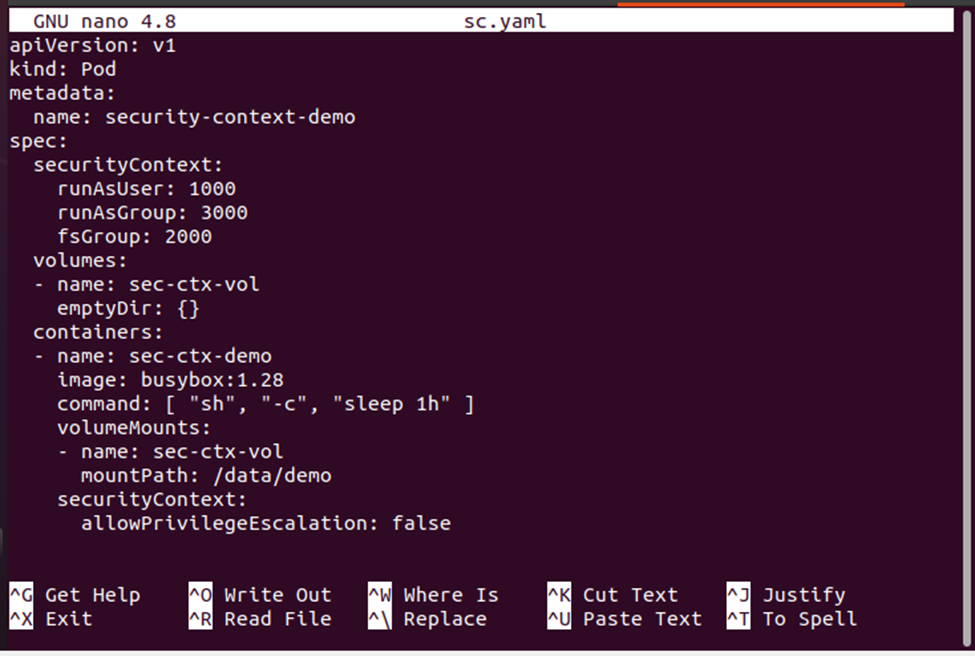
Now that our minikube cluster is up and running, we are ready to change the security constraints for our system. To specify the security settings for a pod in the cluster, we will need a YAML configuration file where we need to provide the deployment definition. Use the ‘nano’ command to produce a new YAML configuration file.
This command will create a YAML file named sc.yaml. Now, you can put the deployment definition in this configuration file. The deployment definition is given below for your reference:
Now, save the deployment definition in the sc.yaml configuration file so that we can apply the deployment on the pods. Note that the value of the runAsUser is 1000 which means that the user id is 1000 which we can use to refer to the specific user. The runAsUser specifies that all the processes for the containers in the pod will execute with the given runAsUser value. The rinAsGroup specifies the primary group id for the process in the pod’s container while the fsGroup specifies the supplementary group id for the process in the pod’s container.
Now, let us apply the configuration definition on the deployment by using the command given below:
This has created the pods from the configuration definition. Let us verify the current status of the pod in the cluster with the following command:
The status of the pod is ‘running’ which means we can deploy the shell in this container. Use the following command to get the shell to the running security-context-demo pod’s container:
The next step is to list down all the processes which are running:
As we have defined the runAsUser as 1000, all the processes are running as 1000 which means we have provided the user 1000 privileges to have access to the system. The security preferences have been changed for the user 1000. Now, all processes will run with the user id 1000. Let us navigate to another directly to check the security context of user 1000:
This will navigate us to the /data directory where we can list down everything in the directory with the following command:
In the output above you can see that the /data directory is using the supplementary user id 2000. Now, let us navigate to another directory to check what user id it is using:
This will take us to the /demo directory where we can list everything from the directory:
Let us see what id(s) have been used by the /data/demo directory:
The output shows that the files in the /data/demo directory are using the user id 1000, primary group id 3000, and supplementary group id 2000.
To close the shell, you can use the exit command and get out of the shell immediately:
Remember that we have navigated to different directories to check the runAsUser privileges, so we need to properly exit from the shell to get back the security privileges from the user.
Conclusion
In this article, we specifically learned about the runAsUser security privileges. We learned that the process can be executed in the Kubernetes environment without having admin rights. The security context can be defined for other users and they can have secure access to the system and can run all the processes as required. When you enable the security context for a certain user by assigning them the runAsUser id then all the processes in the containers of the pod will run with that id.


