Pre-requisites
The system must satisfy these requirements to create an empty directory and its volumes in Kubernetes. The system must be on Ubuntu’s latest version and have installed Virtual Box or VMware, which provides a facility to run the other operating system virtually on Windows. So, we can also run Ubuntu or Linux side by side with the Windows operating system. After operating system stabilization, we run the Kubernetes libraries to install the Kubernetes. Along with all these, we must know about the kubectl command line, pods, cluster concept, docker containers, and etc.
What is the Emptydir Volume in Kubernetes?
When a pod is assigned to a node in Kubernetes, a temporary or empty directory is created and stored in the emptydir volume. emptydir volumes are handy for storing data that a container in a Kubernetes pod needs but that is not expected to be stored after the pod is terminated. At each given location, an emptydir volume is created within the container’s filesystem. The most effective use case for emptydir is a git repository. For file sharing between containers operating in the same pod, EmptyDir is quite helpful.
Why is There an EmptyDir Volume in Kubernetes?
In Kubernetes, EmptyDir is used to store temporary data. This is highly useful for storing data that a pod’s container needs. It is required for data sharing within a pod of containers. By controlling the location to store data that may be inspected after the container has terminated, we can simply do application debugging. In Kubernetes, we perform testing easily to inject data into containers without having to change the container volume. It provides a scratch space.
Let us go over the process of emptying the Dir volume in detail using the screenshots provided.
Step-1: Start Minikube Cluster in Kubernetes
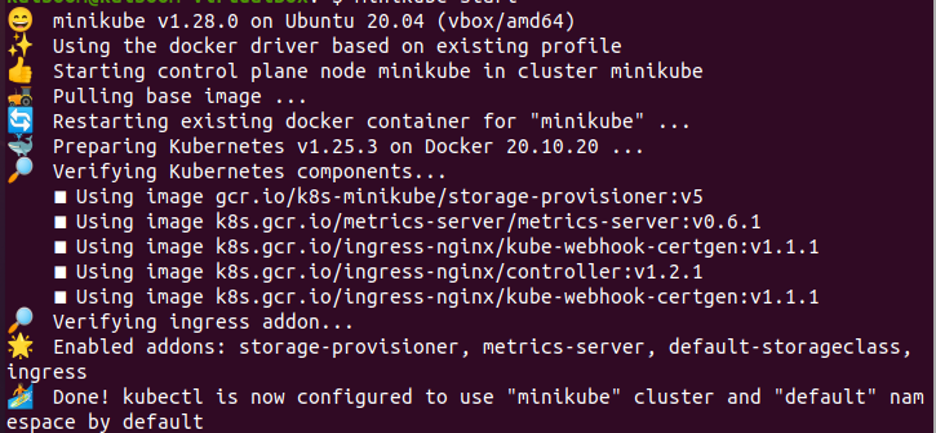
Our first step is about starting Kubernetes. We run the command to start the Kubernetes dashboard:
We see that a local container with a minikube cluster is running in the Kubernetes application.
Step-2: Create a YAML Configuration File in Kubernetes
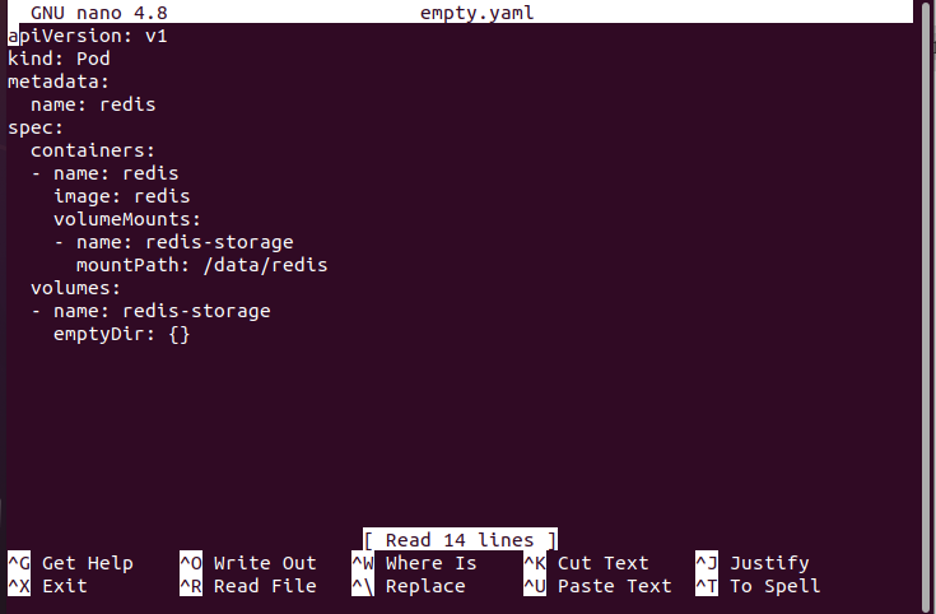
After that, we run the command to create a file in Kubernetes. We define the emptydir volume in the configuration file in detail.
After executing the command, press Enter to display the screenshot below. This YAML file includes an API version, a pod type, metadata fields, container specifications including name, image, volume mount specification including name and mount path, and volume specifications are also included in the Kubernetes configuration file. So, in this way, we create a YAML file in Kubernetes.
Step-3: Create a YAML Configuration File in Kubernetes
We run the command to create a file in Kubernetes. We define the emptydir volume in the configuration file in detail. Now that we have a Kubernetes application, we will see how to deploy this configuration YAML file in the application by simply running the command. In Linux or Ubuntu, we use kubectl to run commands in the terminal. We must try to practice all the commands to remember which command is used for which purpose in Kubernetes. Here, we will run the command on the kubectl command line:
As shown in the attached screenshot, the redis in the pod is successfully created after command execution. We first create a YAML file and, after adjusting all requirements, deploy the YAML in the Kubernetes application to implement the file mentioned in the application. Now, we see that Redis is implemented in a system that is full of different specifications, like volume.
Step-4: Enlist the Running Pods in Kubernetes
In this step, we will learn how to see which pod container is currently running in Kubernetes. So, we have a command that gets all the pods with different attributes that are running at that time. We run the command here:
When the command is executed, then information about currently running pods is displayed on the application terminal, as we can see in the above-attached screenshot. So, we discovered that only one pod that we recently created is active in the system. This command returns various attributes, such as the pod’s name “redis,” the fact that it is currently in the rest position because ready is “0/1,” and the status “pending.” When the status is “pending,” it means that this pod is still in the queue or is waiting for a task. “Restarts” indicates how many times this pod has restarted. But in this case, “restarts” shows “0,” indicating that the restart time is zero. This pod has started keeping an eye on the mount point.
In this article, we see and learn how to create a pod with volume successfully. A pod is currently pending, which means it cannot be scheduled on a Kubernetes node, possibly because the CPU is busy with other tasks or due to a node selector reason. But here, until the pod is terminated, all data that the container writes to this volume will be kept in the EmptyDir volume.
Conclusion
The method for creating a volume is emptydir. The emptyDir volume is very useful for Kubernetes stateful applications. In Kubernetes, an empty directory is a volume type. So, emptydir is initially empty, and it stores all the data gathered while the pod is running. When a pod is terminated for any reason or at the end of a task, the content in the emptydir volume remains safe and secure for further use.


