The rolling update periodically removes older Pods and replaces them with newer Pods. You can change the images, settings, labels, annotation, and resource restrictions of the workload in your clusters using a rolling update. Rolling updates start replacing your resource’s Pods with new stuff, which are then planned on nodes when resources are needed. Rolling updates are built to maintain your workloads updated without causing any disruption.
Kubernetes and kubectl provide a straightforward mechanism for rolling back resource modifications. When a Deployment is not secure, such as when it crashes looping, you also might want to roll back the Deployment. By default, the system saves all of the Deployment’s rollout history so that you might roll back at any moment. In this guide, we are going to talk over the method to roll back a kubectl.
Method to Roll Back a Kubectl
We are implementing this tutorial on Ubuntu 20.04 Linux system. Let’s start the minikube cluster in Ubuntu 20.04 Linux system by the execution of the following attached command.
We have installed kubectl as well for the effective implementation of this tutorial.
Creating Deployment
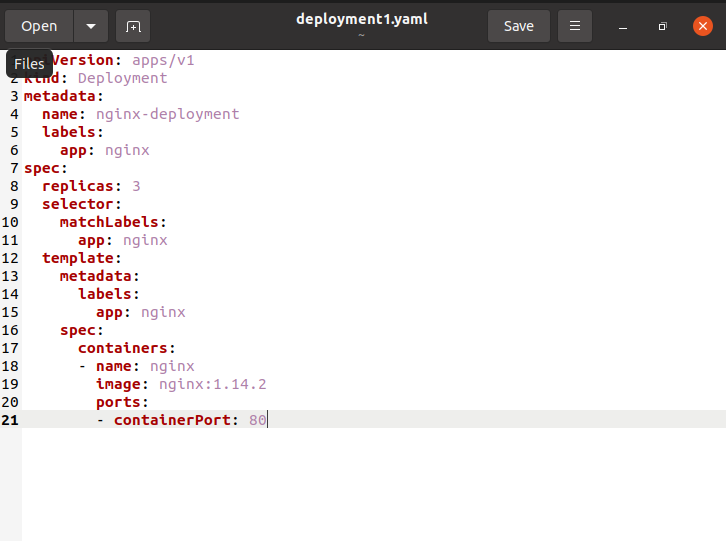
A Deployment is a Kubernetes entity that is used to declaratively manage Pods using ReplicaSets. It has functionality for updates, control, and rollback. This implies you can upgrade or downgrade a program without causing a user blackout, and also roll back to the previous if the current version is unreliable or full of issues. Deployment can also use a declarative management style to obtain optimal states of an application stated in a YAML file to live. We will design a Deployment that will create a ReplicaSet that will set up 3 Nginx Pod instances. You will need a Kubernetes cluster up and operating, as well as the kubectl command-line tool setup and linked to it. Using the command prompt, create a YAML manifest file titled “deployment1.yaml” by using the “touch” command.
The file will be generated in the home directory. Now, we have to add some information regarding deployment in the created file.
The “. metadata.name” attribute indicates that a Deployment named Nginx-deployment is established. The “. spec.replicas” attribute indicates that the Deployment produces three replicated Pods. The field “.spec.selector” specifies how the Deployment determines which Pods to maintain. In this scenario, you will choose a label from the Pod template (app: Nginx). More complex selection rules are feasible, as long as the Pod template directly meets the criteria. Run the subsequent command in the Ubuntu terminal to generate the Deployment:
The output is showing that deployment has been generated effectively in the above-attached screenshot. Verify the status of the deployment to perceive if it has been formed. Execute the listed below command in the console.
The names of the Deployments in the namespace are listed in the “NAME” category. The number of replicas of the application accessible to our users is displayed in the “READY” category. It maintains the ready/desired pattern. The amount of replicas that have been modified to achieve the target state is displayed in the “UP-TO-DATE” category. The “AVAILABLE” category shows how many copies of the application your users have access to. The “AGE” category field shows how long the application has been operating. Execute the attached command to see the status of the deployment rollout.
If you get an output like this, it signifies the Deployment is still in the process of being generated. Wait a few seconds before rerunning the kubectl get command. This is what the ultimate result will appear like after it has been ended.
Execute kubectl to get rs to view the ReplicaSet (rs) established by the Deployment. The subsequently displayed image is a sample of the output:
The identities of the ReplicaSets are listed in the “NAME” category. The desired number of application replicas, which you provide when you build the Deployment, is displayed in the “DESIRED” category. The “CURRENT” category displays the number of replicas that are currently active. The number of replicas of the application access to your users is displayed in the “READY” category. The “AGE” field shows how long the application has been operating.
Conclusion
This article has provided in-depth knowledge regarding the importance of kubectl rollback. We have given an example of deployment rollback to clarify our reader’s reading roll back the process.


