Step 1: Start the Kubernetes Server
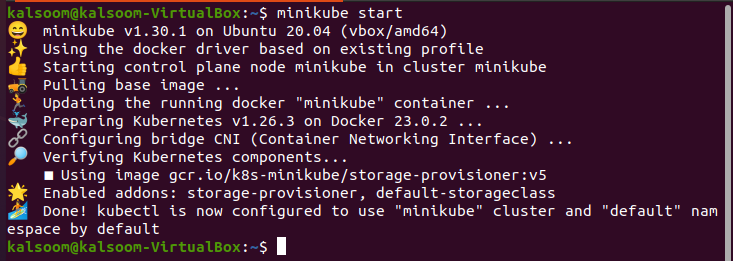
In this step, we run the Kubernetes server which is minikube thatcontains the pods in a container. We can run the minikube cluste by running the following command:
When the command is executed, the minikube local cluster runs in our application.

Minikube makes use of a VirtualBox to build a locally accessible virtual machine. We can quickly deploy our commands or services in Kubernetes clusters. After that, we test them locally using the minikube Kubernetes cluster.
Step 2: View a List of All Pods along with Images in the Cluster
To run all these commands, Kubectl must be installed on your local system. In this step, we will learn how to view a list of images that is used by pods in clusters and is stored in our container. We can run the following command in our Kubectl command-line tool to get a list of stored images.
> sort
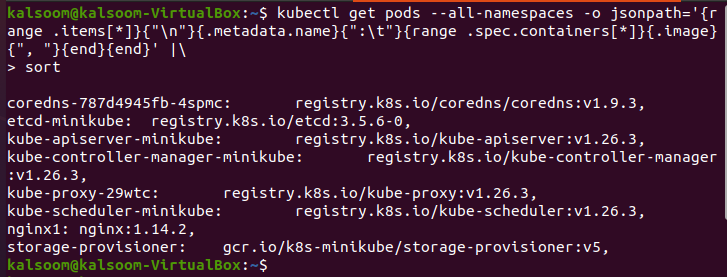
When the command is executed, the output appears as in the following screenshot:
This command fetches the list of pods that are present in the cluster and then fetches all images that are found in this path. After the images are found, the command also sorts these images in sequence, alphabetically. Lastly, it counts the number of images that are present in our cluster. This command returns the output in JSON path format. Let’s discuss the parts of the command one by one:
– -all-namespaces: We can easily fetch the list of pods in all namespaces in our Kubernetes cluster. Here, all the images of pods are declared.
–o jsonpath=’: This parameter gives the format of the output. The JSON path format is according to the given command and displays the pod name and container images as well as the output format. The list is tab-separated, and each pod is separated by inserting a new line.
|: As you can see, the commands employ the “|” character. It is used to transfer the output to the passing command.
sort: This parameter sorts the images in a specific order.
This is the complete explanation of the command. Hopefully, you understand this command’s purpose. As we can see in the screenshot, the list of pods and images are displayed and separated by commas.
Step 3: Get the List of Images for a Specific Pod
In this step, we will only learn about the retrieval of specific pod images. For this purpose, we run the command again that specifies the name of the pod in the JSON path. Run the following command to fetch the images of a specific pod.
In this command, we take a pod named “app=ngnix”.
When the command is executed, the JSON path output format displays the list of all container images that is used by the pod which is named “app-ngnix”.
In this way, we can get a list of images that is used by specific pods across all the namespaces in our Kubernetes application.
Step 4: Get a List of Images in a Specific Namespace in the Cluster
This is the fourth step of our article where we learn about how we can get the list of images against a specific namespace in our Kubernetes cluster. We run the following command in our Kubectl command-line tool:
In this command, we want to retrieve the images of the namespace whose name is “kube-system” which is used by pods in our Kubernetes cluster.
A list of images is displayed in the output that is produced when the command is executed. Here is the screenshot:
The JSON path format of the output is easily obtained by running the command. Each line in the output approaches a container image which is used by a pod in the “kube-system” namespace. The format of the output is shown by the JSON path template that is used in the command. In this example, the “.items[].spec.containers [].image” template returns the container image that is used by each pod in the namespace.
Step 5: Get the List of Images of All Namespaces of the Go Template
In this step, we will learn the process of fetching the list of images of all namespaces which is used by pods that uses a “go template” output format in the Kubernetes cluster. For this, we use the following command:
Before going to the output, let’s first discuss the parameters of the command so that you have an idea of how we can use the different parameters in our command. We can start with new parameters that are not discussed before:
-o go-template: This shows that the output format must be according to the “go-template” notation.
– -template=”{{range. items}} {{range. spec.containers}}{{.image}} {{end}}{{end}}”: This provides the template to be used for the output. This template iterates through the list of pods which retrieves the container image for each. The result is a space-separated list of container images that is used by all pods in all namespaces in the cluster.
Upon the execution of the previous command, you get the following output:
These are all the steps through which we can fetch the list of images that is used by pods in our Kubernetes container.
Conclusion
We conclude that we can easily retrieve the list of stored images in the container in our Kubernetes application with the help of the kubectl command line tool. In Kubernetes, we can get the list of images in different methods. Every method is explained clearly in the given steps. The “–all namespace” option gets the images of all namespaces that are used by the pod which are stored in the container and are easy to fetch by the running the commands. You can follow all the steps for your application to get the list of images by running the commands in the kubectl command line tool.


