In this article, the capabilities, limitations, how to set up namespaces, and how to get a list of namespaces will be discussed. Let’s start with the definition of kubectl namespaces.
What are Kubectl Namespaces?
A kubectl namespace is an object in Kubernetes that divides a single physical Kubernetes cluster into multiple virtual clusters. Every namespace object defines the limits for the names which are included with it. In other words, each namespace object in the cluster has a unique identity which is the fundamental object and is used to separate and administer the Kubernetes clusters.
The kubectl namespaces are used to logically distinguish and allocate the resources to a specific program, team, application, group of users, or individuals. The efficiency of the resources can be boosted using namespaces because one cluster is used for multiple collections of workloads.
Now let us move forward and see how to get a list of namespaces and what prerequisite needs to be fulfilled.
Prerequisite:
In order to use the namespaces Kubernetes object, the Minikube cluster needs to be installed. In our case, Ubuntu 20.04 is used to run the namespace object commands. Two different techniques are used to start a Minikube cluster terminal. The first technique is to access the terminal using the operating system application bar. The second technique is to access the terminal window by pressing Ctrl+Alt+T.
After accessing the terminal window, start the minikube by using the minikube start command. When the ‘minikube start’ command is executed, the following output will be displayed:

Now let’s see how and when to use the kubectl namespaces.
How to Use Kubectl Namespaces?
The Kubernetes namespaces object gives a mechanism for segregating the resource group in one cluster. The name of every resource must be unique in a namespace but not across the namespaces. However, the scoping of namespaces is only applicable for namespace objects like services and deployments but not for cluster-wide objects like persistent volumes, nodes, storage classes, etc.
To list the existing namespaces in a cluster ‘kubectl get namespace’ command is used. After executing the command, the following output will be generated:

Observe that the Kubernetes object starts with four initial namespaces: Default, kube-node-lease, kube-public, and kube-system.
Default: Namespace for objects without any other object.
Kube-node-lease: It holds a lease object which is associated with all nodes.
Kube-public: It is created automatically and can be readable by both authenticated and unauthenticated users.
Kube-system: It is created by the system of Kubernetes.
How to Set the Namespace for a Request?
The ‘–namesapace’ flag is used to set the namespace for a request. Here is the code to set the namespace for a request:
![]()
After running the ‘kubectl run nginx’ command, the server has thrown the error because the nginx pod already exists. However, let’s run the get pod command to get the namespaces. The ‘kubectl get pods’ command is executed to get the namespaces. Below you can see the result of the get pods command.

How to Set the Preferences for Kubectl Namespaces?
The namespaces for all the subsequent kubectl commands can be permanently saved by using the set-context command. Here is the command to set the ‘default’ namespace preference. Note that ‘–namespace=default’ is provided to set the kubectl preference to default.
![]()
Similarly, the ‘view’ command needs to be executed to view the namespace. See the code below:
![]()
The Relationship Between DNS and Namespaces
When a service is created, its corresponding DNS entry is also created. The DNS entry provides the service name, namespace name, and local cluster, which means that if a container just uses the service name, it will connect to the local cluster namespace.
This becomes useful while deploying the same configuration over various namespaces like production, staging, and development. When the users need to reach across the namespaces, they need to specify the fully qualified domain name (FQDN).
Objects that are Not the Part of Namespace:
The Kubernetes object or resources are part of some namespace, i.e., replication controller, services, pods, etc. However, the namespace object itself is not a part of any namespace. Moreover, the persistent volumes, nodes, and other low-level resources are not a part of any namespace.
In order to see which resources are in a namespace and which resources are not in any namespace, the API resource command is used. See the code below.

When the –namespaces are set to ‘true’, it will show the names of the resources part of some namespace. On the other hand, when the –namespaces are set to ‘false’, it will show the name of those resources which are not in any of the namespaces. The ‘kubectl api-resource –namespace=namespace preference’ is used to see the resources of the namespace.
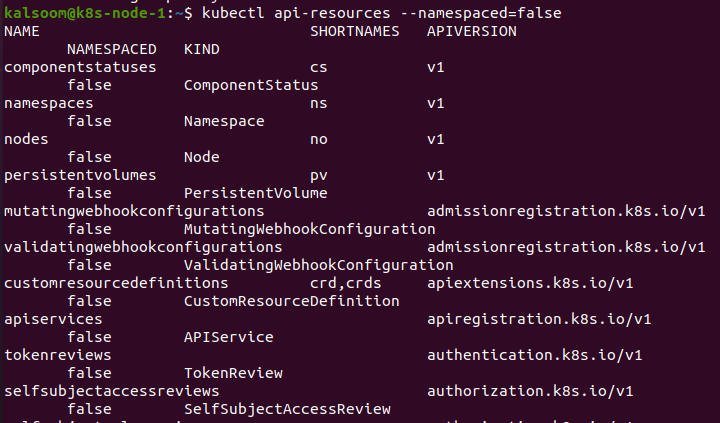
As you can observe in the above given outputs, the true and false preferences are given to see which resource is in some namespace and which is not.
Conclusion:
This article is about managing complicated systems like Kubernetes can be a big challenge even for expert users. However, strong knowledge and command of a namespace can make challenging and complicated tasks much easier. A namespace is a powerful tool that defines the hierarchy, performance, and security of the Kubernetes system.