What Is Kubectl Get in Kubernetes?
In Kubernetes, the “kubectl get” command is used to retrieve one or more resources like pods, services, nodes, and deployments. The “get” command is used to get the lists and display all the resources of our cluster. This command is flexible in every situation where you get the information in the Kubernetes cluster.
To use the “kubectl get” command, run the kubectl command-line tool first in the Kubernetes cluster. Remember that the kubectl must be installed in your system. After that, we must have a minikube cluster that performs different functions and operations compared to the Kubernetes cluster. It helps you to understand the concept of the Kubernetes cluster easily.
The user must have a Linux operating system. Then, we need to run a Kubernetes cluster in our local system. In this cluster, we performe a kubectl command to get the list of our required information.
Step 1: Launch a Minikube Cluster Dashboard
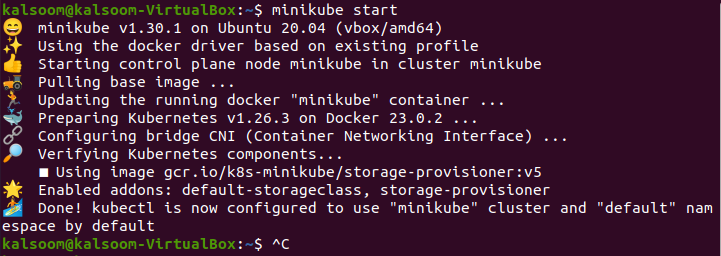
In this step, we need a Kubernetes cluster where we run the kubectl command. So, we start the dashboard which is “minikube”. We run the given command here to create or launch the new minikube cluster in the Kubernetes system:
The result of this command is attached as follows:
Here, we create a new cluster that contains different requirements of the cluster and it is created successfully.
Step 2: Get an Information for the Pod in Kubernetes
In this step, we will learn how we can get all the detailed information of pods in Kubernetes easily by entering the command on the kubectl command line tool. We run the “get pods” command to obtain the list of running pods and their required data:
The output of this command is attached in the following. It is in tabular form as you can see:
Here, we can see that the name of the cluster is “nginx1”, the cluster instance is in a “ready” state, the status is “running”, and it restarts the time and age of the pod.
Step 3: Display an Information about the Pod in a Wide Format
In this step, we will learn how we can get a detailed information by having more columns in a wide range. In this way, we will cover more information in one click. We run the following command in our kubectl to get a wide format or more information:
Run the previous command. The output of this command is attached as a screenshot which helps you in understanding the functionality of this command:
In this command, we only use the “- o wide” extra from the previous command. So, the output is also different that it shows more information about the cluster like IP address, node, nominated node, readiness gates, etc.
Step 4: Retrieve the Cluster Information in JSON Format
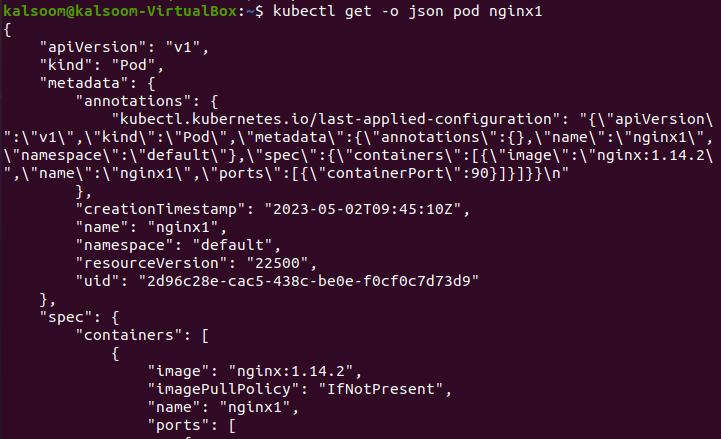
In this step, we will learn that the information of the specific cluster can also be fetched in JSON format which represents the configuration setting of the file. Here, we run the following command to get the JSON format data of the cluster:
In this command, we take the name of the cluster as “nginx1”. Upon the command execution, we display the different information about the Kubernetes cluster. In this file, the metadata, name, namespace, resourceVersion, and other information are visible. The output of this command is attached as a screenshot to make everything clearer:
Step 5: Retrieve an Information about the Services in Cluster Namespaces
In this step, we will learn to retrieve the information about our services in all namespaces of our Kubernetes cluster. Here, we fetch the list of all cluster services and their detailed information against all the namespaces. We run the following written command to get the list of information:
The output screenshot is given here for your help:
This command extracts the information in which the namespace, name, type, cluster-IP, external-IP, and ports are shown in tabular form.
Step 6: Get the List of Namespaces in Kubernetes
Here, we will learn how we can get the list of all namespaces that are present in our Kubernetes cluster. Every namespace in our Kubernetes indicates a separate environment that have different resources. We run the following “get namespace” command that is related to this step:
The output of this command is attached as a screenshot here:
In this output, we can see that four namespaces of the cluster are running at this time. The name, status, and age of these four namespaces are also given in this command result.
Step 7: Get the Pods in the Default Namespace
In this step, we will learn to fetch the list of pods that is in the default namespace. By default, we cannot assign the name of the namespace separately. We just type the default name in the namespace, and it returns the result. We run the following command:
The output of this command is displayed in the attached screenshot:
In this result, you can notice that the pod has default a namespace which is “nginx1”. It fetches the history of this pod in tabular form.
Step 8: Get the Secrets in Kubernetes
In this step, we will learn how we can create, get, or access the secrets of pods in the Kubernetes cluster. We run the following command to get the secrets in the Kubectl command line tool of Kubernetes:
Here, the output shows that the name of this secret is “db-name-pass”, its type is “Opaque”, its data is “2”, and the age of this secret is “5d”. The output is attached here for your reference:
Conclusion
At the end of this article, we can say that the “kubecl get” command is a powerful command through which we can easily get all the detailed information of the pods in the Kubernetes cluster. We can also easily get the secrets of pods with the help of this command. In Kubernetes, we run a different command on the kubectl command line tool which returns the result in a specific format. We properly explained everything with the help of examples and attached screenshots.


