In this article, we are going to describe the syntax of kubectl, actions of different commands, and common instances. We have to create the situation on the container for the procedure to run effectively. The real purpose of using the shell script is to construct the environment according to the requirement and start the core procedure. When using this procedure, shell scripts are assigned PID 1 instead of a method. Therefore, we must operate the exec command to begin the procedure. This is the built-in instruction of the shell script. The exec instruction substitutes the script with the required application. At that time, PID 1 is directed to the procedure. This artifact gives specifics on how to use the kubectl exec command.
Prerequisites:
We must have a Minikube cluster arranged on our system to implement exec commands using kubectl. We want Sudo privileges to be in contact with the system. The implementation of the commands included in this topic utilizes Ubuntu 20.04. We can also use our favored operating system for this execution, and we have kubectl set up on our system. It must be installed before executing the commands.
Technique to Utilize the Kubectl Exec Command:
In this article, we will deliberate using the kubectl exec command.
Start Minikube:
Let’s see how to start the Minikube. To utilize the kubectl exec command, the Minikube cluster must first be installed. We have executed some commands on Ubuntu 20.04. There are two common approaches we can use to launch a terminal. One method is to access the terminal by using the application bar of our operating system. The alternative option is to utilize the shortcut “Ctrl + Alt + T” on the keyboard. Use any of these choices to launch a terminal. First, we need to boot a Minikube cluster formerly installed on the operating system Ubuntu 20.04. Now, we start the Minikube by running the following attached command on the terminal:
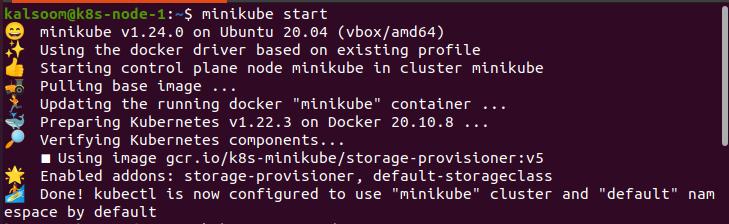
We will have to wait for a while after executing this command, to begin with the Minikube. We may also check the Minikube shown later if the command is implemented correctly.
Get the Pods:
In this step, we want to know about the different pods by using the command “kubectl get pods” and selecting the pods to run by the exec command:
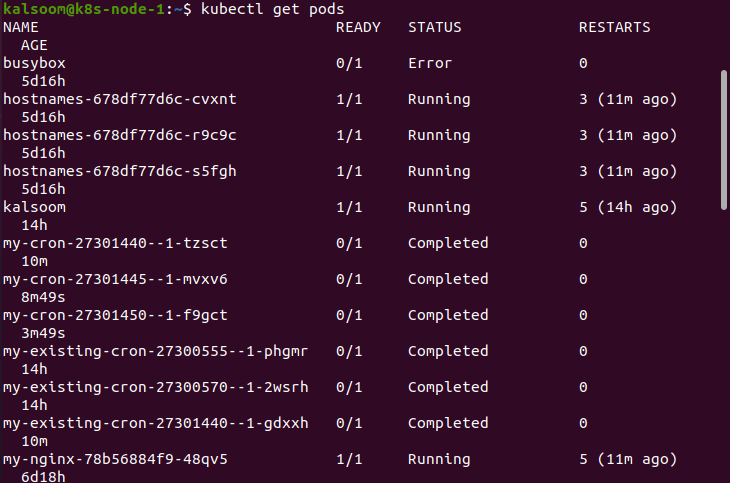
After running the command, we get information about the names, ready state, status, and ages of different pods.
Use Exec Command:
Here, we are using “kubectl exec –it nginx – sh”. We use the shell demo pod where we can run the commands. There are two parameters. We utilize “i” and “t” constraints of the kubectl exec command to present a shell associated with a terminal. For example, utilize the succeeding command. The sh code must be a distinct optional parameter. Additional arguments are different. The kubectl exec could not create a string. The array to be executed is created after the array of parameters:
![]()
Now, we are set to use the shell.
The succeeding commands will support enlisting the root directories:

The output is the same as the output shown in the figure.
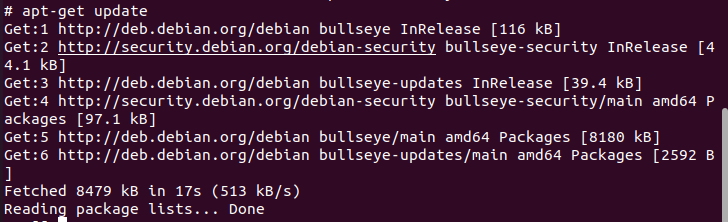
Now, we utilize the “apt-get update” command. We can upgrade the shell by utilizing this command:
Using Kubectl Exec Nginx Command:
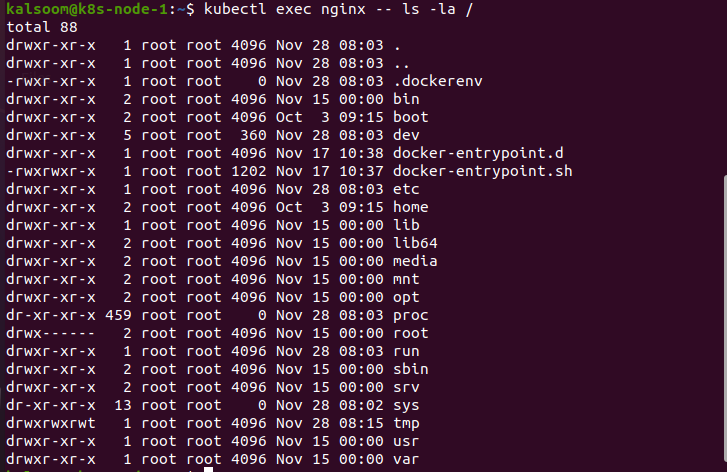
In the end, we execute the “kubectl exec nginx –ls –la /” command. The kubectl exec command executes the command if ls is a particular parameter. There is an nginx container in this instruction. Thus, we want this in the distant shell:
To fix some problems, we may need to access the pods and run different commands identically in the container. We access different containers via the bash shell by utilizing the kubectl exec command.
Conclusion:
Kubernetes is a complex system. However, the fastest and most observable method to define the problems is to execute different commands on the terminal. Fortunately, the kubectl contains a built-in function. And that is the exec command, specifically for this persistence. In this article, we have described in detail how to use the exec command. We can check and debug the application by running commands in the container. We hope you found this article helpful in utilizing the kubectl exec command. Check out Linux Hint for more tips and information.