What is Kubectl Describe Pod?
Kubectl Describe Pod is a command that describes any resource in Kubernetes. It is used to show data on a single or even a collection of resources. This command combines a number of API calls to create a thorough description of a resource or set of resources.
The describe pod command looks for an exact match on TYPE and NAME PREFIX before proceeding. If no such resource exists, it will print information for all resources with the prefix NAME PREFIX. Pods (po), nodes (no), services (svc), events (ev), replicationcontrollers (rc), limitranges (limits), persistentvolumeclaims (pvc), namespaces (ns), persistentvolumes (pv), resourcequotas (quota), endpoints (ep), serviceaccounts, horizontalpodautoscalers (hpa), or secrets are some of the resource types that can be used.
Now, let’s look at how you may use the Kubectl describe pod, and the few prerequisites to meet.
Prerequisite
The Minikube cluster must first be installed before using the kubectl describe pod. We used Ubuntu 20.04 to run certain commands.
To start a terminal, we can take one of two techniques: One option is to use our operating system’s application bar to reach the terminal. Another way is to press the keyboard shortcut “Ctrl + Alt + T”. To start a terminal, select one of these possibilities. First, we must boot a Minikube cluster that was previously deployed on Ubuntu 20.04. Now, we’ll launch Minikube by typing the following command into the terminal:

How to Use Kubectl Describe Pod to Get Information about Pods
Here’s an instance of how you can use the kubectl describe pod command to get relevant information about pods. We will build two pods in this example. Refer below for detailed instructions.
![]()
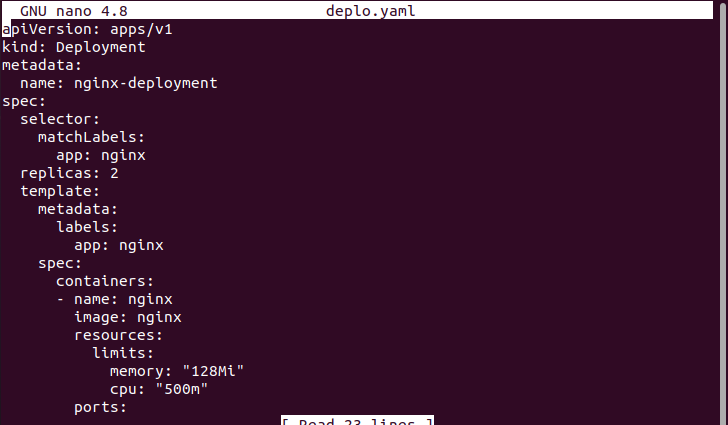
The whole configuration file can be seen below. You can amend it if required.
Run the following ‘create command’ for the purpose of creating a deployment.
![]()
Below is the output screenshot of the above executed command.
![]()
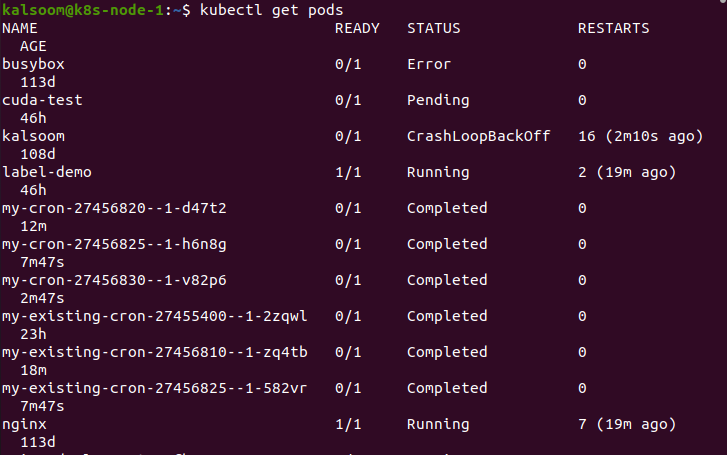
By executing the get pods command, you can check the status of the pod. The depiction can be seen below.
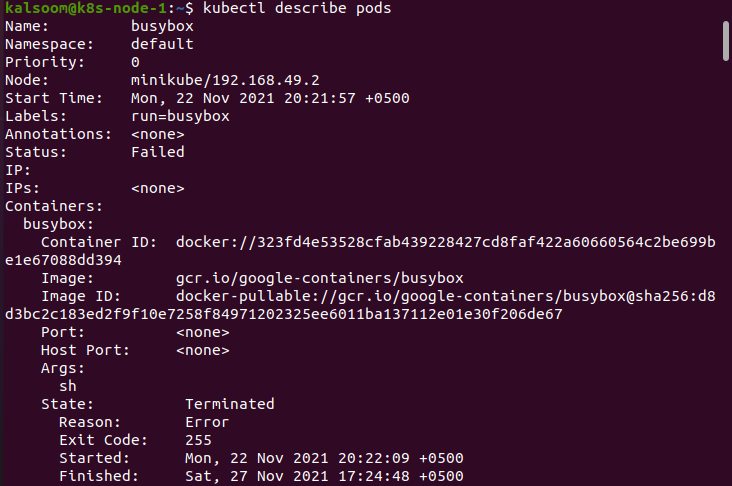
We can learn a lot more about these pods by using kubectl describe pod. Look at the following instance in order to comprehend the concept better. The pod name can be altered as per user choice. However, the remaining command would be the same.
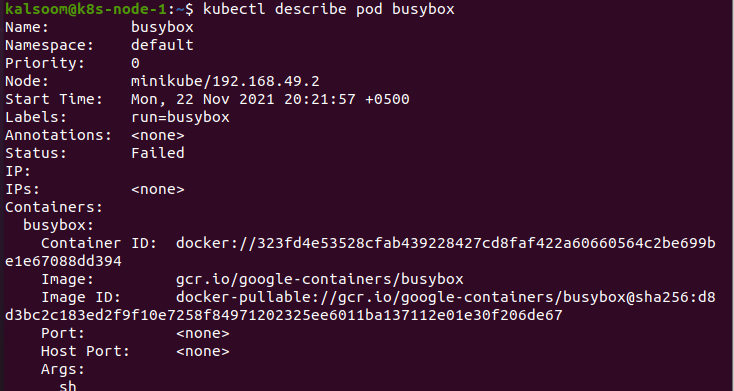
Here, you may see the container(s) and Pod’s configuration information (labels, resource needs, and so on), as well as the container(s) and Pod’s status information (state, readiness, restart count, events, etc.).
Let’s discuss some of the options from the above output in detail:
Waiting, Running, and Terminated
These are the states of the container. Depending on the state, you can get more information — for example, if the container is now in the Running state, the system will tell you when it started.
Ready
It indicates if the container passed its most recent readiness probe. The container doesn’t even have a readiness probe setup in this situation; if there is no readiness probe defined, the container is considered to be ready.
The Restart Count
This option shows how many times the container has already been restarted. This specific information is very helpful for locating crash loops in containers with an ‘always’ restart policy.
The Binary Ready Condition
It is the only option linked with a Pod. It shows that the pod is good enough for serving requests and can easily be added to similar services’ load balancing pools.
Finally, you’ll see a history of recent events involving your Pod. By noting the first or last time it would be seen, as well as the number of times it would be seen, the system compresses many similar events. “From” shows which component or components are logging the event. The “SubobjectPath” option specifies which object or container is being referenced to. Finally, the options “Reason” and “Message” show what actually happened.
How to Debug Pending Pods
You may use events to detect a Pod that won’t fit on any of the nodes. For example, the Pod could possibly request multiple resources than any of the nodes possesses. On the other hand, it could give a label selector that doesn’t necessarily match any nodes. You can use kubectl describe node to get detailed information on nodes, much like you do with Pods.
To understand why the pod isn’t starting, we may run kubectl describe pod on the pending Pod and examine its events.
The scheduler generates an event stating that the Pod is unable to schedule due to FailedScheduling (and may be of others). The message alerts us that no node has sufficient resources to support the Pod.
You can fix this by updating your Deployment using kubectl scale and specifying fewer replicas. (Alternatively, you could leave one Pod pending, which is safe.)
Conclusion
The kubectl describe pods command gives you complete information about each of the Kubernetes infrastructure pods. Run the command kubectl describe pod if you want to see the output from a specific pod. For your convenience, we’ve gone over the kubectl describe pods command in depth in this post.