What Is Kubectl Config?
The “kubectl config” command is used to search the information about specific Kubernetes clusters. The kubectl modifies or changes the Kubernetes config files using this command which is the “kubectl config” command. The kubectl command-line tool accesses the configuration setting and then connects with specific clusters through the Kubernetes API server. Through the kubectl config, we can easily view the logs and manage the kubeconfig file of the cluster that is in YAML format.
In our Kubernetes cluster system, the kubectl command-line tool must be installed or in active state to run this config command easily. You just start the Kubernetes starting server which is minikube and we will help you to learn every step-in detail to access the kubeconfig file of Kubernetes.
Remember that you are a Linux user and Kubernetes is running on the system. You are required to open the command prompt and simply follow the steps sequentially.
Step 1: Launch the Server of the Kubernetes Cluster
First, start the new Kubernetes server whose name is “minikube”. Minikube is essential to make changes in the Kubernetes cluster. Open the Linux terminal and write the following command. This opens the dashboard of the Kubernetes cluster:
The output of this command is attached here which provides you with a better vision of a command. The IP address, port number, and more information about the cluster are installed:

Step 2: Display the Config File Setting
In this step, we will display the configuration file of the present cluster that is created recently. We run the following command in our kubectl command line tool to show the information in the kubeconfig file.
Run the command. The following screenshot is the output after the execution:
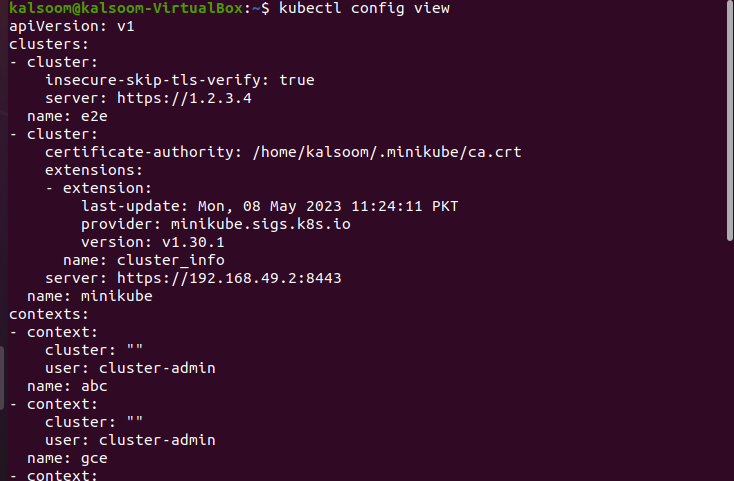
The configuration file which is YAML contains different types of data like the name of the cluster, the user credentials, the namespaces of the cluster, and more content related to the cluster. Read all the content of this YAML file properly to understand the working of the cluster.
Step 3: Extract an Information in a Specific Format
Now, we will learn how to extract the information from the configuration file of the cluster easily in the specific format that we want. We run the following command:
In this command, we take a format or syntax that identifies the Jsonpath expression to extract the required data. In our case, the username is “Kalsoom: which is present in the configuration file. Then, we extract the password against this user easily. In the configuration file, the passwords are always stored in clear plain text for security risk. So, the certificate-base authentications are preferable in a production environment.
Step 4: Display the Current Context of the Kubernetes Cluster
In this step, we will learn how we can get or know the current context of our Kubernetes cluster. In the kubectl command line tool, we run the following command that returns a name of the current context:
After the command execution, the result of the command appears which is “minikube”. A context contains different parameters like cluster names, namespaces, etc. The output is attached in the following:

Step 5: Create a Cluster Entry in the Kubernetes Configuration File
In this step, we want to create or update the cluster entry in our Kubernetes configuration file. We run the following command for this purpose:
When this command is executed, the command takes the name of the cluster which is “e2e”. Along with that is the IP address or the server URL which is “https://1.2.3.4”. With the help of this command, the API server of our Kubernetes is becoming more valid than having all permissions and authorizations. We can easily access the permission as per requirements. The output of this command is attached in the following for your clearance:

Step 6: Define a Path for Authority Certificate of Cluster
In this step, after creating the cluster entry successfully, we assign a path to the file where the authority certificate of our Kubernetes cluster is stored. This file is used further to validate the authenticity of our Kubernetes certificate of the API server. We run the following command to perform this action:
In this command, we use the “- – certificate-authority” flag to define the path of the file. When this command is executed, the result is shown in the following attached screenshot:

Step 7: Disable the TLS Certificate Verification
Here, we run the command which in return disables our TLS certificate verification that is used to connect with the Kubernetes cluster. We run the following command on kubectl that contains different flags:
The “- -insecure-skip-tls-verify” flag is used here to verify the “tls” certificate of our Kubernetes cluster name, “e2e”. We assign the flag with a true value. This command returns a cluster entry that is modified.

This action is only suitable for testing purposes rather than the production environment.
Step 8: Modify the Kubernetes Cluster Entry Name and Username
Here, we will learn how we can modify the entry name in the configuration file of our cluster. We run the following mentioned command by defining the modified names:
In this command, we give the cluster with an entry name, “abc”, to set the context name. The username of this context is “cluster-admin”. With this command, a new context is created successfully. You can also see the screenshot here:

Step 9: Set the Credentials for the New Context
We create the credentials again in the Kubernetes configuration file to access the different information. So, we run the following command by providing the name, username, and key path of the cluster:
The cluster entry is created successfully as shown in the following screenshot:

Step 10: Set the Authentication Credentials of the Cluster
In this step, we set the password against our new username for more security. So, we run the following command:
In this command, we pass the name of the cluster and the password that we want to assign to our new cluster. Here, our cluster name is “cluster-admin”, the username is “admin1”, and the password is “uXFGgdsurfye”. Here is the output:

Conclusion
We discussed about the kubectl config command. Here, we conclude that we can easily add or modify the changes in the configuration file of Kubernetes. We learned the different methods through which we make our cluster more secure and authenticated. We explained every step with the help of examples and screenshots.