What Is Kubectl Attach Command?
The “kubectl attach” command gives us the facility to allow different users to attach to the running cluster of Kubernetes and perform interactive tasks. When the user attaches to the Kubernetes cluster by running this command, the user has access to its input and expected output. Real-time interaction and troubleshooting are easily performed with the help of this command. When troubleshooting and error debugging issues appear in running the Kubernetes cluster, the developers run this command to resolve the issue.
Make sure that you are using the Linux operating system that has a grip on commands. We first start our Windows terminal on which we install the kubectl command line tool in our Kubernetes system if it already exists.
After that, we open the terminal again. Then, we run the minikube command to create a new cluster of Kubernetes that manages our different operations. Let’s discuss this article in detail with proper syntax for your help.
Start 1: Launch a Minikube Kubernetes Dashboard
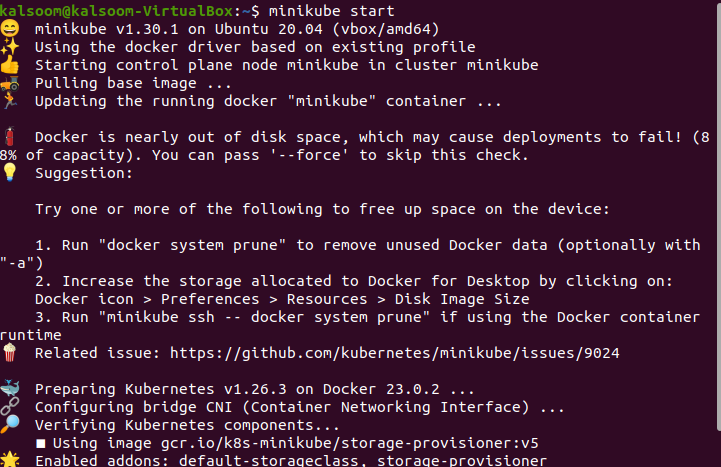
At the very start, launch or create a minikube Kubernetes cluster by running the following command. The minikube is a dashboard of the cluster that is essential to perform the actions within the container. Here is the command to get started:
The output of this command is attached in the following as a screenshot. When this command is executed, the minikube cluster is created and starts processing:
Step 2: Fetch the Pod List in the Kubernetes Cluster
In this step, we will acquire the method to get the list of all pods to show the running pods. We use the following instructions to fetch the list of pods:
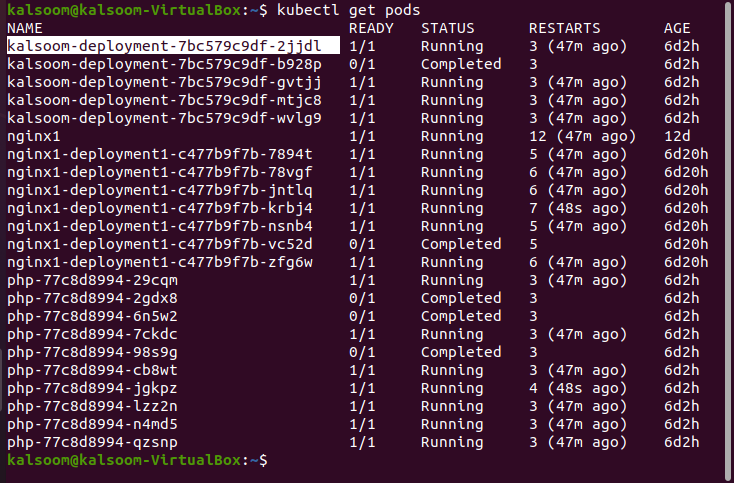
After the command is executed, the output of this command is attached in the previous screenshot to explain the functionalities of this command. In return, we see the name of the pods, ready status, how much is in “ready” or “not ready” status, the Restarts timing, and the age of the pod.
Here, we see that the status of pods are completed or running. The “completed” status means that the pod completes its processing and its required actions are completed and are no longer needed. The “running” status means that the process is in working and does not perform the required task fully.
Step 3: Describe the Configuration Setting of the Specific Pod
In this step, we will discuss how we can see or fetch the details of the configuration file of the pod. We run the command on the kubectl command line tool that is specially designed to describe the pods.
Run the given command. When it is executed, the output of this command is displayed on the terminal which is attached as a screenshot:
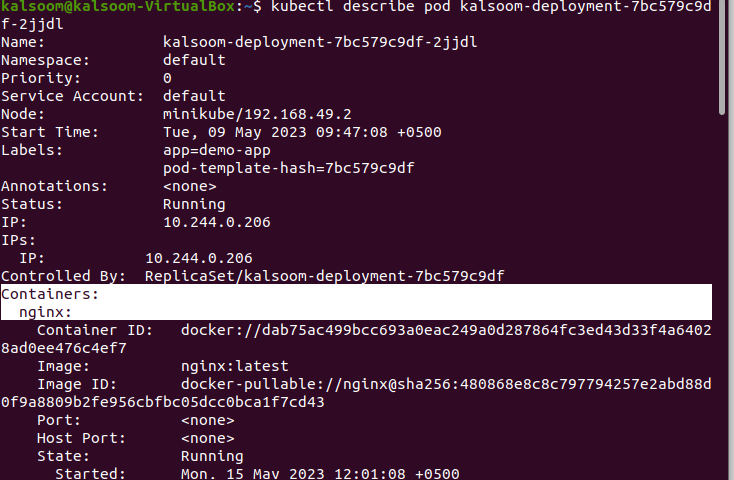
In the command, we want to fetch a description of the pod whose name is “kalsoom-deployment-7bc579c9df-2jjdl”. This file contains a detailed data about the pod that has a container whose name is “nginx”. Except for all this information, it also contains the namespace, priority, service account, node, start time, labels of pods, the annotation that is applied on the pod, status of the pod, IP address of the pod, controller image of the container, and port information of specific pod. Verify all information that are present in the attached screenshot.
Step 4: Attach the Container with a Specific Pod
In this command, we attach our pod to the container. We run the following instruction using the kubectl command-line tool through which we connect the container inside the pod and perform our tasks by running the command on the terminal:
Run the command until the command execution is completed and generate the following output:

In this command, we want to attach the pod name “kalsoom-deployment-7bc579c9df-2jjdl” with a container that runs at this time. Here, the command supposes that the pod is present in the default namespace. For attaching, the pod must be one container that runs in our Kubernetes. The output of this command is attached in the previous screenshot and verifies all information.
Step 5: Attach a Specific Pod with Specific Container in Kubernetes
In this command, we will show you how we can attach our running specific one pod with the container that is present in our Kubernetes cluster. We run the following command that is given here and attach the required container:

In this command, we take a container named “nginx” with the help of using the “-c” flag. The “c” flag is used to indicate the name of the Kubernetes container that we want to attach to the pod.
Step 6: Establish an Interactive Session to Attach the Pod to the Container
In this step, we attach the container with the pod to our Kubernetes cluster. Along with this, we create an interactive session. We run the command on the kubectl command tool to interact with the container terminal.
When this command is executed, the output of this command will be visible on our terminal.
![]()
In this command, we take the pod name “kalsoom-deployment-7bc579c9df-sjjdi” and the container name is “nginx”. We use two flags in this command – “- i” and “- t”. The “- i” flag is used to indicate or enable the interaction between pods and containers. The “- t” flag is used to engage the terminal processing for this interactive session.
Conclusion
At the end of this article, we can say that the pods can be attached to the containers easily in Kubernetes using the kubectl command line tool. Always make sure that the pot and specified container must be running. We only attached the pod with the container only in case that the container has an attached terminal. We explained every step in detail with proper command output screenshots. You can also follow all the provided steps to attach the pod to the container according to your Kubernetes cluster setting.