What Is Kubectl Annotate in Kubernetes?
This kubectl annotate command is used to insert or edit the annotations for the objects or instances of Kubernetes. Annotations are very helpful and are used to store as well as lead the metadata that is related to Kubernetes objects. Annotations are used to validate the attaching of metadata that is external to our Kubernetes cluster. These are key values that contain arbitrary strings input like the JSON format. Here, the Kubernetes cluster uses annotations to store their long data and information. For example, if we want to store the qualification of any employee, we store this information in Kubernetes annotation.
When we run this command on kubectl, the different types of objects that exist in our Kubernetes cluster are visible. After that, we can easily insert and update the information of our objects easily through this command. This command returns the annotations for the designated objects or instances of the Kubernetes cluster. This command helps you to make changes in Kubernetes object information and store huge amounts of information easily and effectively.
This command is only usable and is important if and only if our Kubernetes cluster and kubectl server are running. To fetch the accurate result of a command, the format of this command must be correct. Let’s start the step on how we can annotate our objects easily in Kubernetes just by following the mentioned steps.
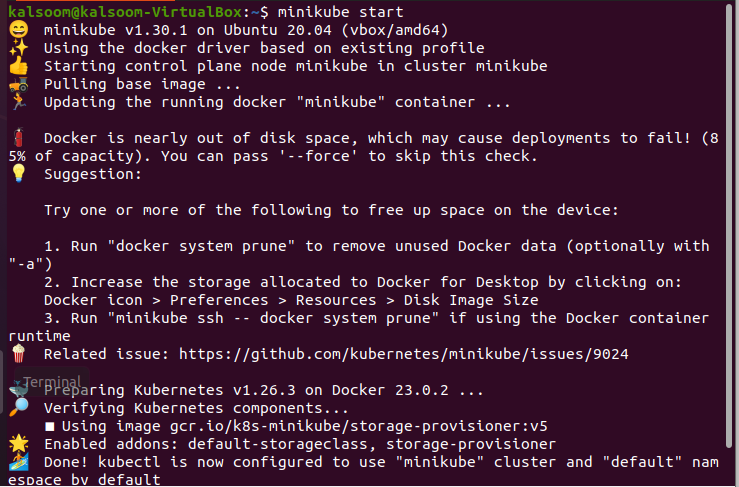
Step 1: Launch the Minikube Cluster
First, it is important to start the Kubernetes cluster in our system. The Minikube server is easily started in the system by running the command that is written as follows:
When the command is executed, the Minikube Kubernetes cluster is turned on and starts running. This command provides us with a small container in which we can easily perform our desired actions. The output of this command is given in the following screenshot:
Step 2: Retrieve the List of Pods
To make changes in our objects, we need to get the list of all the running pods in our Kubernetes cluster with their duration of existence. Since our cluster is running start, we can easily get the list of pods by entering the following command in the kubectl prompt:
The result is attached in the following that appears after running the “get pods” command:
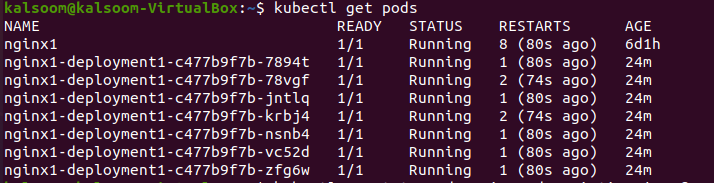
This command gets the basic information of pods like name, status, ready state, restart duration, and age of the pods. So, using this command, we get the list of all pods that are running to perform annotation on the desired pod.
Step 3: Add the Description Annotations to the Pod
In this step, we will try to learn how we can add an annotation to the Kubernetes objects. The pods, services, and deployments include Kubernetes objects. We can see in the previous step that the “nginx1” pod is present in our fetching list of pods. Now, we can add an annotation in this pod that is a description of the pod. We run the following command to insert the annotations:
In the provided command, “ngnix1” is the pod and the description of the pod is “my frontend”. When this command is run, the pod is annotated successfully and the description is added. The output is attached here as a screenshot for your better understanding:

Step 4: Update the Pod Description
Here, we will learn the method through which we can easily update or modify the description of the pod that is running. We run the following command to update the description if we want to change the description. We use the “- – overwrite” flag to update the description of the “nginx1” pod with the existing one.
The result of this command is also attached as a screenshot. You can see that the description of the pod is updated:

Now, the description of this pod is “my frontend running nginx” which is annotated.
Step 5: Annotate the Description of All Running Pods
In this step, we will add or modify the description of our all running pods in the Kubernetes cluster. We apply this annotation on all pods using the “- – all” flag in our command that is used on the kubectl command line tool. The command is given as follows:
The output of this command is shown in the following screenshot:
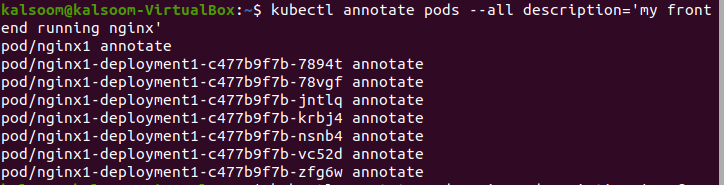
We can see that the description of all the pod that is running is “my frontend running nginx” which are annotated.
Step 6: Add Annotation for Specific Resource Version of the Pod
In this step, we will learn the annotation that adds or modifies the description of a pod that has a specific resource version. We run the command that is mentioned in the following:
In this command, we want to add the “my frontend running ngnix” description to the “nginx1” pod whose resource version must be “1”. When we run the command, the output is shown as you can see in the following screenshot:

It gives an error on the pod that is modified already because its resource version is up on every update. Now, our pod is updated.
Step 7: Modify the Pod Description
In this step, we add or modify the description of “ngnix1” pod by entering the following command:
Here is the output in which you can see that the command is successfully executed:

Conclusion
We provided an information that annotations are a powerful concept that we can use to easily add or modify the data of our Kubernetes objects. The annotation command runs on the kubectl command line tool. In this article, we learned about the different ways to add or modify the description of our pod. We explained this article with the help of proper examples and screenshots.