In this article, I am going to show you how to install and configure TFTP server on CentOS 7. So, let’s get started.
Installing and Configuring TFTP Server:
First, update the YUM package repository cache with the following command:
Now, install TFTP server and client packages with the following command:
NOTE: The TFTP client package tftp is installed to test the TFTP server after configuration.
Now, press y and then press <Enter> to continue.
TFTP client and server packages should be installed.
TFTP uses systemd by default. But, it’s not a good idea to modify the default systemd service files. So, I am going to copy the systemd service files of tftp server to /etc/systemd/system directory just to be safe.
To copy the default tftp.service file to /etc/systemd/system directory, run the following command:
The new tftp service file is called tftp-server.service which we can modify as much as we want.
Also copy the tftp.socket file to /etc/systemd/system directory with the following command:
The new socket file is tftp-server.socket which we can work on.
Now, open the tftp-server.service file for editing with the following command:
tftp-server.service file should be opened. Now, you have to modify the lines as marked in the screenshot below.
I replaced tftp.socket with tftp-server.socket. I also changed the command (ExecStart) that starts the TFTP daemon. The -c TFTP option will let you upload files to the server, the -p option will solve many of the permission issues, and the -s option sets /var/lib/tftpboot as the directory which you can access via TFTP.
Also add WantedBy=multi-user.target in the [Install] section as marked in the screenshot below.
This is the final tftp-server.socket file. Now, save the file.
Now, open the tftp-server.socket file for editing with the following command:
Now, add BindIPv6Only=both line in the [Socket] section as marked in the screenshot below and save the file.
In order to enable anonymous upload to the TFTP server, you need to do some SELinux configuration.
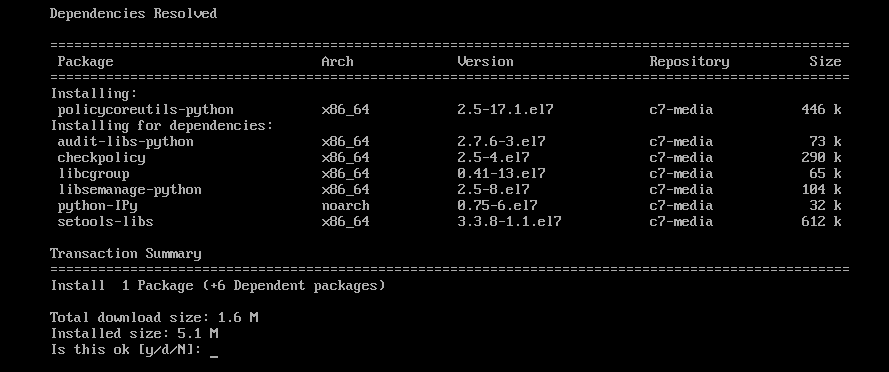
For SELinux configuration, install the policycoreutils-python package with the following command:
Now, press y and then press <Enter> to continue.
policycoreutils-python package should be installed.
Now, enable SELinux TFTP anonymous write with the following command:
The TFTP directory is /var/lib/tftpboot. It needs to have read, write and executable permission for the directory owner, group and others in order for TFTP upload and download to work. Otherwise, you will get permission error.
You can assign the required directory permissions to the /var/lib/tftpboot directory with the following command:
Now, try to start the tftp-server service with the following command:
Now, check whether the tftp-server service is running with the following command:
As you can see, the service is active or running. So, TFTP should be configured correctly.
Now that TFTP service is running, we have to test the TFTP server to see whether it works or not.
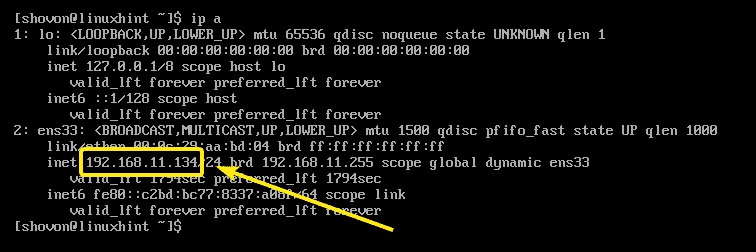
First, run the following command to find the IP address of your TFTP server.
As you can see, the IP address is 192.168.11.134. It will be different for you. So, make sure to replace it with yours from now on.
Now, connect to the TFTP server with the following command:
You should be connected.
Now, enable verbose mode as follows:
Now, try to upload a file (let’s say hello.txt) to the TFTP server as follows:
As you can see, the file is successfully uploaded to the TFTP server.
Now, exit out of the TFTP command prompt.
Now that everything is working correctly, add the tftp-server service to the system startup with the following command:
Now, configure firewalld firewall program to allow TFTP requests to the server with the following command:
Now, reload firewalld for the changes to take effect with the following command:
TFTP server should be configured.
Known Issues:
When you try to upload files to the TFTP server from your computer, you may see Transfer timed out error as marked in the screenshot below. This is a known issue on CentOS and RHEL systems. TFTP uses UDP port to communicate and for some reason the client firewall blocks it. This is the reason for this error.
To fix the problem, disable firewall on the client and try to upload the file again. It should work as you can see in the screenshot below.
So, that’s how you install and configure TFTP server on CentOS 7. Thanks for reading this article.


