C# has a feature “DataTable” that allows us to store data in the database in the form of rows and columns. It is present in the C# “ADO.NET” package class and enables the grid representation of the data. Using the data binding concepts the data can be bound in both the data table and data grind view in the same way. DataTable objects are case sensitive so we should be careful while using these objects as it can cause errors in the program.
How “DataTable” Works in C# – Examples
“DataTable” allows to store and retrieve data tables. Users can bind data in the grid view form using “DataTable”. Data tables are more useful when users have a lot of data to store. They can add and delete data in the “DataTable”. It has different properties, such as Primary key, Rows, Data set, Default values, and Constraints.
The general syntax is as follows:
using System.Data;
Public class classname {
DataTable objectname = new DataTable();
objectname.Columns.Add(name, type);
objectname.Rows.Add(data);
//then display the data in the main method
}
Now, let’s understand the “DataTable” concept with the help of a given example:
using System.Data;
public class Student_data {
public static void Main() {
DataTable student = new DataTable();
student.Columns.Add("Reg_no", typeof (int));
student.Columns.Add("Name", typeof (string));
student.Columns.Add("CGPA", typeof (double));
student.Rows.Add(101, "Sarah", 3.0);
student.Rows.Add(102, "Laura", 2.8);
student.Rows.Add(103, "Emma", 2.5);
student.Rows.Add(104, "Alex", 3.4);
student.Rows.Add(105, "Thomas", 3.5);
student.Rows.Add(106, "Harry", 2.9);
student.Rows.Add(107, "Marie", 2.0);
student.Rows.Add(108, "Chloe", 2.2);
student.Rows.Add(109, "Emily", 3.6);
student.Rows.Add(110, "Anna", 3.1);
student.Rows.Add(111, "Julie", 3.9);
student.Rows.Add(112, "Hannah", 2.9);
student.Rows.Add(113, "Paul", 2.7);
student.Rows.Add(114, "Jones", 2.1);
student.Rows.Add(115, "James", 2.6);
foreach(DataRow r in student.Rows) {
Console.WriteLine("Registration no : {0}\t Name : {1} \t CGPA: {2} \t ", r[0], r[1], r[2]);
}
}
}
According to the above-provided code:
- We want to store the data of students, for this purpose, we have created a class “Student_data” and used the library “System.Data” to create the object of “DataTable” in this class.
- Then, the “DataTable” object is created named “student” that will use to store data in the table.
- Next, we created three columns, such as “Reg_no”, “Name” and “CGPA” using the “student” object.
- Afterward, rows are added along with the data that we want to store in the table. For that purpose, we have used the “student” object for adding the rows.
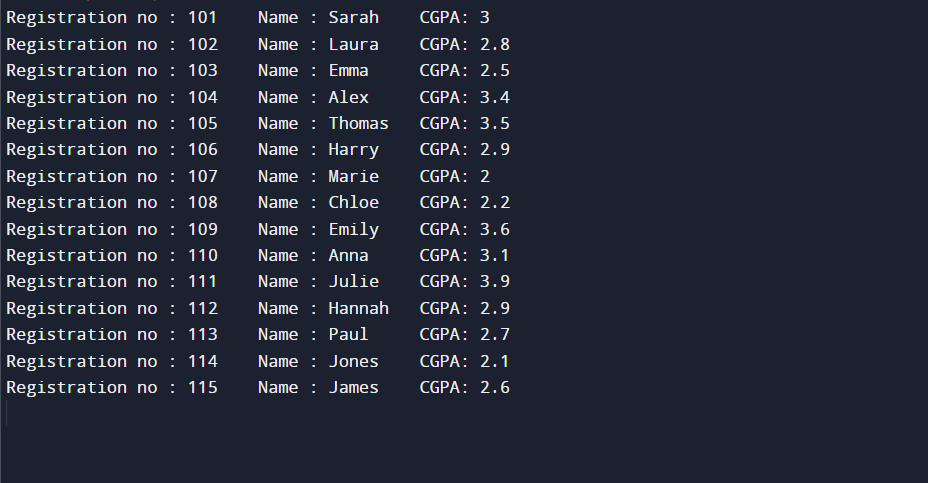
- Lastly, use the “for each” loop, and call the “Console.WriteLine()” method to display all the added data on the console.
As can be seen, all the store data has been displayed successfully:
We can also delete data or columns from the created table. To do so, follow the provided code:
using System.Data;
public class Student_data {
public static void Main() {
DataTable student = new DataTable();
student.Columns.Add("Reg_no", typeof (int));
student.Columns.Add("Name", typeof (string));
student.Columns.Add("CGPA", typeof (double));
student.Rows.Add(101, "Sarah", 3.0);
student.Rows.Add(102, "Laura", 2.8);
student.Rows.Add(103, "Emma", 2.5);
student.Rows.Add(104, "Alex", 3.4);
student.Rows.Add(105, "Thomas", 3.5);
student.Rows.Add(106, "Harry", 2.9);
student.Rows.Add(107, "Marie", 2.0);
student.Rows.Add(108, "Chloe", 2.2);
student.Rows.Add(109, "Emily", 3.6);
student.Rows.Add(110, "Anna", 3.1);
student.Rows.Add(111, "Julie", 3.9);
student.Rows.Add(112, "Hannah", 2.9);
student.Rows.Add(113, "Paul", 2.7);
student.Rows.Add(114, "Jones", 2.1);
student.Rows.Add(115, "James", 2.6);
Console.WriteLine("--------------------DATA--------------------");
foreach(DataRow r in student.Rows) {
Console.WriteLine("Registration no : {0}\t Name : {1} \t CGPA: {2} \t ", r[0], r[1], r[2]);
}
Console.WriteLine("-------------DATA AFTER DELETING A ROW-------------");
for (int i = student.Rows.Count - 1; i >= 0; i--) {
DataRow r = student.Rows[i];
if (r["Name"] == "James")
r.Delete();
}
student.AcceptChanges();
foreach(DataRow r in student.Rows) {
Console.WriteLine("Registration no : {0}\t Name : {1} \t CGPA: {2} \t ", r[0], r[1], r[2]);
}
}
}
Here, we have used the previously described example DataTable, the difference is:
- First, we have shown the initially added data.
- Then, we deleted a row from the table.
- Lastly, view the data on the console after the deletion of a particular row.
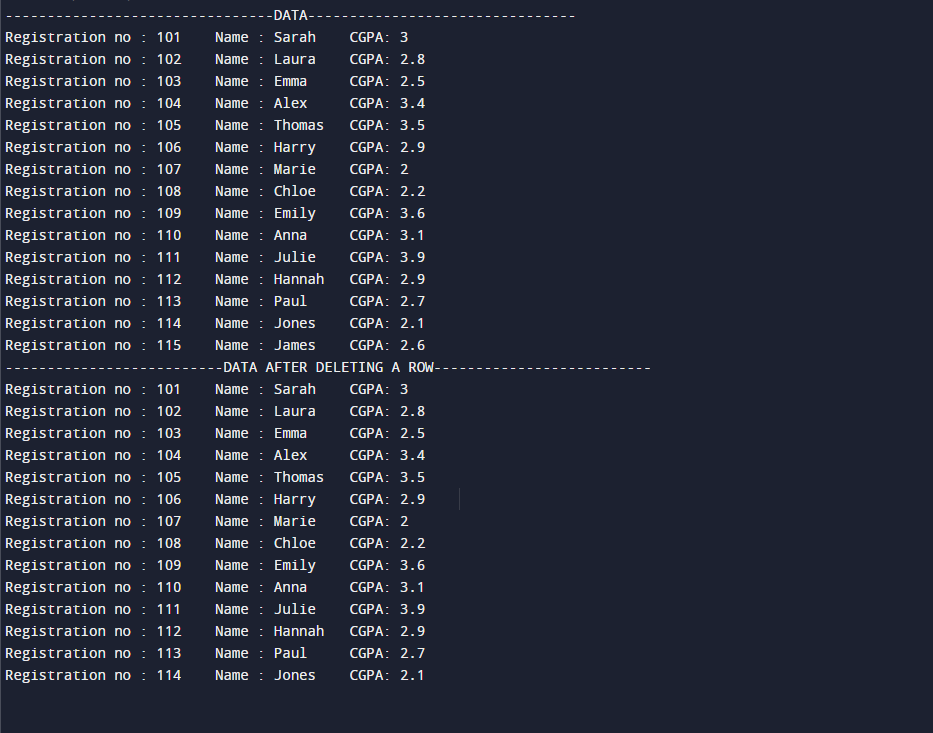
According to the following output:
- The initial data can be seen under the “DATA”.
- Then, we can see there is no data for Registration no “115” with the Name “James” which indicates the data has been deleted successfully:
That’s all! We have elaborated on “DataTable” and its working in C#.
Conclusion
In C#, the “DataTable” can be accessed using “System.Data” and permits users to store data in the form of a table. Users can add, and delete columns as well as rows from the table and can access data of a specific column or row. The data table represents the grid view of data that is useful when users want to store a lot of data. This blog described the working of the DataTable in C#.