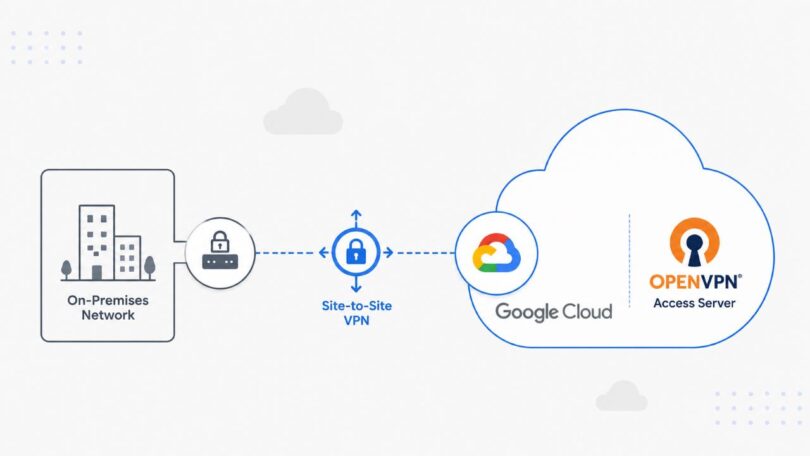
What is a Site-to-Site Business VPN? First, you need to understand what a VPN is. VPN stands for Virtual Private Network and as the name represents, it creates a secure private tunnel between a machine i.e. a laptop and the server. A site-to-site business VPN is where instead of a machine, a tunnel is created between two networks (such as Office LAN and Cloud VPC) using gateways so they can communicate back and forth. Let’s say a company has resources on Google Cloud or GCP and they want all their employees to securely access them through their LAN, so what they will do is create a Site-to-Site Business VPN connection that will form a secure tunnel between the company’s LAN and GCP which will prevent the traffic directly going through the internet (which is public and vulnerable) and instead send that traffic through a secure, private and encrypted tunnel. Just to clarify that it will still ride on the public internet but traffic between both networks goes through the tunnel that ensures security. All devices on the company’s network can send traffic to GCP and GCP can send traffic back to the devices. This can be done by deploying OpenVPN Access Server from GCP Marketplace.
We will use our Linux machine on our local network as our LAN gateway and a VPC on Google Cloud. This setup will cover everything step by step without missing any important configuration.
Table of Contents
- Prerequisite
- Google Cloud (GCP) Site-to-Site Business VPN with OpenVPN Access Server
- Step 1: Create a VPC in Google Cloud
- Step 2: Deploy OpenVPN Access Server From Google Cloud Marketplace
- Step 3: Access the OpenVPN Access Server
- Step 4: Configure OpenVPN Access Server for Site-to-Site Routing
- Step 5: Create and Download the OpenVPN Connection Profile
- Step 6: Configure Local Linux Gateway Machine
- Step 7: Verify the OpenVPN Tunnel Interface and Routes
- Step 8: Enable IP Forwarding on Local Linux Gateway
- Step 9: Configure NAT and Forwarding Rules on the Local Linux Gateway
- Step 10: Create a Static Route in Google Cloud Back to the Local LAN
- Step 11: Create a Firewall Rule to Allow Local LAN Traffic into GCP
- Step 12: Create a Test VM Inside the GCP VPC
- Step 13: Test the Site-to-Site VPN Connectivity
- Production Notes
- Conclusion
Prerequisite
Before we start working on our setup, you must have a Google Cloud account with billing enabled. Without billing enabled you won’t be able to work on this. OpenVPN allows 2 connections absolutely free so you won’t be charged until you shift to a higher plan. For this example, we’ll stick to 2 connections. We have enabled billing.
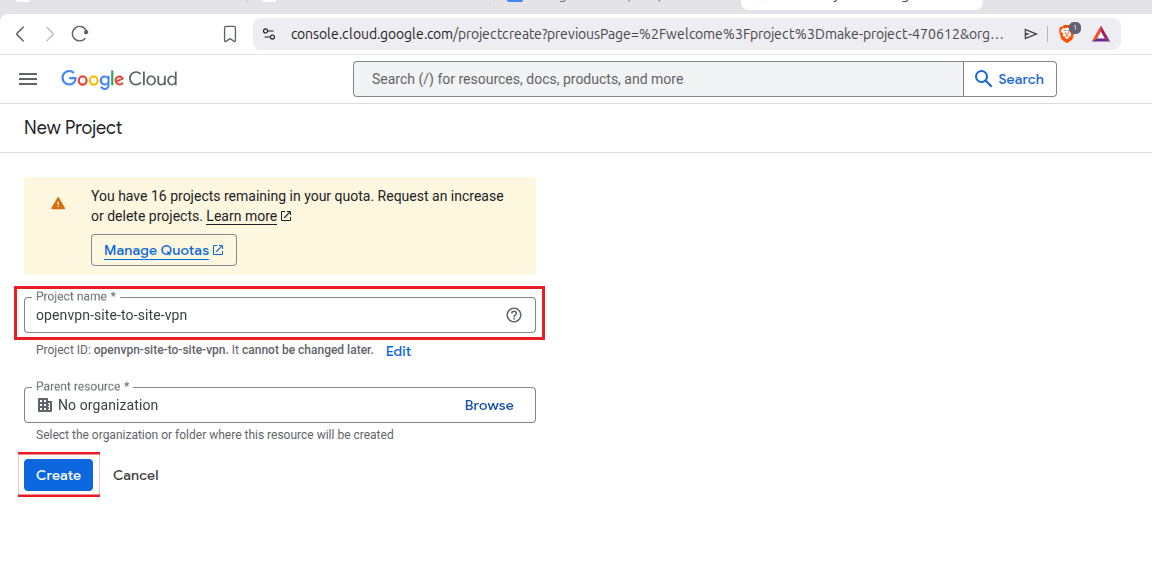
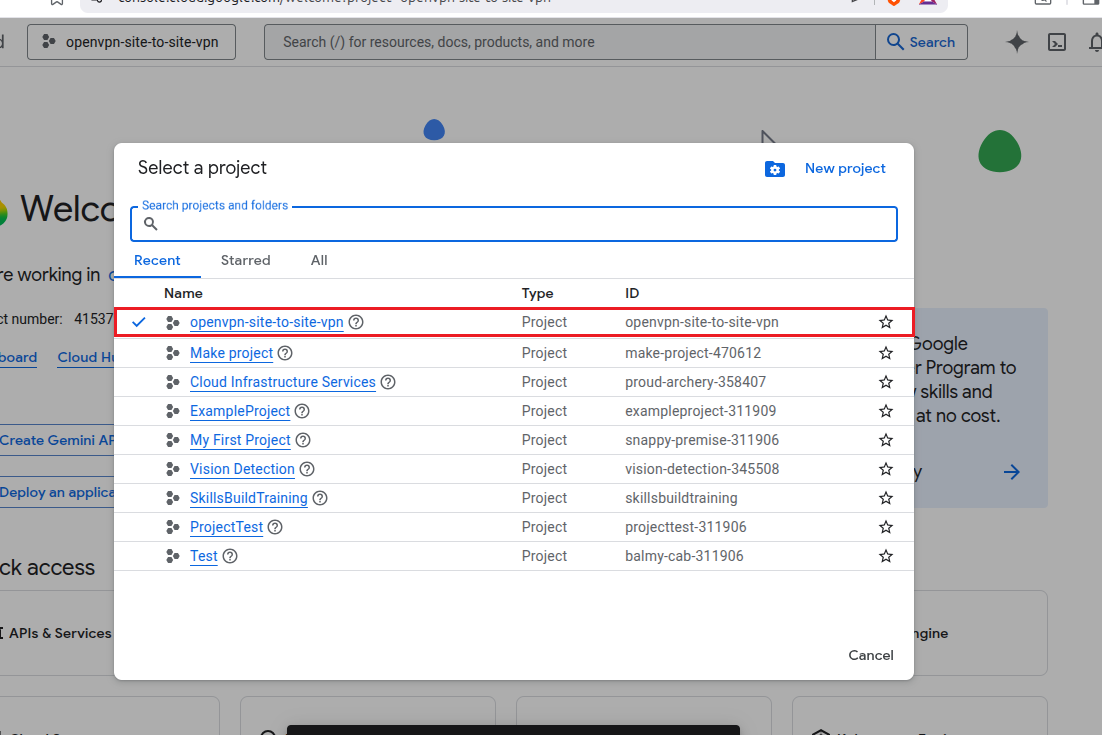
Also, you need to create a new project for this so your current cloud resources are separated and stay off limits. We have also created a new project.
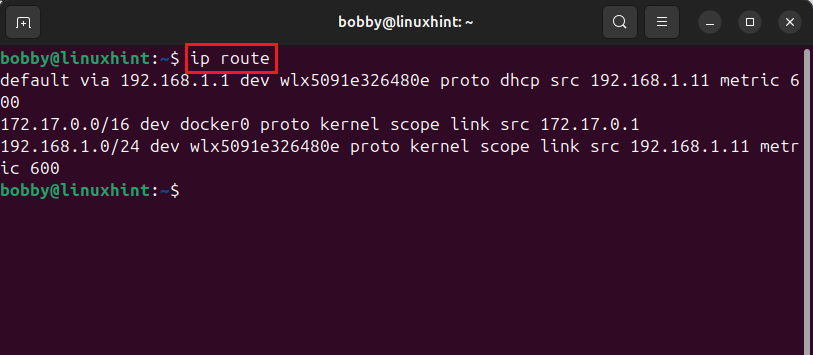
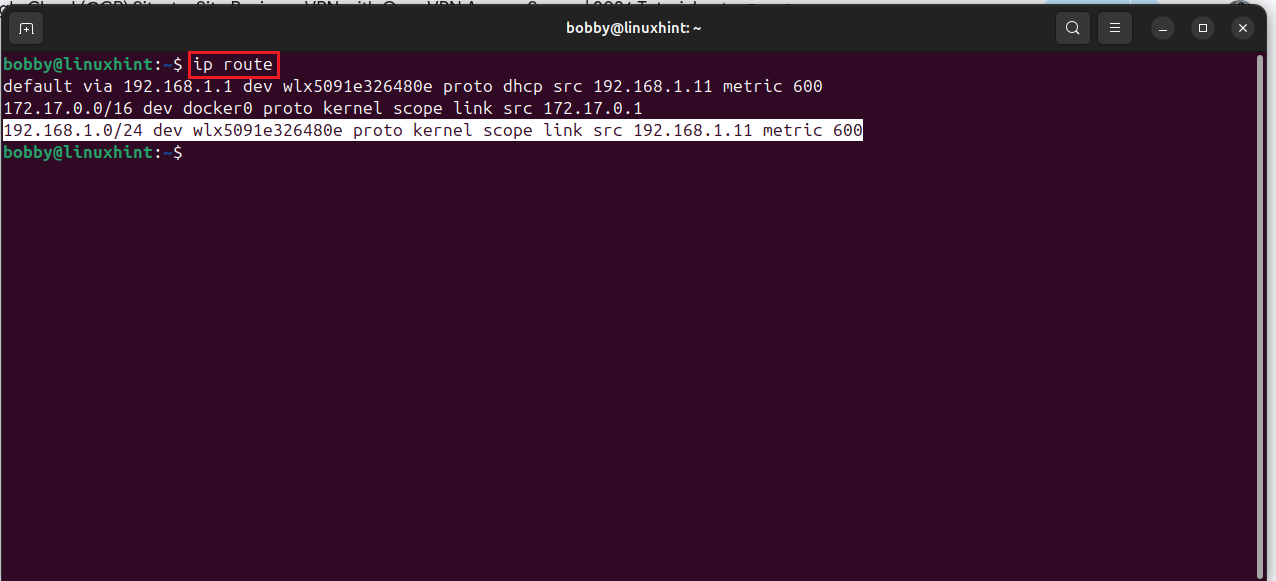
You also need a Linux machine which will work as a gateway on your LAN so all devices on your LAN can communicate with GCP resources. Just ensure that the LAN subnet and Google Cloud subnet ranges must not overlap in any case because if they do, it all won’t work. For this tutorial, I am picking 10.20.0.0/24 as GCP’s subnet range and 192.168.1.0/24 for LAN’s subnet range. Keep that in mind, it’s important. To check your subnet on your Linux machine, use this command:
You also need to have Compute Engine API enabled so that you can create a custom VPC network and so that OpenVPN Access Server could run. Without that, it won’t run on Google Compute Engine VM.
Google Cloud (GCP) Site-to-Site Business VPN with OpenVPN Access Server
Step 1: Create a VPC in Google Cloud
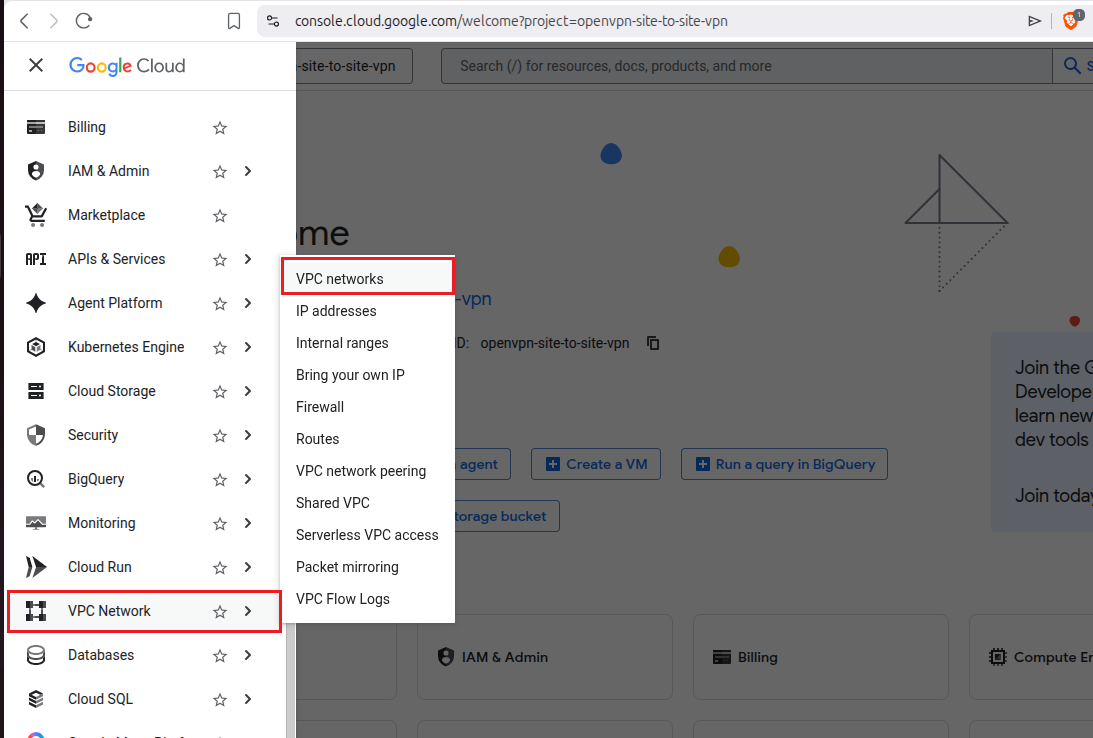
First off, go to your Google Cloud Console and in the left menu of the dashboard look for the VPC Network option and then hover over it and you’d see another list from where you need to click on VPC networks.
If you haven’t yet enabled Google Compute Engine API then it will prompt you here before moving any further. Just enable it here.

On your dashboard you will see a Create VPC Network button or option. You need to go ahead and click on that:
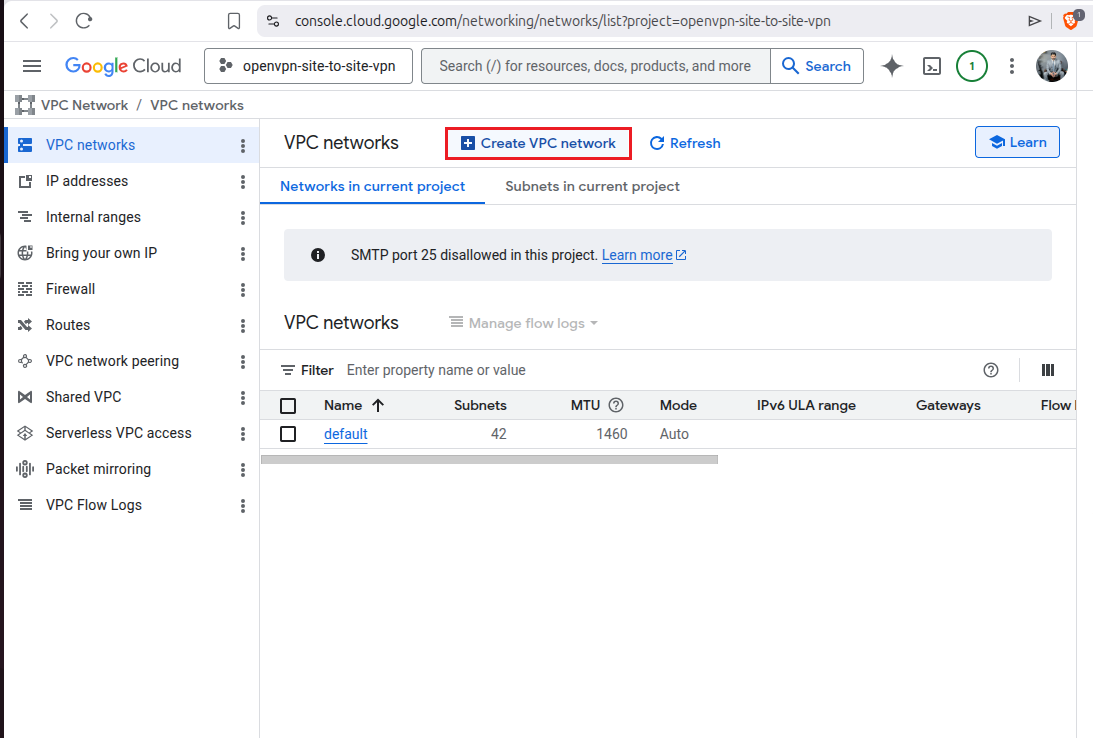
You can see in the above screenshot that we only have 1 default VPC right now, this list will be updated and have one more VPC after we are done with this step.
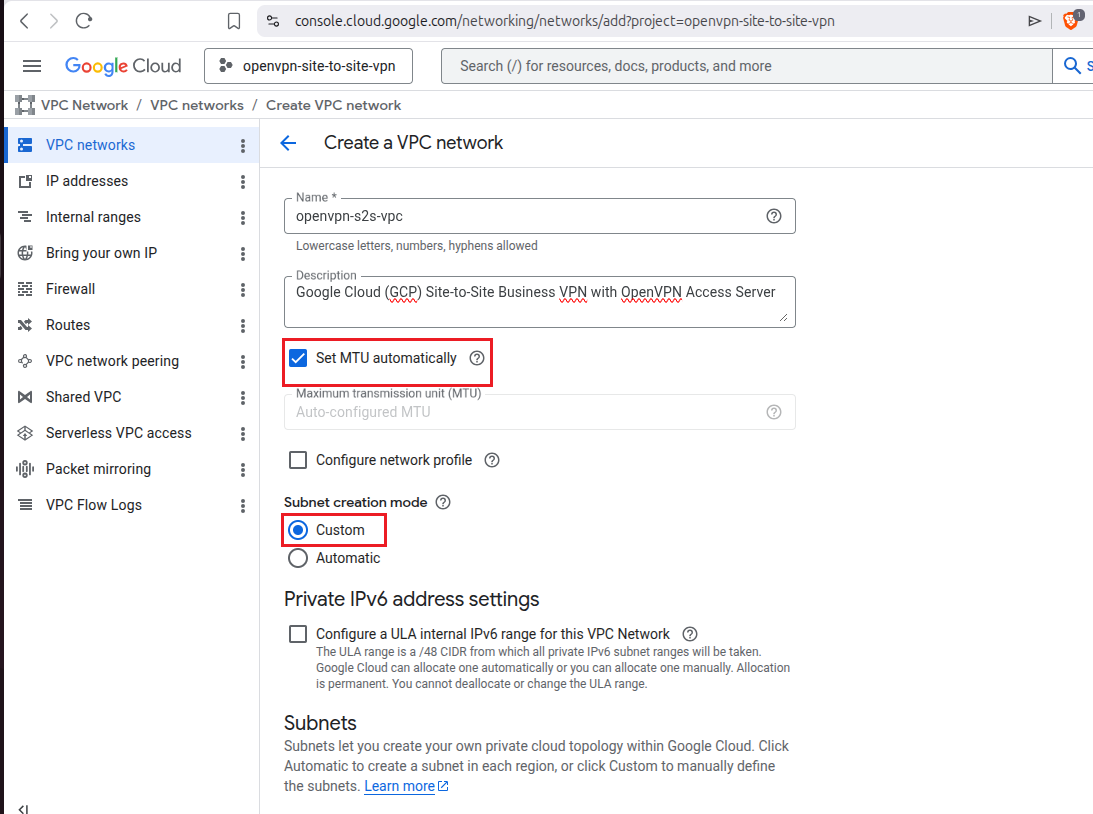
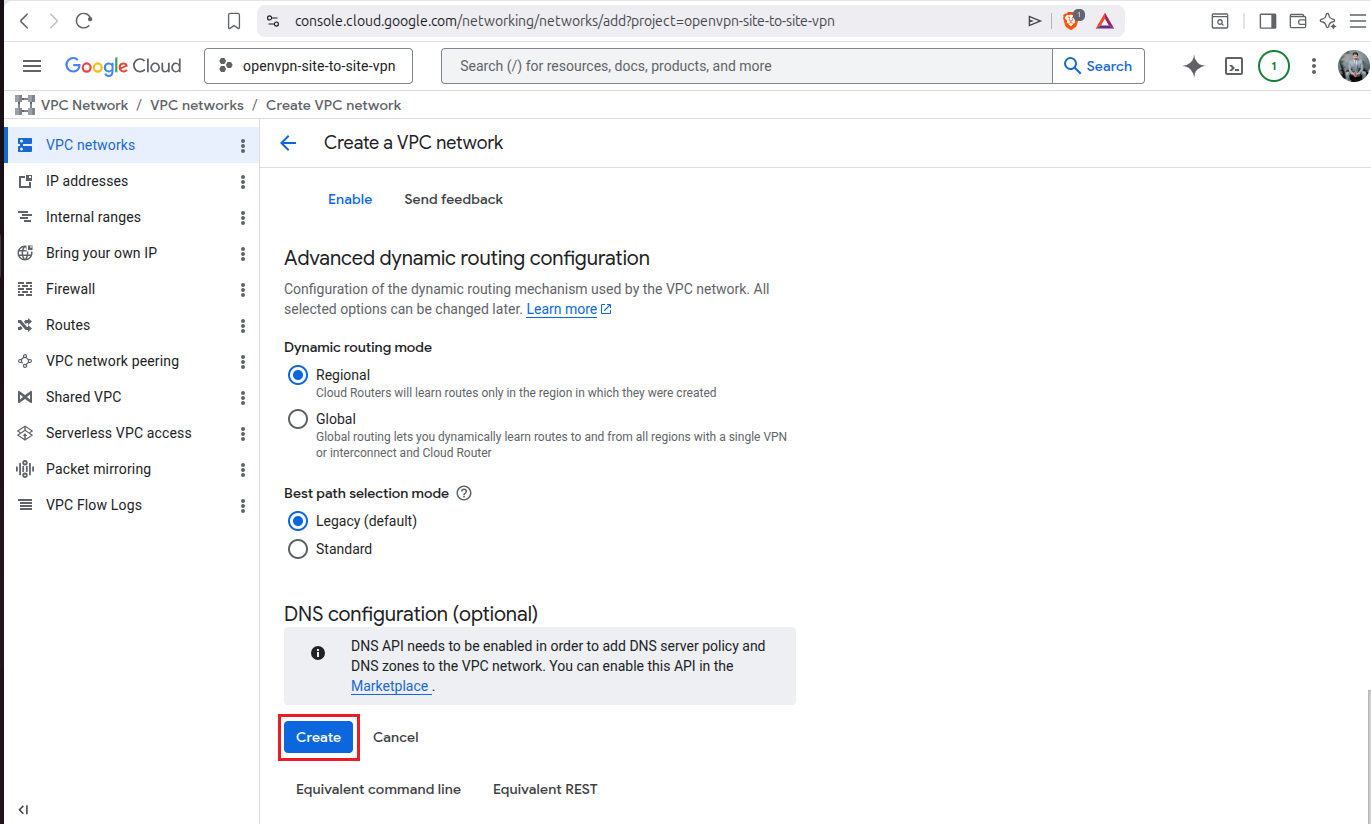
Now you will have an entire form in which you need to fill up fields to make your VPC a custom VPC. I have added in the name openvpn-s2s-vpc, added a little description and then I’ve kept the option set MTU automatically checked which is a safe option as that’s okay for now for our site-to-site VPN setup and custom MTU setup could cause connection issues and hence packet fragmentation. Lets keep this set MTU automatically option checked. Keep Configure network profile option unchecked as it adds unnecessary complexity and we do not need that in our case where our site-to-site VPN will form a tunnel. Subnet creation mode should be set to Custom as we do not want our GCP subnet range to overlap with our local LAN. So, we will set it ourselves. Skip Private IPv6 address settings and leave that option unchecked.
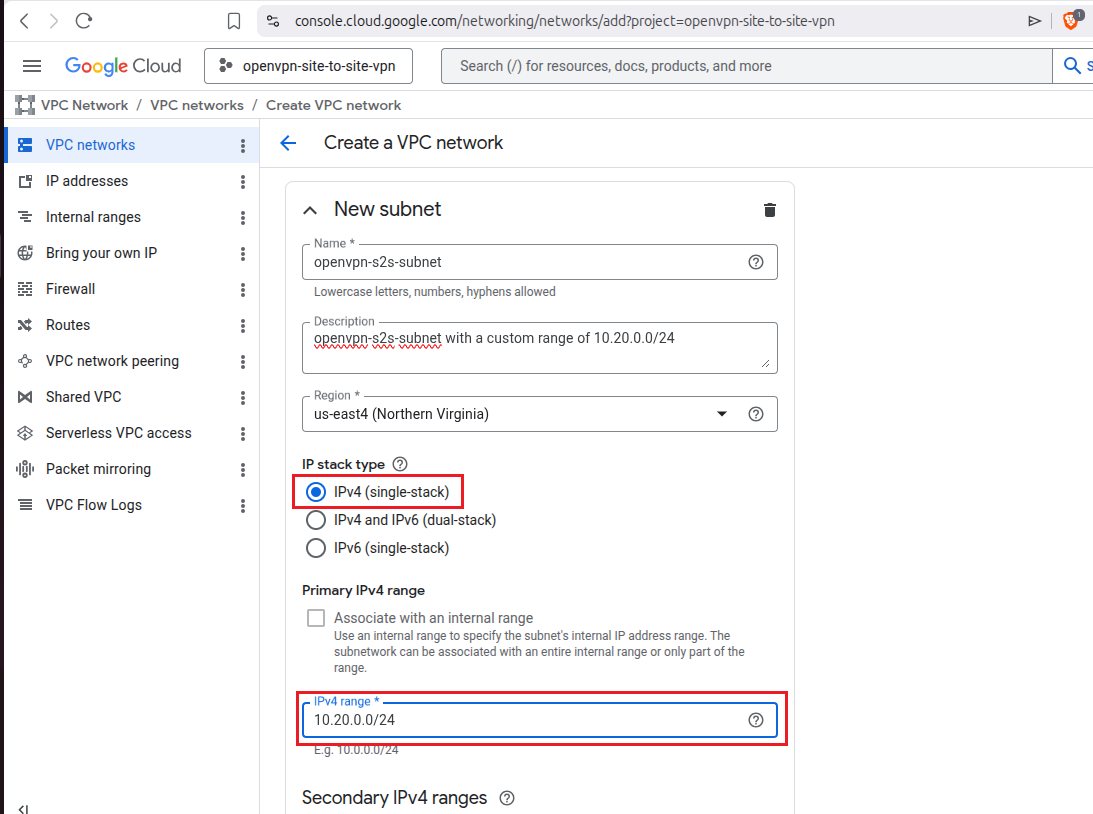
Scroll down and you will see an option here New Subnet, give it a name like in my case I have set the name as openvpn-s2s-subnet, added a little description, then selected the region as us-east4 (Northern Virginia). You can choose a region that is best for you or near you. Next, select the option IPv4 (single-stack) then keep the Primary IPv4 range option unchecked and I’ll add the IPv4 range as 10.20.0.0/24. You can add a range of your choice but again I’d say that you must ensure that both network ranges don’t overlap otherwise routing will not work between your local LAN and Google Cloud.
Keep these options off: Private Google Access, Flow logs, and Hybrid Subnets.

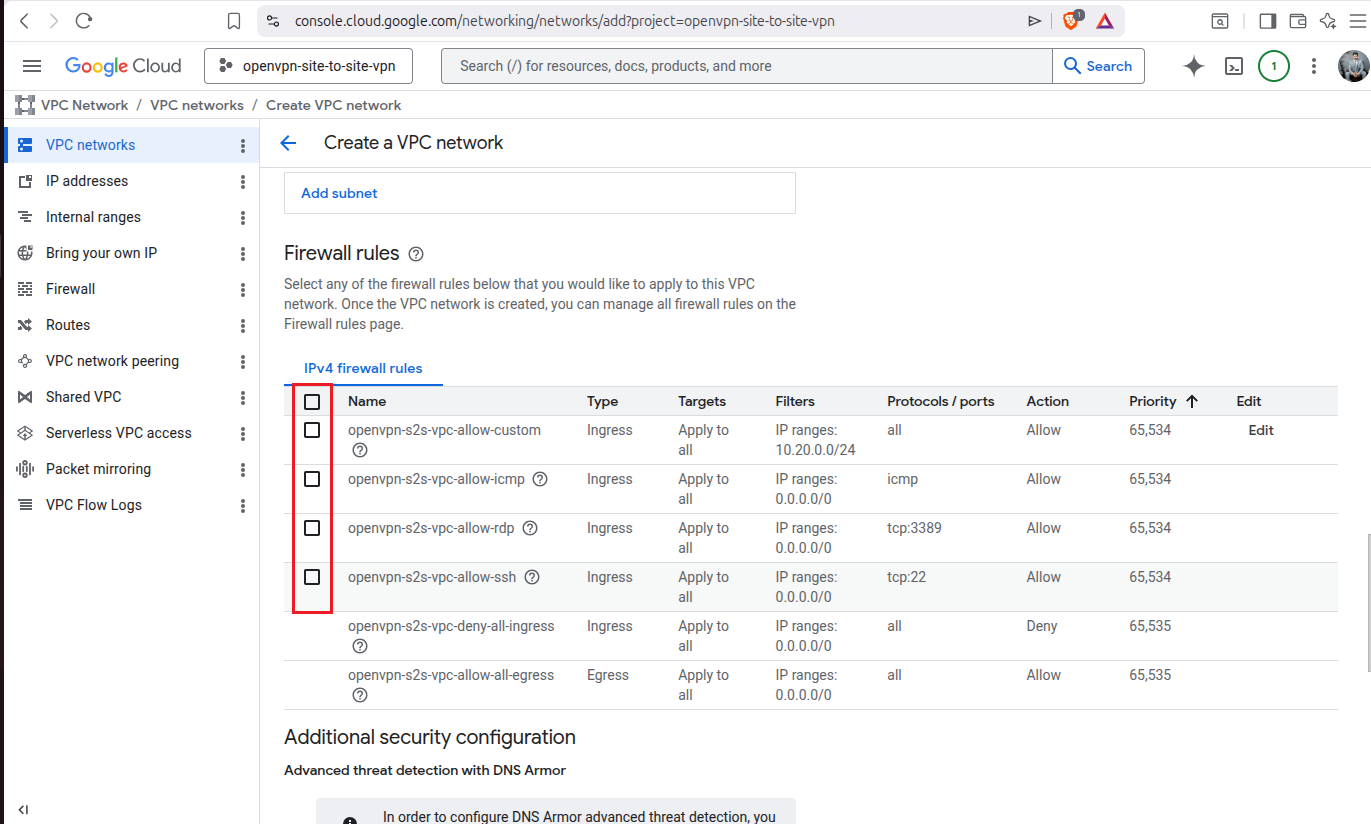
Leave all Firewall rules unchecked as they are not needed for now, we’ll set up our own firewall rules for OpenVPN Access Server.
Keep Network Security API not enabled as we do not need that, lets avoid complexity.
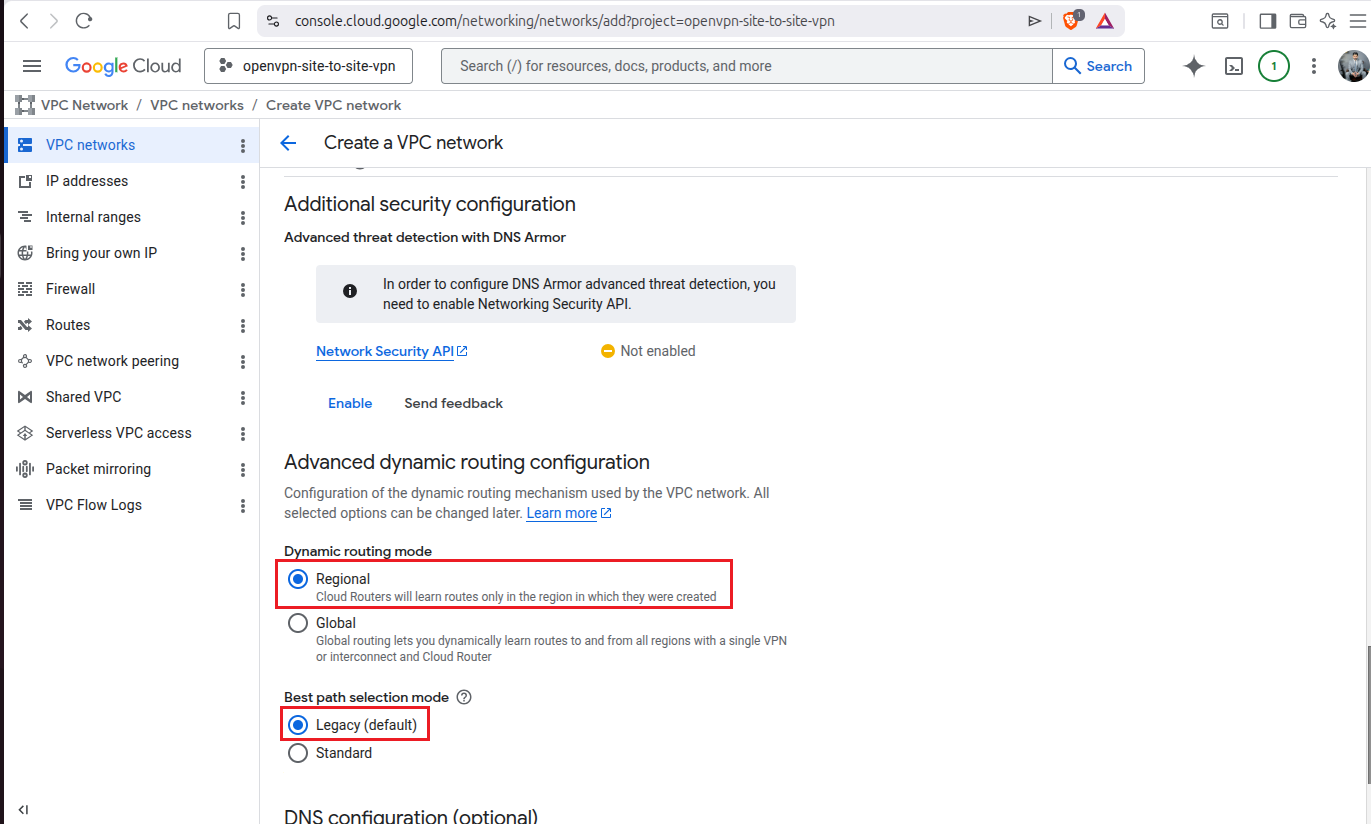
Set Dynamic routing mode to Regional and Best path selection mode to Legacy (default) as the name suggests it’s the default option and is already selected. Then finally click on the button Create and it will initialize the process and your custom VPC will be created shortly.
Now on your VPC networks dashboard you will be able to see this newly created VPC.
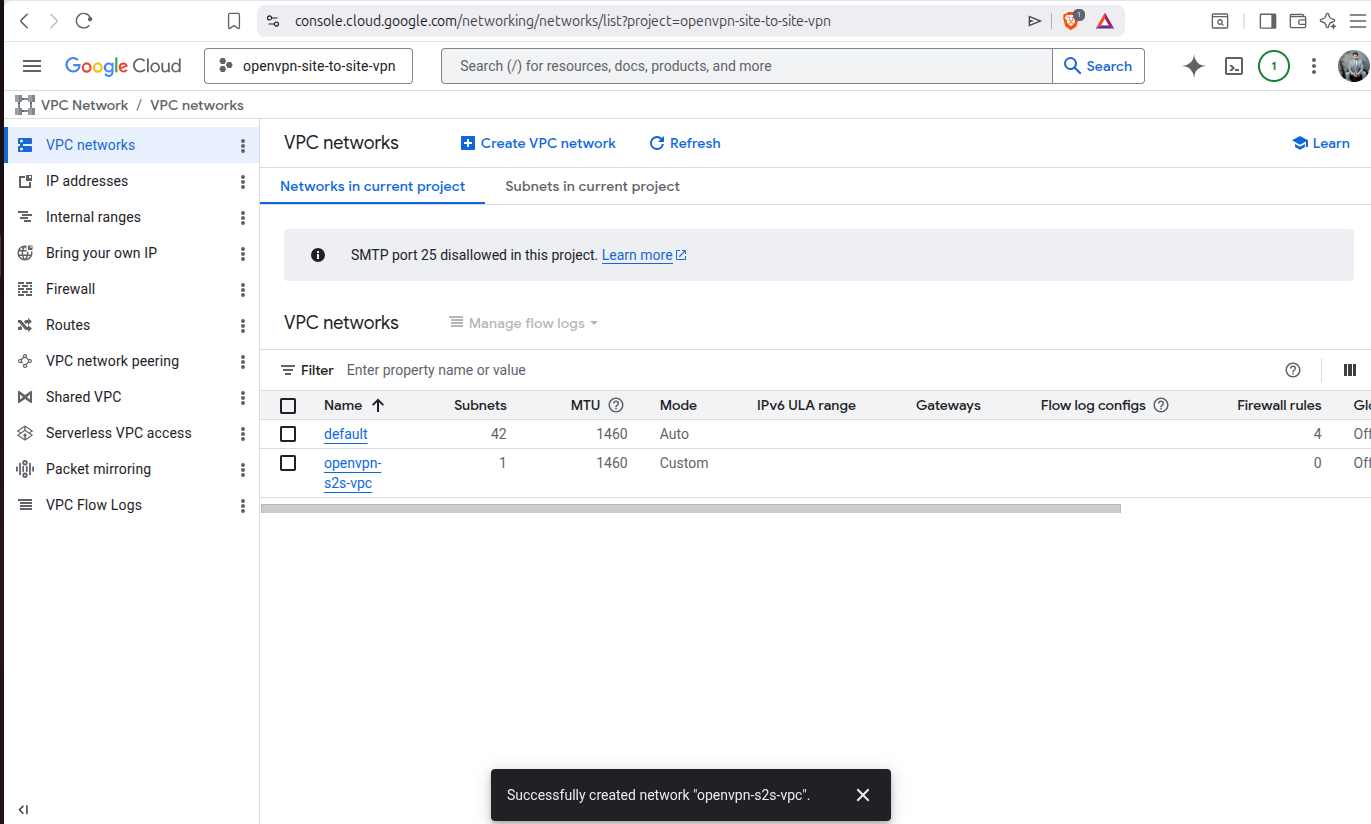
Also, click on Subnets in current project option, scroll all the way down and you will also be able to see the subnet created along with the VPC.

Step 2: Deploy OpenVPN Access Server From Google Cloud Marketplace
Go to the OpenVPN Access Server listing on the Google Cloud Marketplace. Scroll down and review all the details and then come back and click on Get Started.

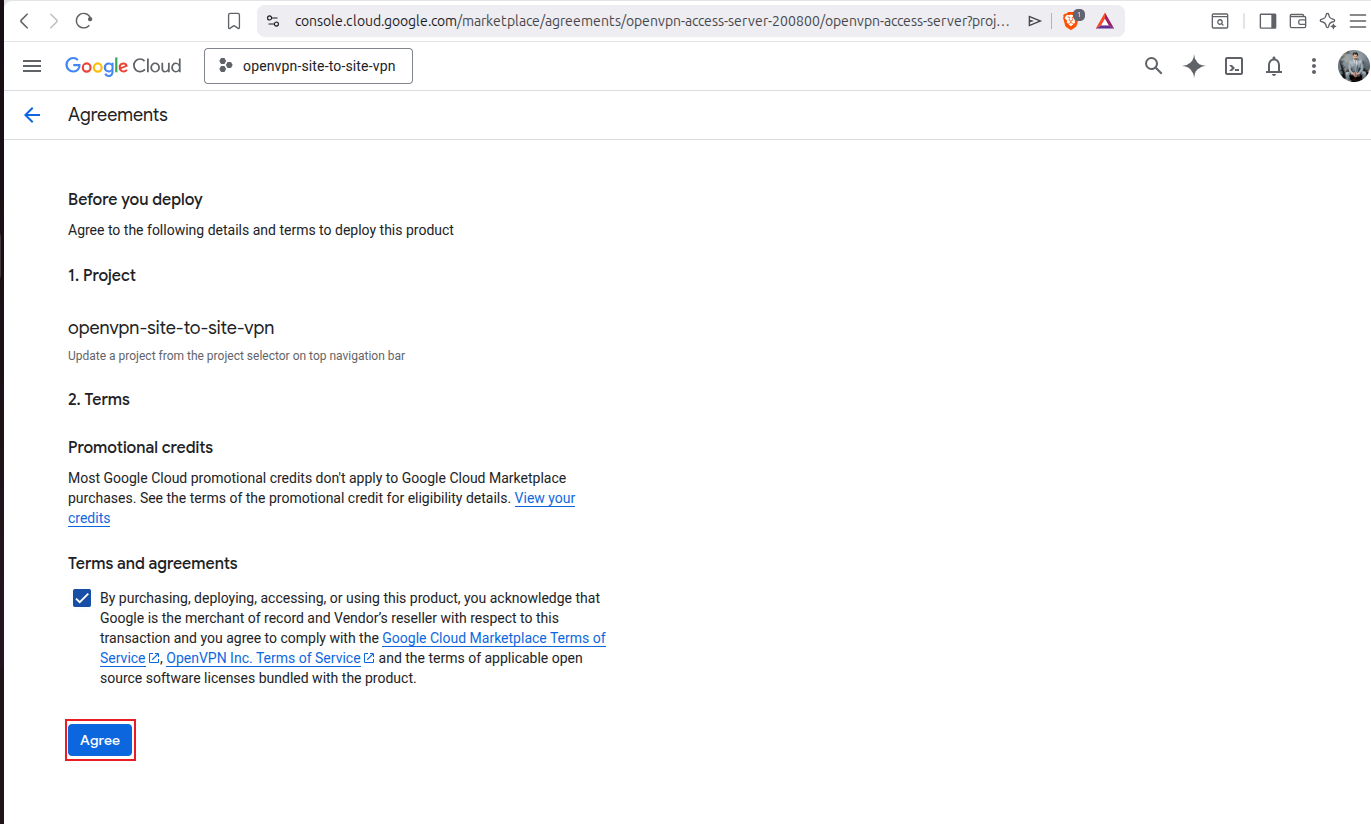
Make sure that the right project is selected and then check the Terms and agreements option and then click on Agree.
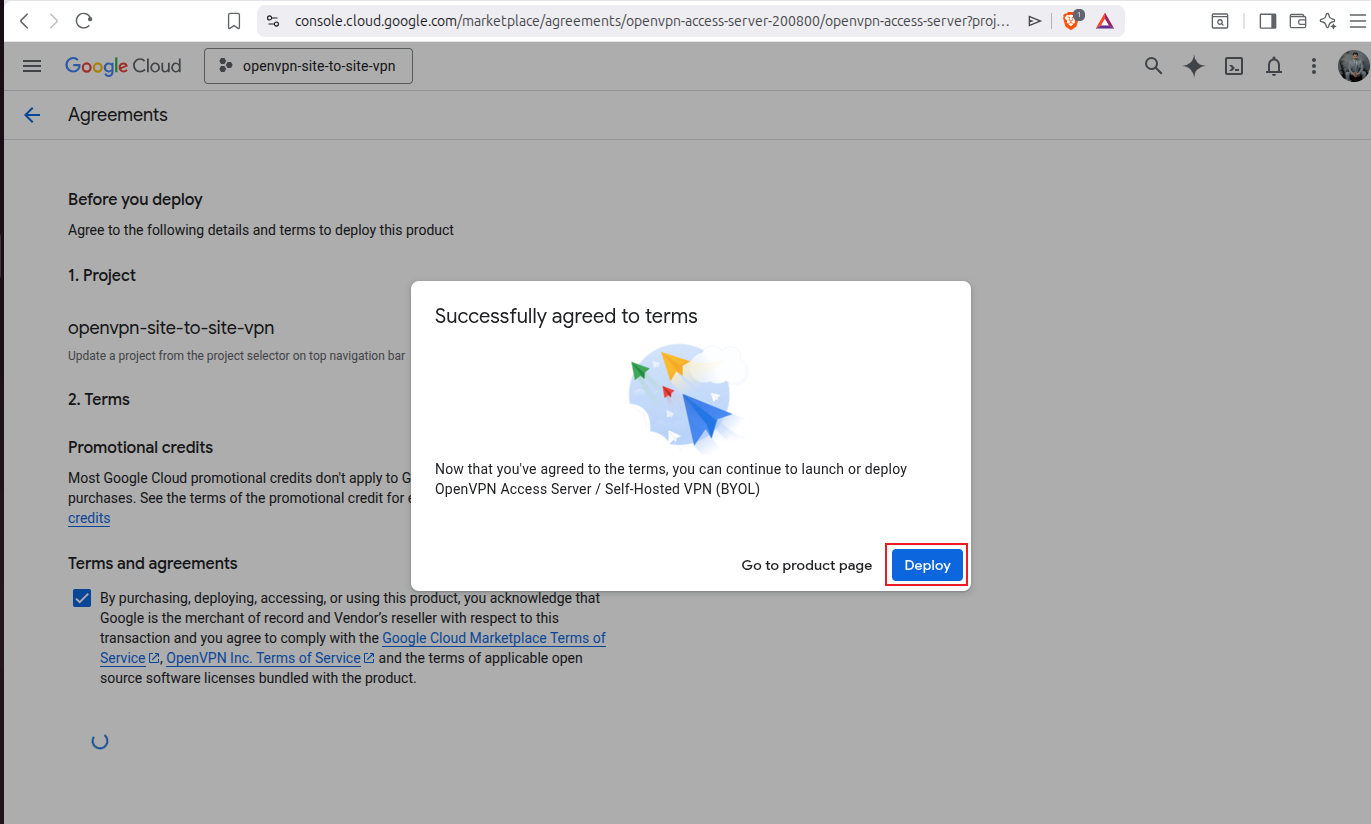
A pop up window will appear in which it tells that you have successfully agreed to the terms and you have two options either go to the product page or deploy. We will click on the option Deploy.
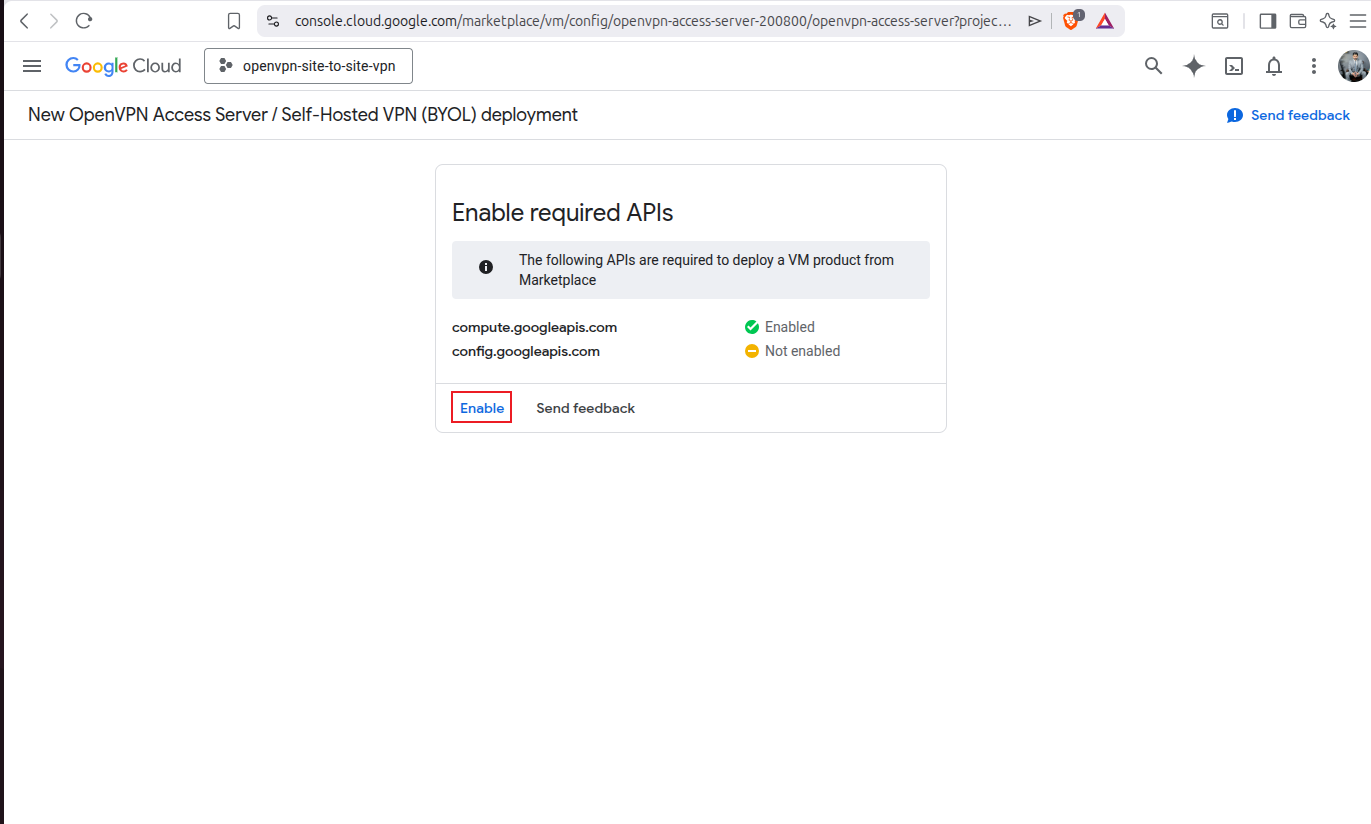
Now it will ask you to enable required APIs, in my case it asks me to enable google config API so that GCP could continue with the VM deployment. Click on the option Enable.
Now you will be redirected to the deployment form where you have Terraform and Command-Line Deployment options. I will use Terraform based deployment where I will simply fill up the form and google will deploy it using Terraform for me.
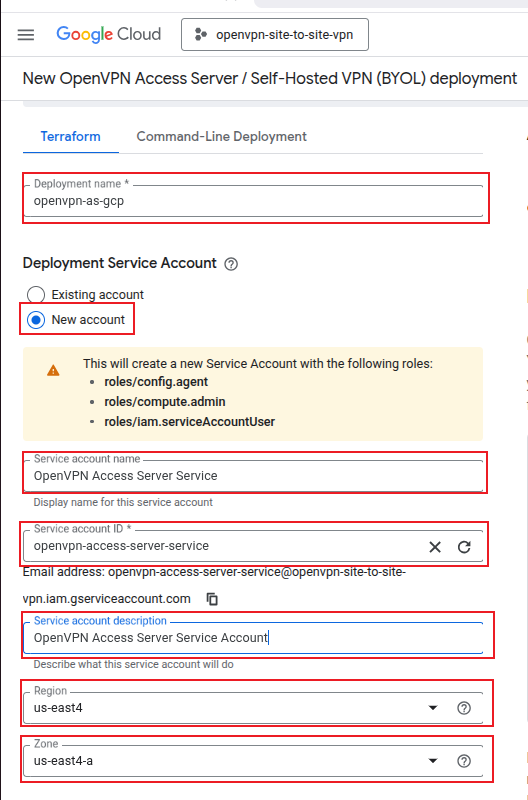
I will set the deployment name as openvpn-as-gcp, and will select the New Account option under Deployment Service Account. Set the service account name as OpenVPN Access Server Service and id as openvpn-access-server-service and add a little description and select the region as us-east4 and zone as us-east-4a.
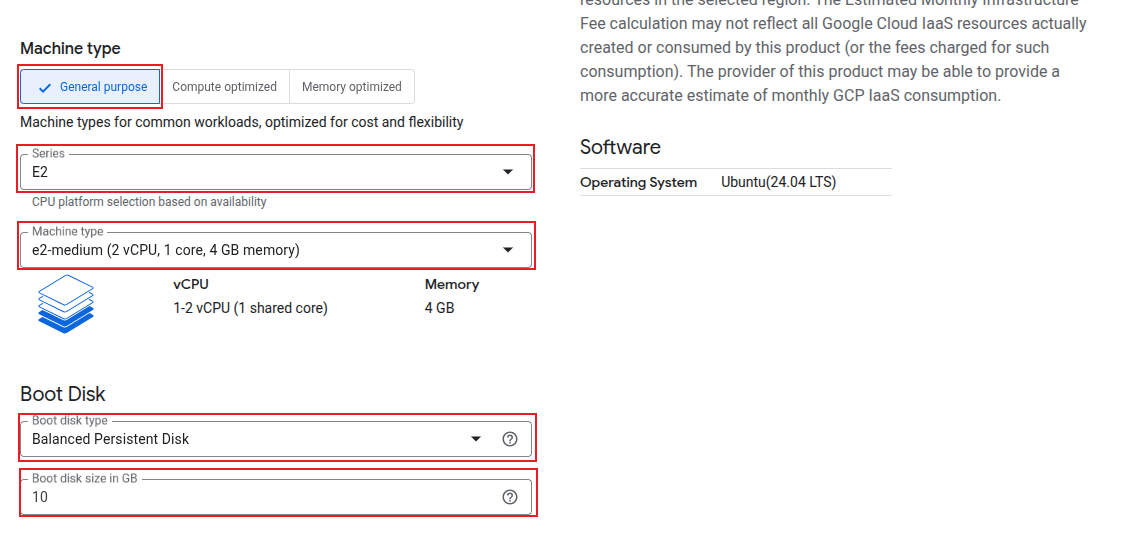
In the Machine Type section, select General purpose then Series as E2 and Machine Type as e2-medium. For the Boot Disk select the type as Balanced Persistent Disk and the storage as 10GB. The VPN server only routes the traffic and manages a tunnel between two networks and doesn’t really need that big of a storage or a very sophisticated machine type. Just a simple E2 with 10GB storage is enough.
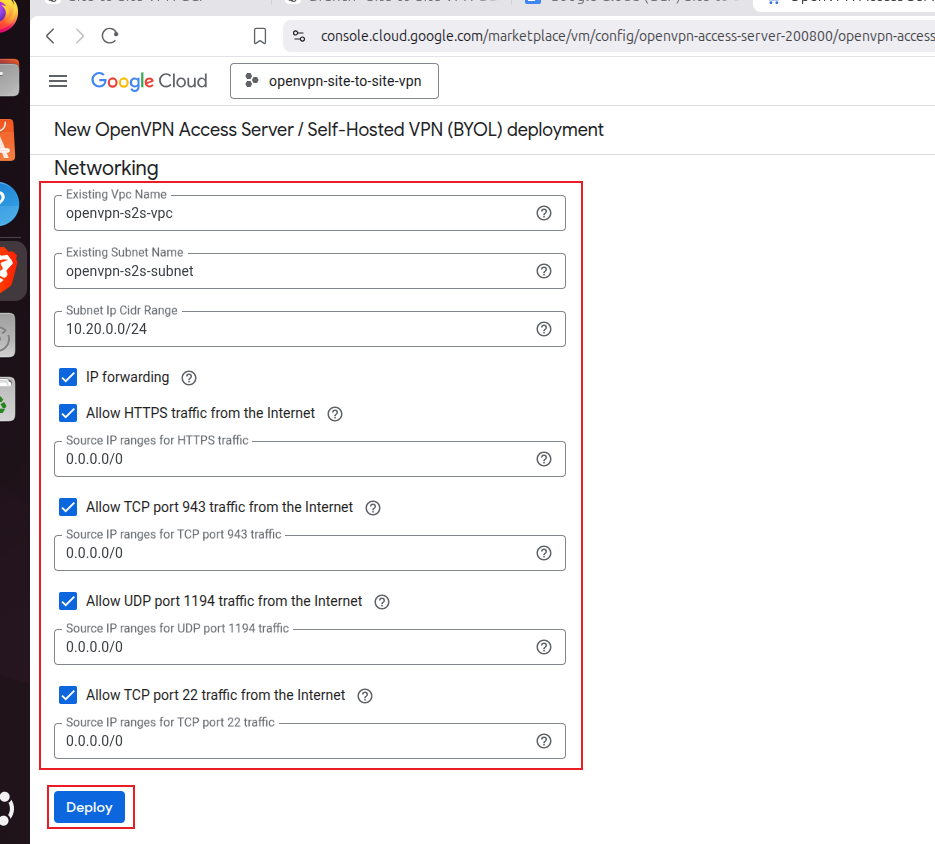
We added Existing Vpc Name as openvpn-s2s-vpc, Existing Subnet Name as openvpn-s2s-subnet, Subnet Ip Cidr Range as 10.20.0.0/24 then enabled IP Forwarding which is a must. Finally we added 0.0.0.0/0 to the Source IP Range field and OpenVPN ports fields. This 0.0.0.0/0 means that it allows traffic from all over the internet. Finally click on Deploy.
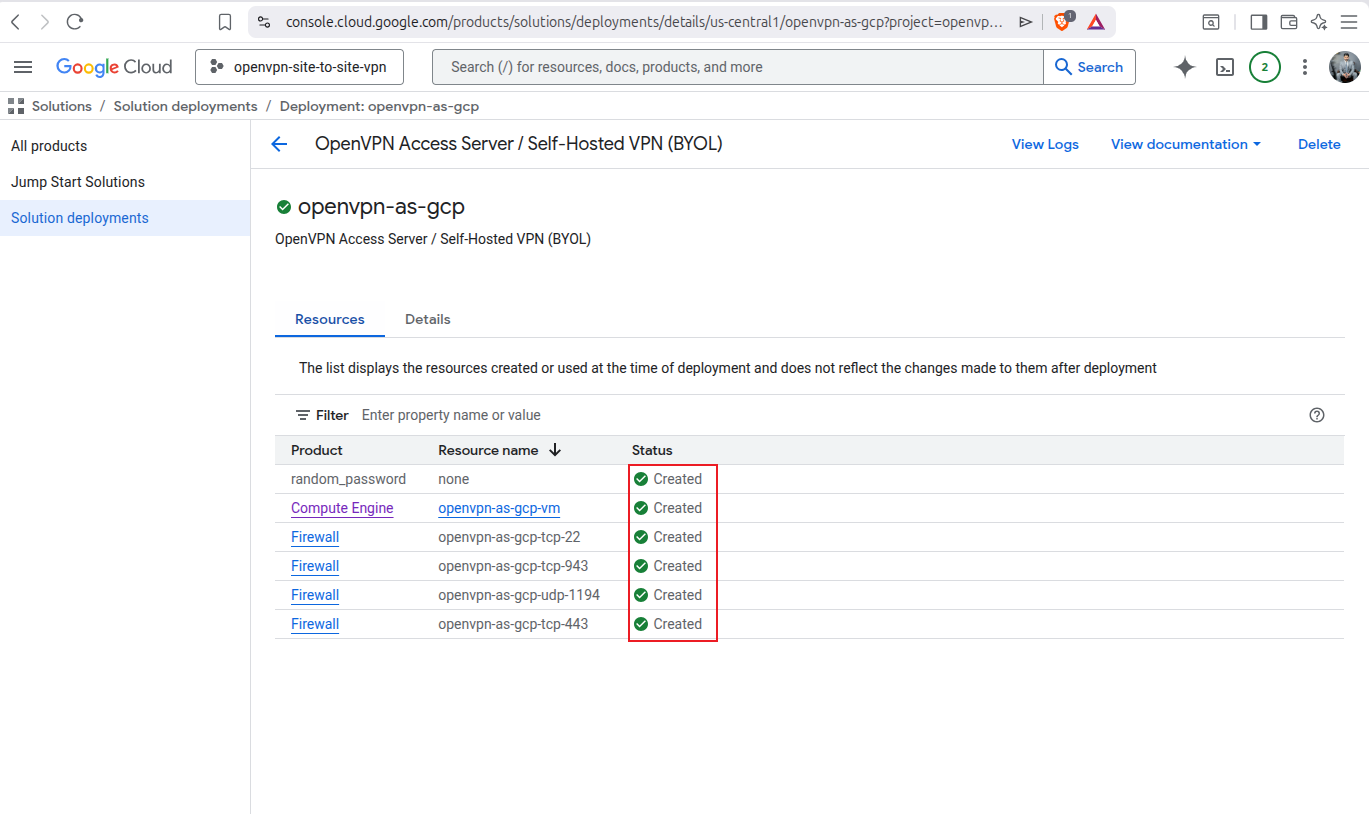
Now it took a few minutes but it has been deployed successfully:
Step 3: Access the OpenVPN Access Server
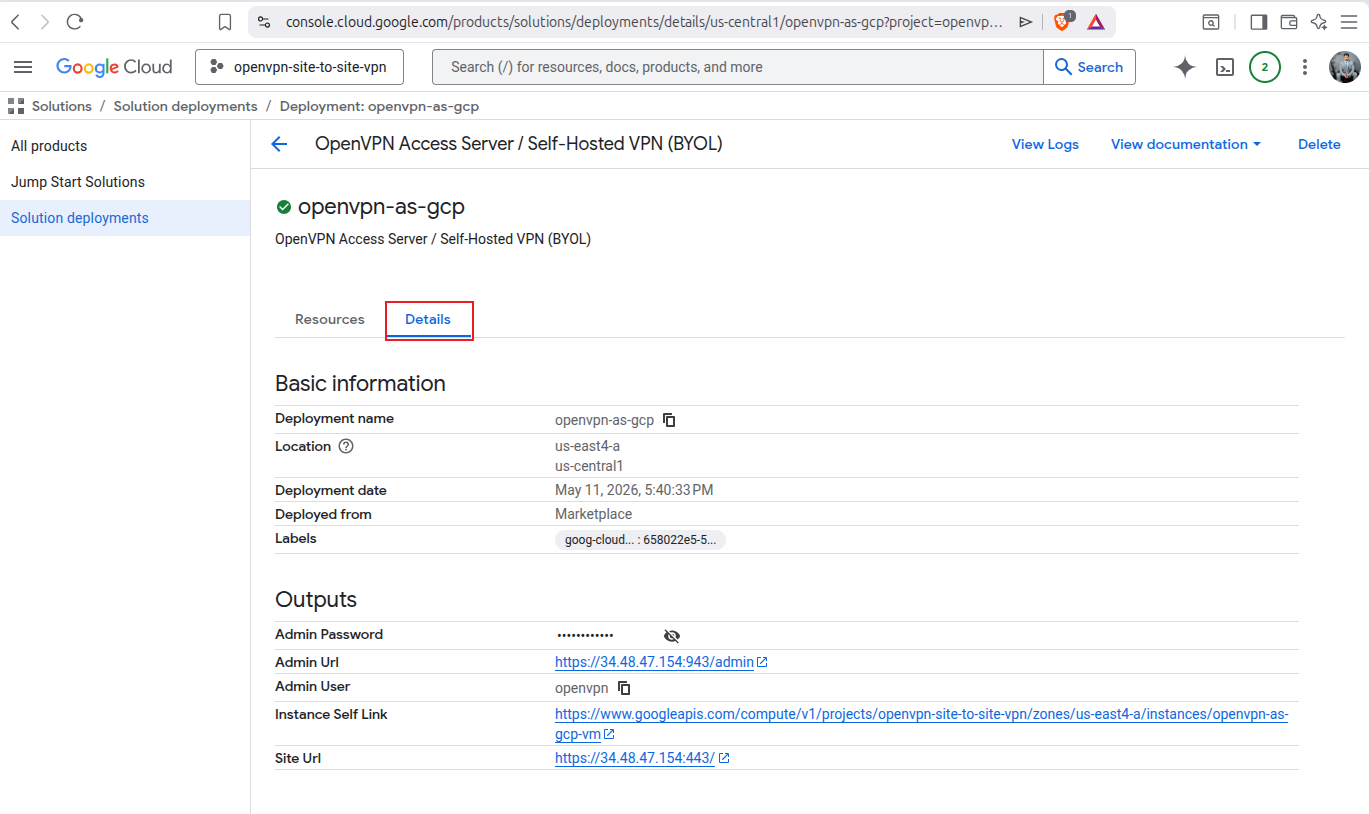
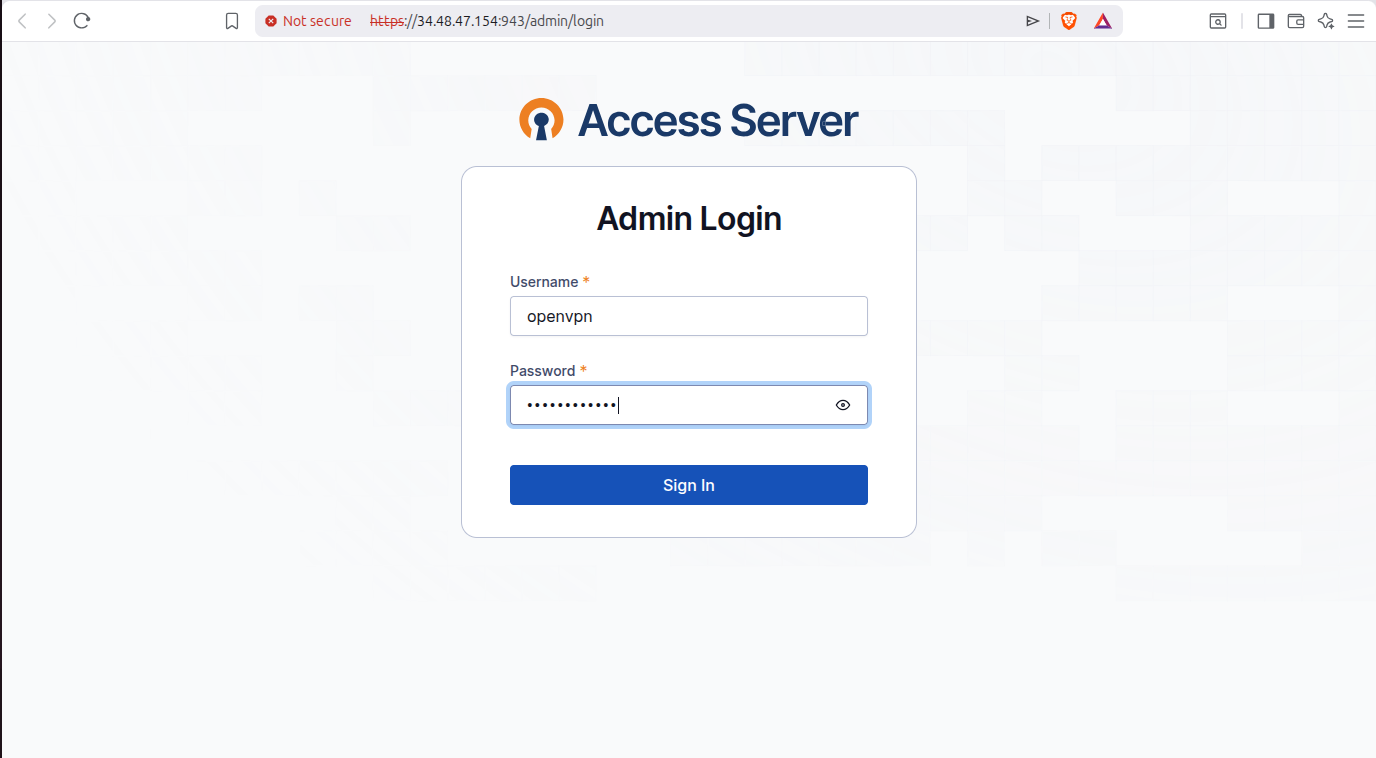
Go to the Details tab and here you will see the Admin Portal URL of OpenVPN, your username and a random password generated. You must change the password after logging in for security.
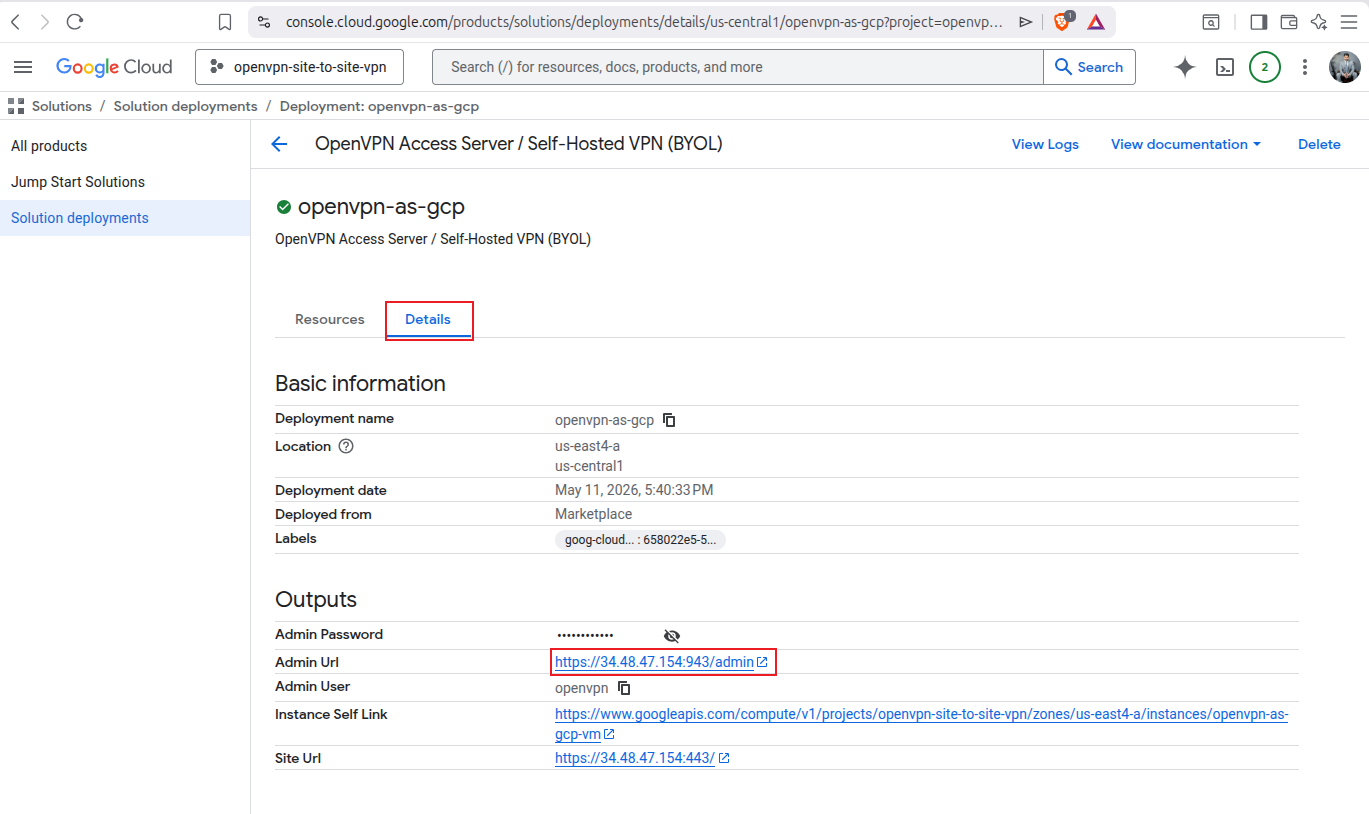
Click on the Admin Portal URL:
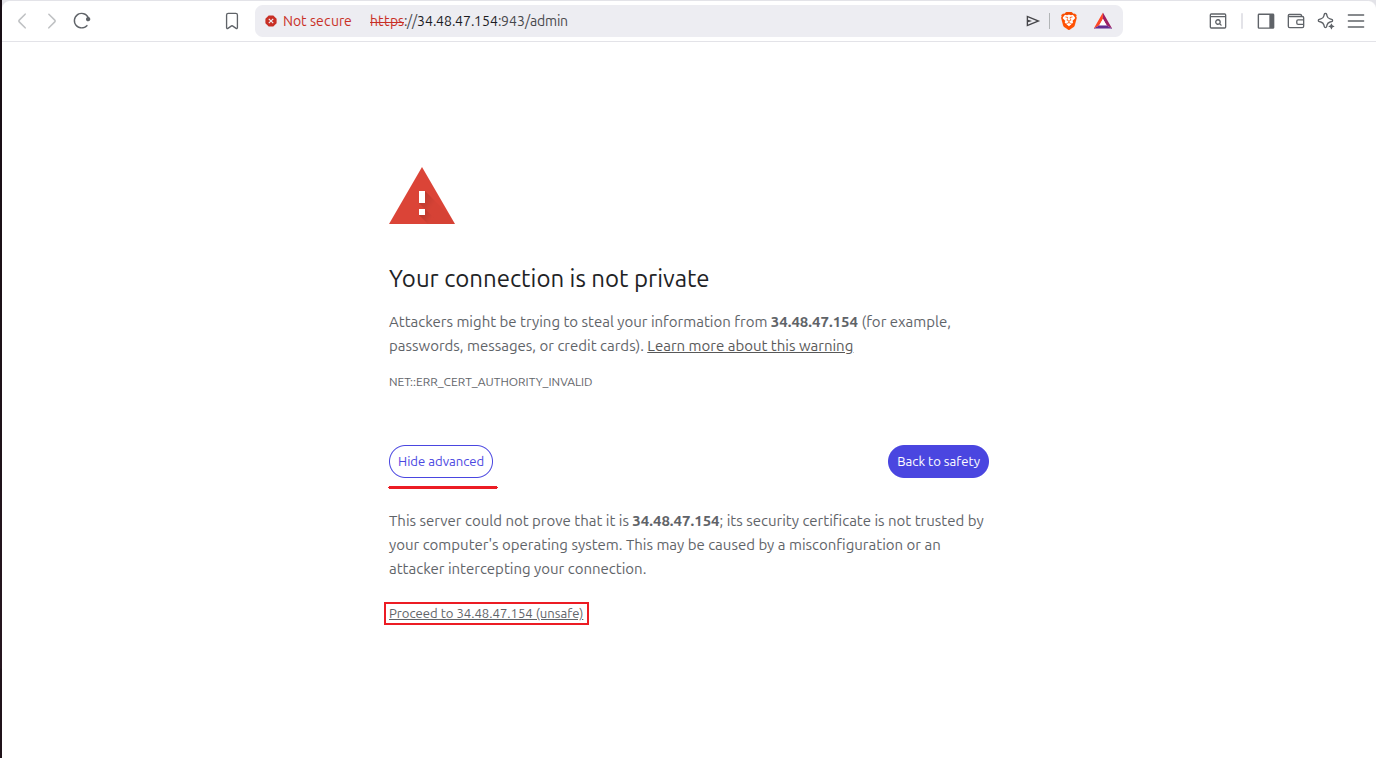
It will open up another tab in which there would be a warning or a Privacy error. Click on Advanced then click on Proceed to IP_ADDR(unsafe) where IP_ADDR could be different in your case. This error is due to self signed certificate, so you may proceed without any worry.
Add in your OpenVPN username and temporary password provided earlier by Google Cloud in the deployment details.
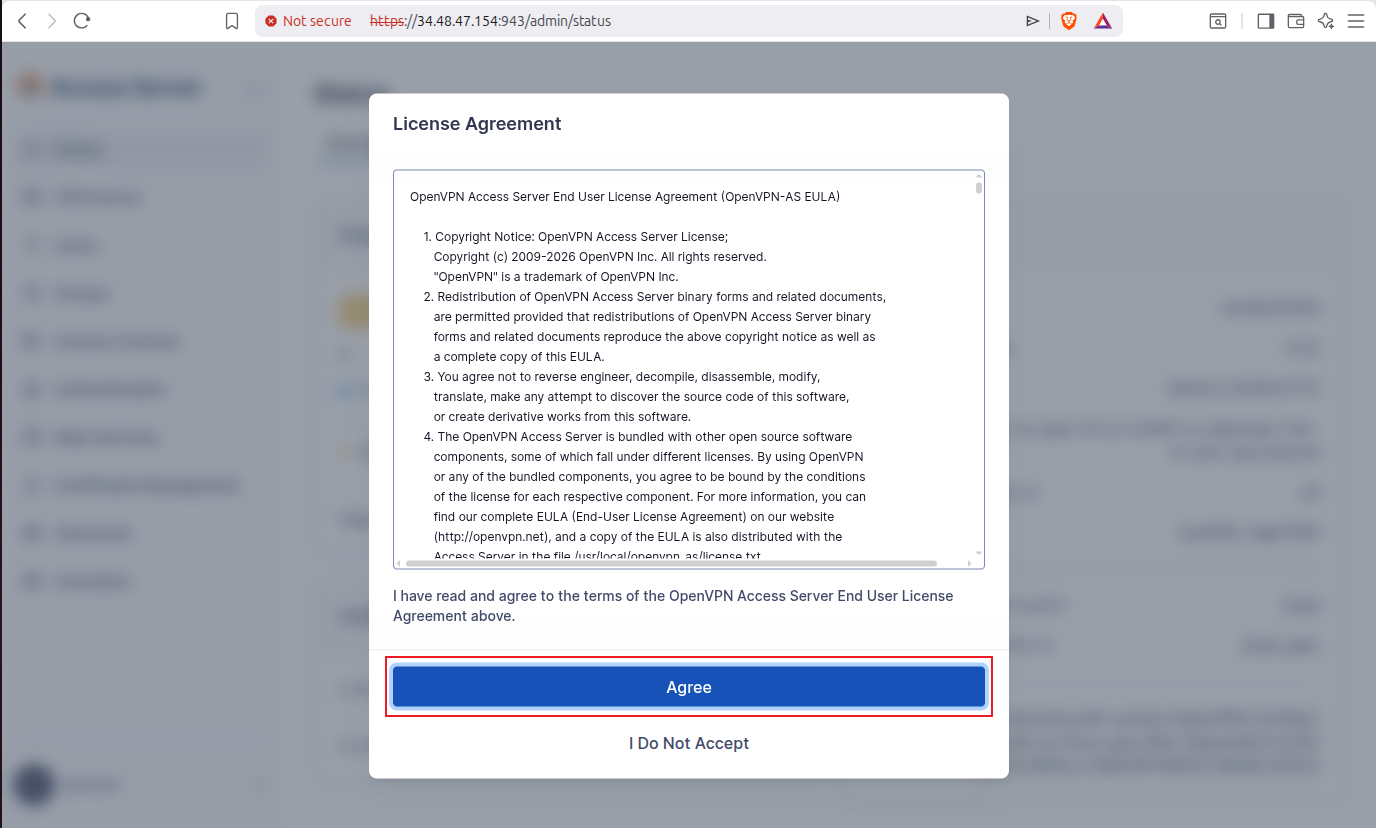
Now I am prompted to Agree to the license agreement, which I will accept:
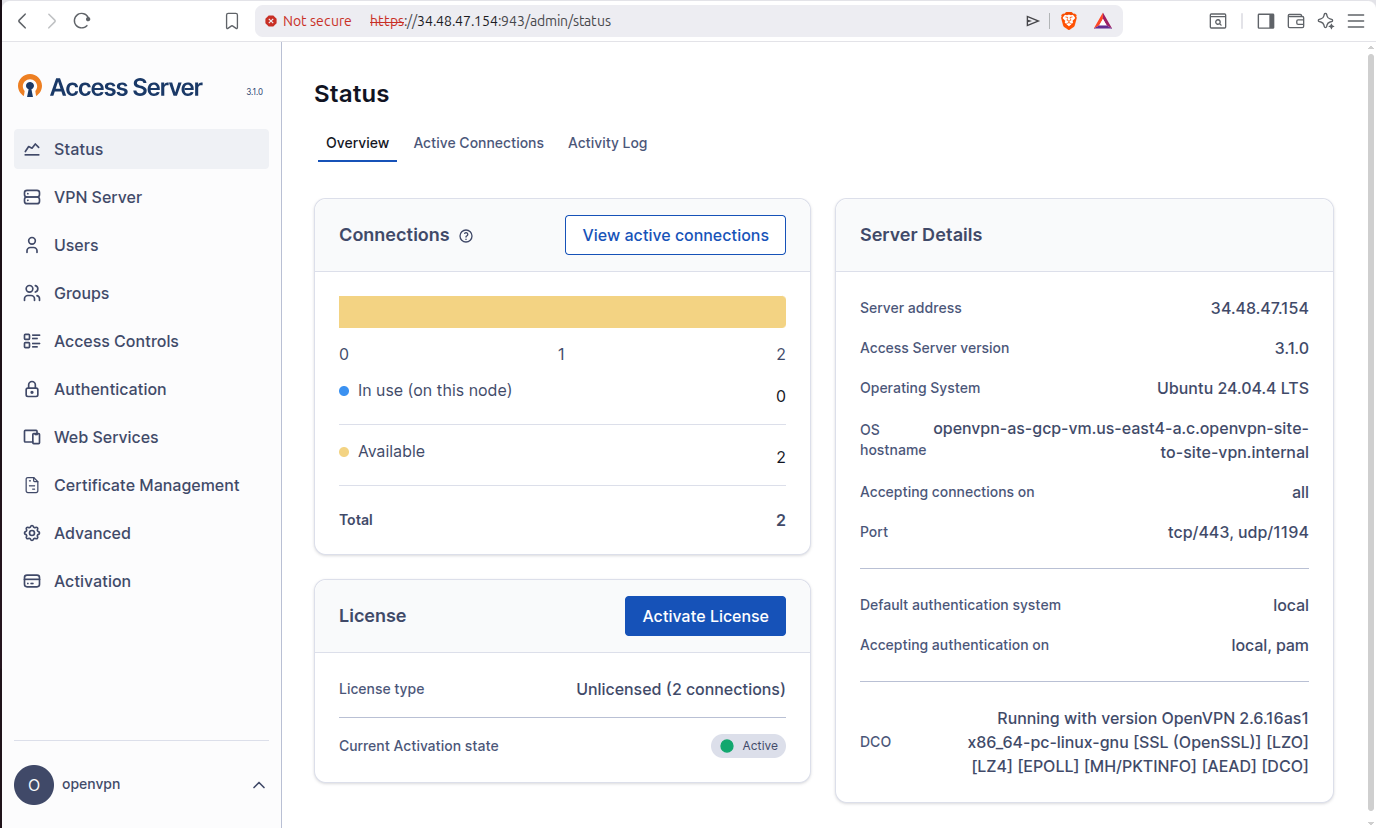
And I have access to OpenVPN Access Server Admin UI.
Step 4: Configure OpenVPN Access Server for Site-to-Site Routing
4.1 Go to Global Access Rules
First off, go to Access Controls then go to Global Access Rules then Go to IP Addresses and Subnets section and select Route instead of NAT. Also add your GCP and local LAN subnets. Then click on Save.

After saving, if it prompts you to restart the access server then don’t do that just yet as we need to make more changes and then we will restart at once.
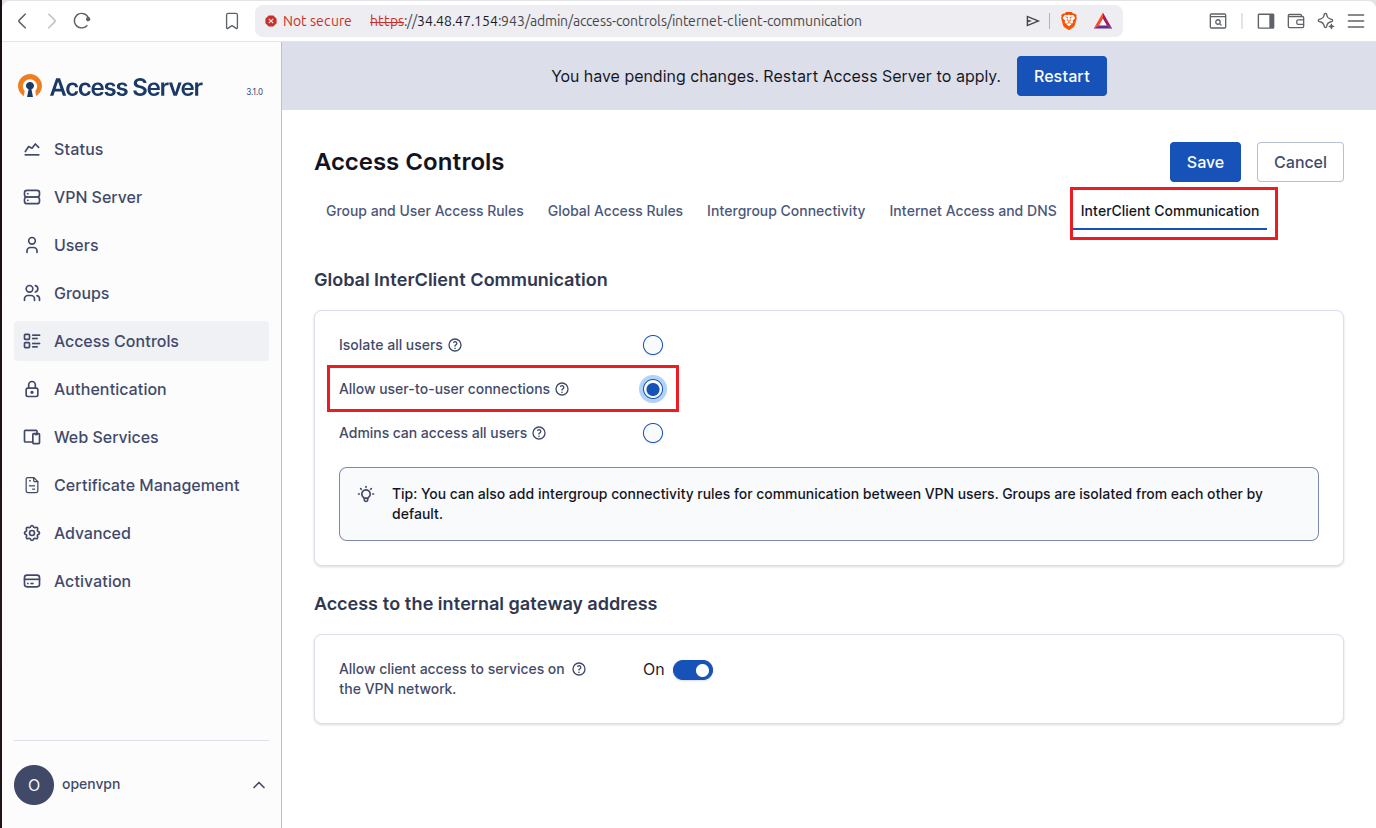
4.2 Go to InterClient Communication
After that Go to the InterClient Communication tab and select allow user-to-user connections. Then click on Save.
4.3 Restart Access Server
To really apply changes, you have to restart the OpenVPN Access Server. For that on the top bar you will see a Restart Server prompt, just go ahead and click on Restart.

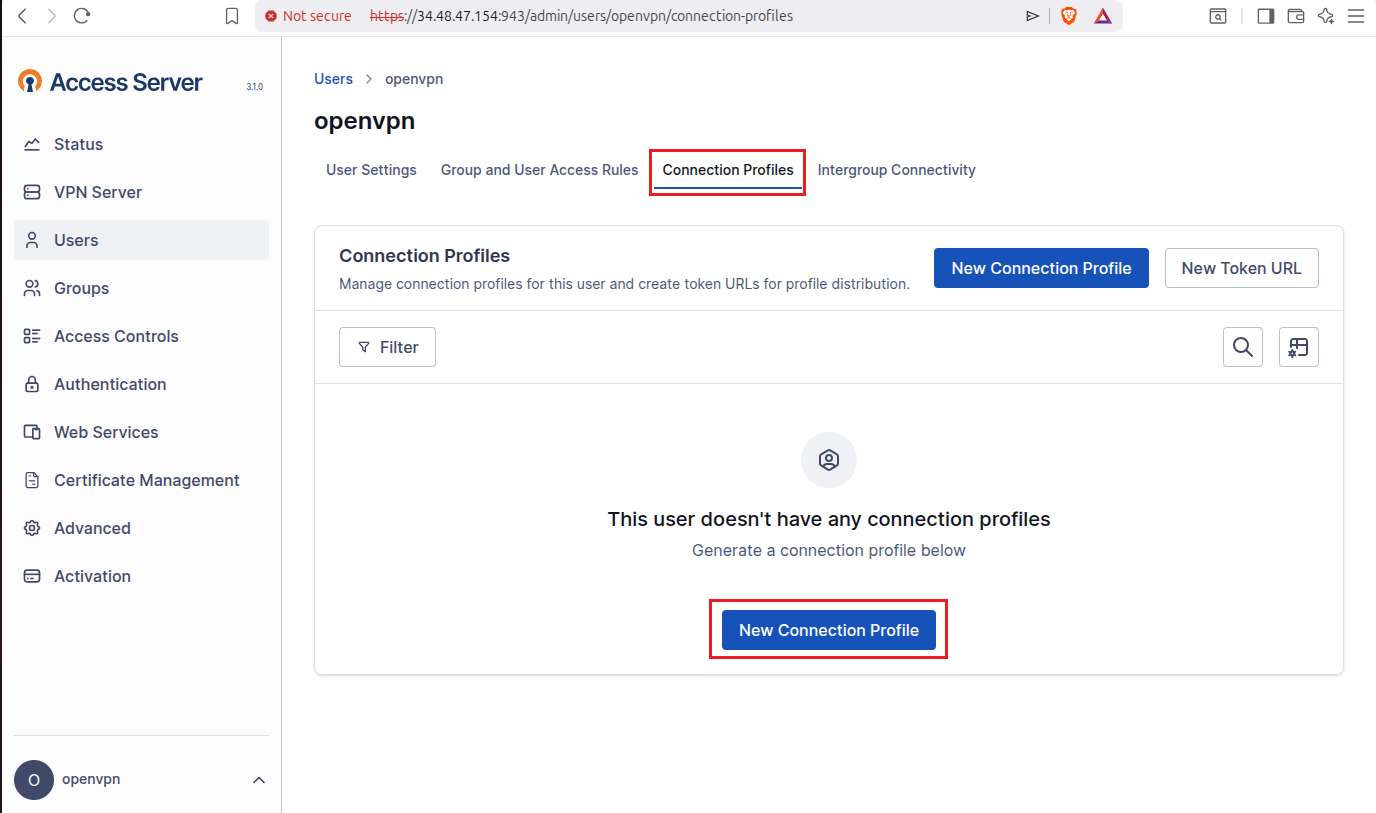
Step 5: Create and Download the OpenVPN Connection Profile
This profile will essentially be used by our Linux gateway machine to create a connection between the linux gateway machine and the OpenVPN Access Server running in our GCP.
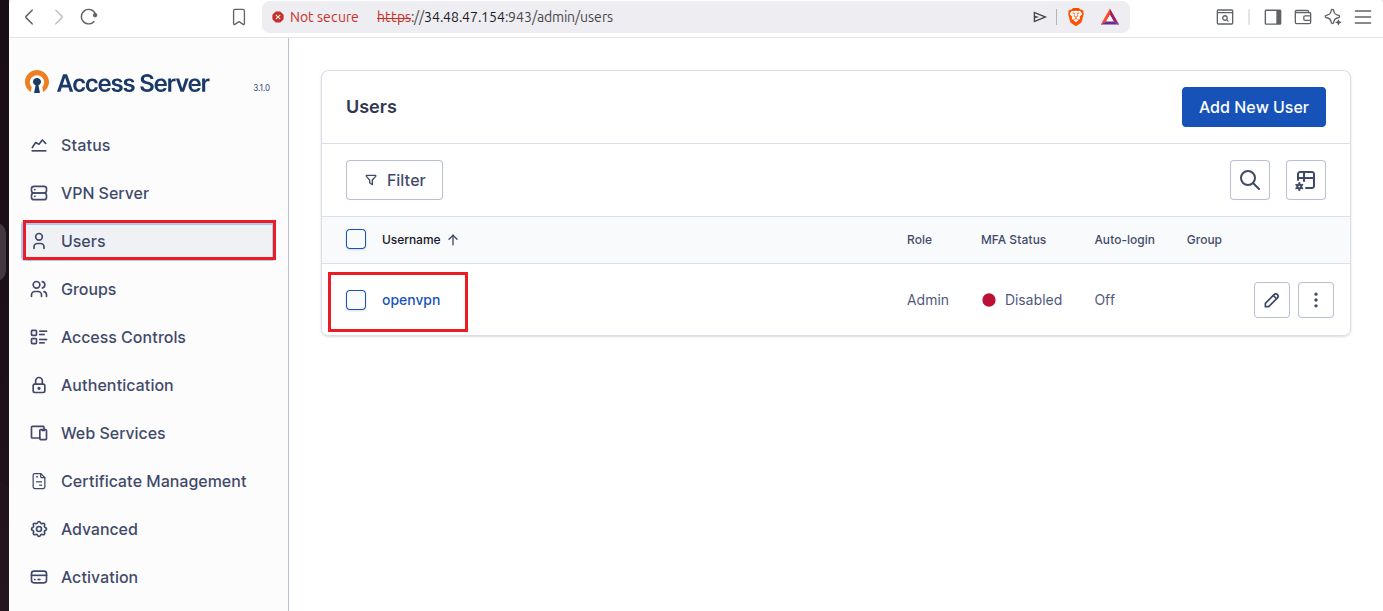
Go to Users and then click on the user which is openvpn in our case:
Now go to Connection Profiles tab, then click on New Connection Profile:
You will see a popup like shown in the below image, just click on Download:
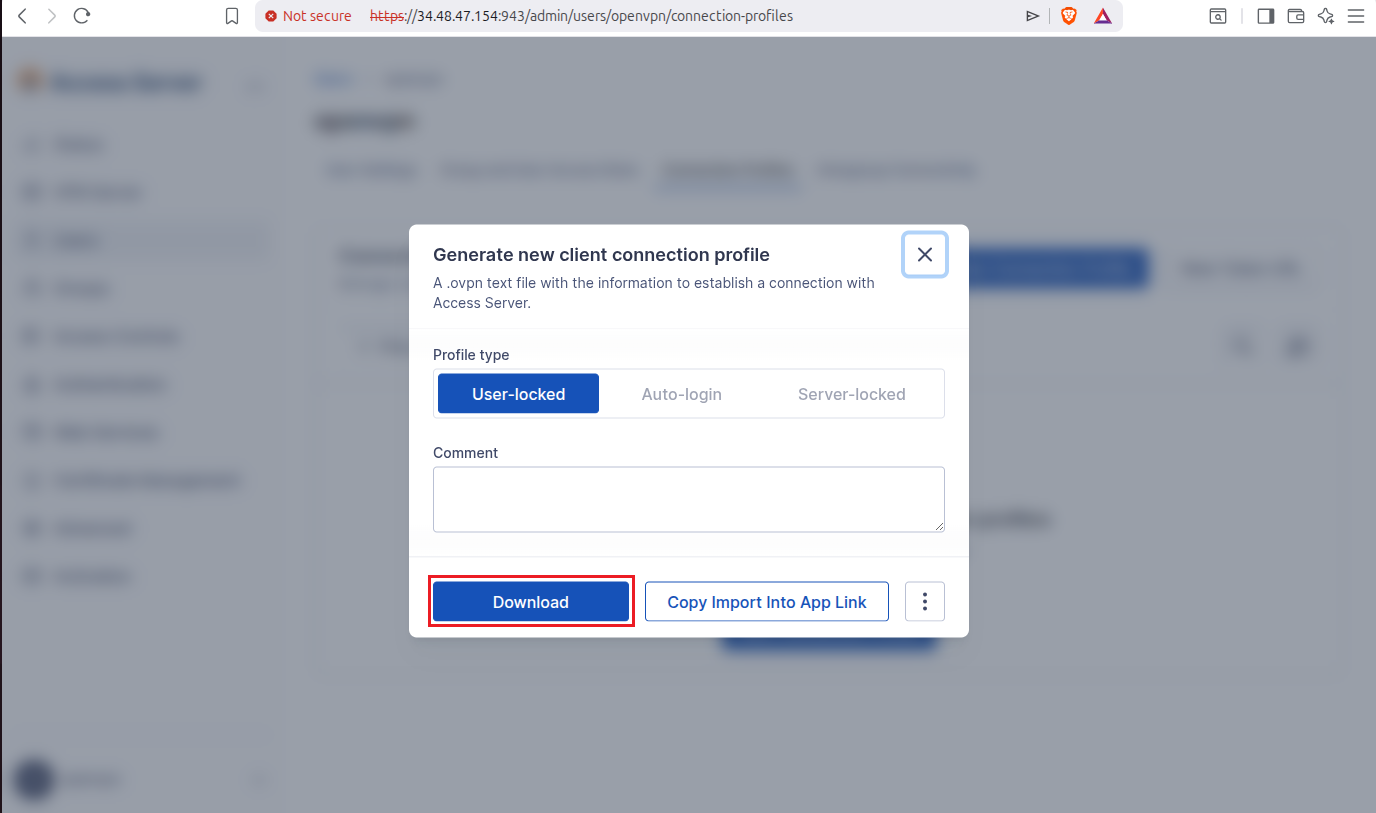
It will ask you to save it on the location of your choice, usually Downloads directory which is fine:
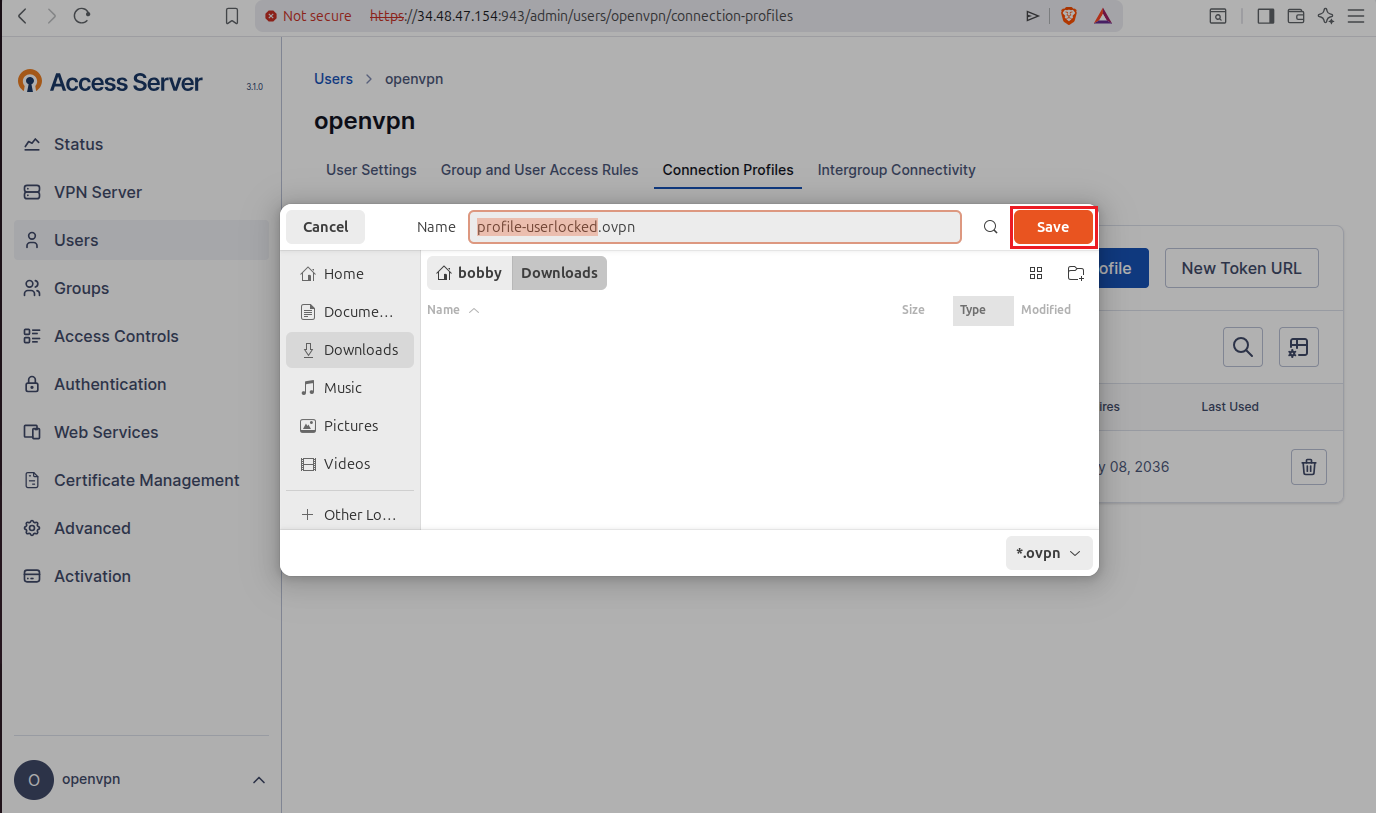
It will be downloaded and saved in your Downloads directory just like it did in my case.
Step 6: Configure Local Linux Gateway Machine
This is the local linux gateway machine that will connect our local LAN to the VPC on google cloud and all the traffic will route through it back and forth.
6.1 Check your Local LAN Subnet and Interface
To check your local LAN subnet and interface simply use this command:
Look for a line that appears like this:
192.168.1.0/24 dev wlx5091e326480e proto kernel scope link src 192.168.1.11 metric 600
Here, the local LAN subnet is 192.168.1.0/24, our interface is wlx5091e326480e and the IP address for this Linux machine is 192.168.1.11. Your interface could be different such as eth0, wlan0, enp3so etc.
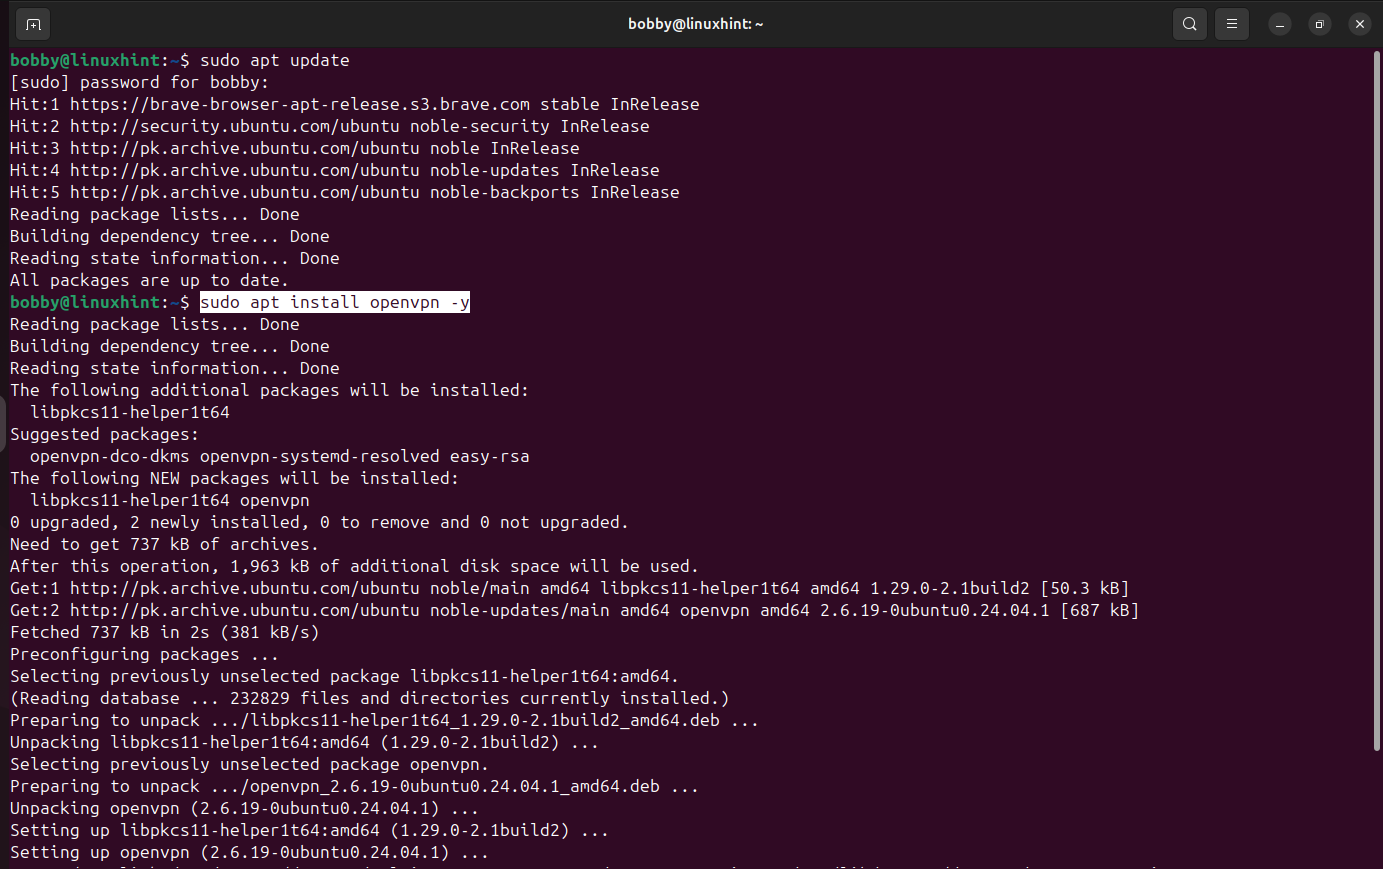
6.2 Install OpenVPN Client
First off, update your repository:
Then install OpenVPN client:
6.3 Go to Downloads Directory
Go to the downloads directory or where you have downloaded the file:
Now, do ls here to find and see the .ovpn file:

In our case, the file name is profile-userlocked.ovpn.
6.4 Connect to the OpenVPN Access Server
Now staying in Downloads directory, we need to run this command to connect to OpenVPN Access Server:
It will prompt you for the username and password, add your username which is openvpn in our case and add your OpenVPN Access Server Admin UI password.
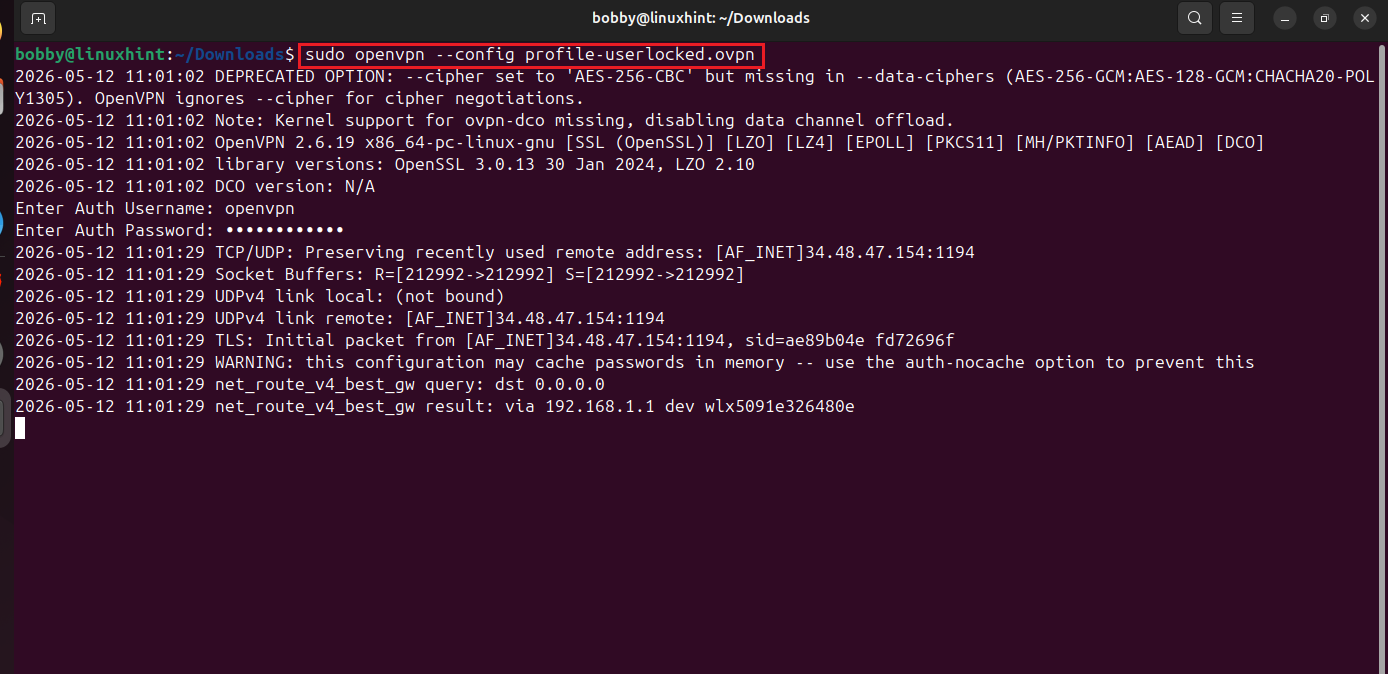
Now at the end, the final line you will see a line like Initialization Sequence Completed.

IMPORTANT NOTE: Now leave this terminal open. Do not press CTRL + C or close this terminal window. OpenVPN client is running and a tunnel is established, if this terminal window is interrupted or closed then OpenVPN client will also stop running.
Step 7: Verify the OpenVPN Tunnel Interface and Routes
Now open a new terminal window, while the old one stays open.
7.1 Check the VPN Tunnel Interface
To check the VPN Tunnel interface use this command:
tun0 interface will show up:

This tun0 is the tunnel established between our local Linux gateway machine and VPC on Google Cloud.
7.2 Check the Routing Table
We will now use ip route command to check our Google Cloud subnet and our local LAN interface:
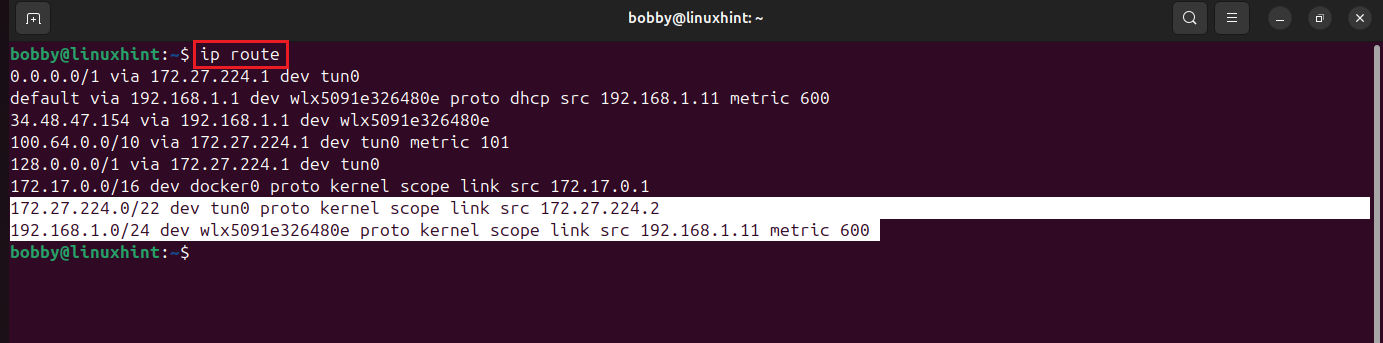
Our local LAN subnet is 192.168.1.0/24, Our local LAN interface is wlx5091e326480e, and our local gateway IP is 192.168.1.11.
Also note this on the 3rd line in the screenshot above:
34.48.47.154 via 192.168.1.1 dev wlx5091e326480e
This shows our machine is reaching the OpenVPN server’s public IP through our normal router.
So, in a nutshell, the ip route output confirms that the VPN tunnel interface tun0 has been created and my local Linux machine received the VPN tunnel IP 172.27.224.2. The output also shows that my local LAN subnet is 192.168.1.0/24, my local network interface is wlx5091e326480e, and finally my Linux gateway machine’s local LAN IP address is 192.168.1.11.
Step 8: Enable IP Forwarding on Local Linux Gateway
Our Linux machine is connected to OpenVPN, but mostly it is acting like a VPN client. To make it a true site-to-site gateway, we must allow packet forwarding between local LAN interface(wlx5091e326480e) and VPN tunnel interface(tun0).
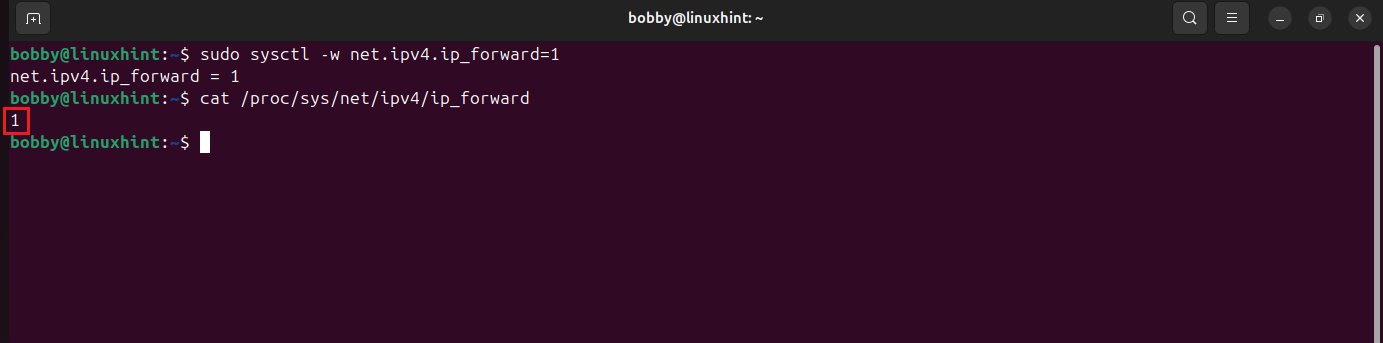
8.1 Enable IP Forwarding Temporarily
To enable IP forwarding temporarily, run this command:
Then do the verification if IP Forwarding was enabled or not, by running this in your terminal:
If this returns 1, then IP forwarding has been enabled successfully.
8.2 Enable IP Forwarding Permanently
You have to open the sysctl config file to do that:
You need to look for this line:
#net.ipv4.ip_forward=1
You need to remove # from this in the file:
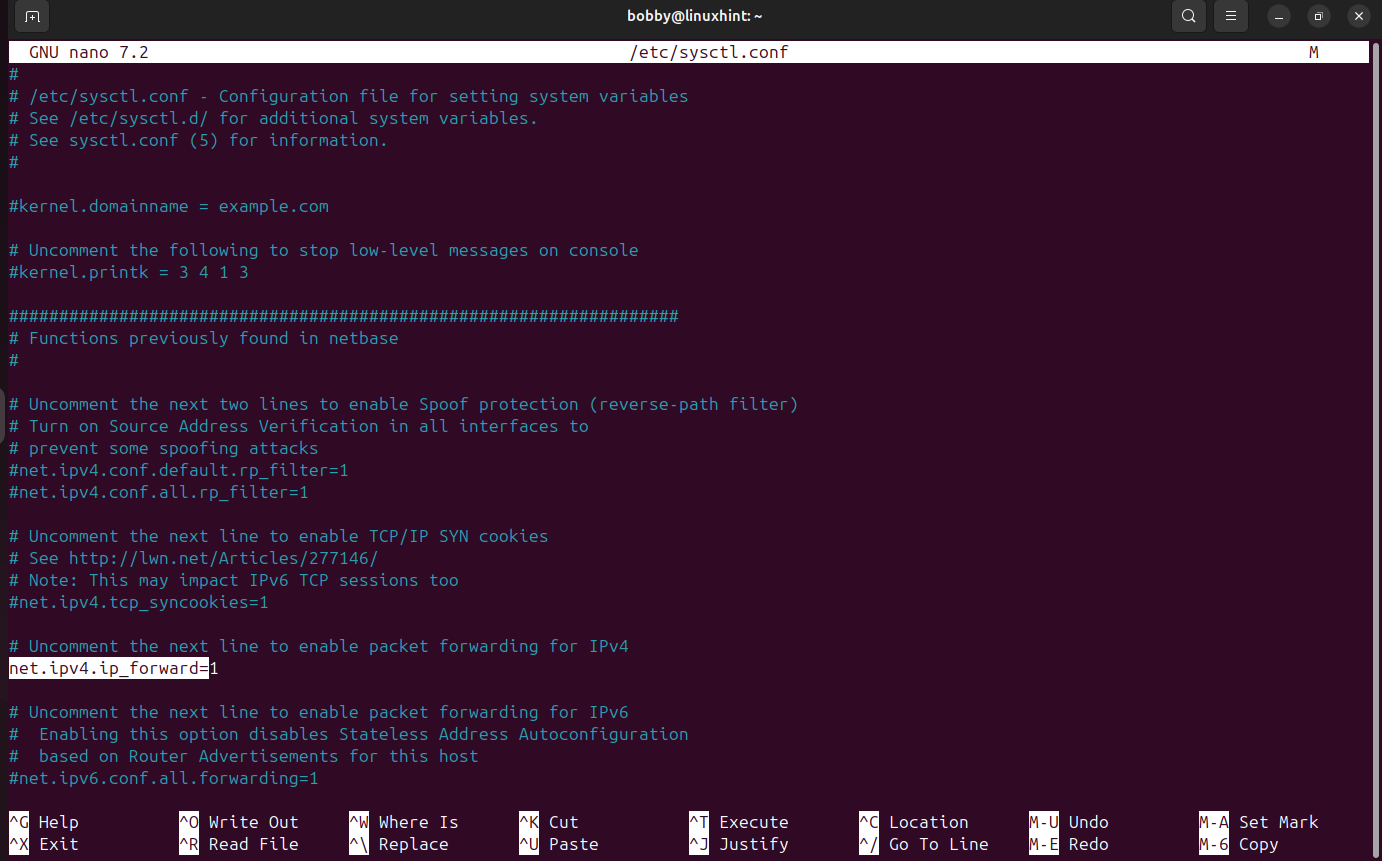
Save and exit by pressing CTRL + O then Enter and then CTRL + X. This will save changes.
Now finally, apply the changes in the terminal:

Step 9: Configure NAT and Forwarding Rules on the Local Linux Gateway
Now at this level, the OpenVPN tunnel is established and connected to our local Linux gateway and IP forwarding is enabled. Now we need to configure the Linux gateway so that the traffic from local LAN could pass through the gateway and then on to the tunnel.
For this tutorial, I am using NAT to keep things simple but usually a static route is added to a local router to handle this permanently.
My network details are:
| Local LAN Subnet | 192.168.1.0/24 |
|---|---|
| Local LAN interface | wlx5091e326480e |
| Local Linux gateway IP | 192.168.1.11 |
| VPN tunnel interface | tun0 |
| Google Cloud subnet | 10.20.0.0/24 |
Just replace your details in this table and follow me, we are going to use a few commands which will use this above information.
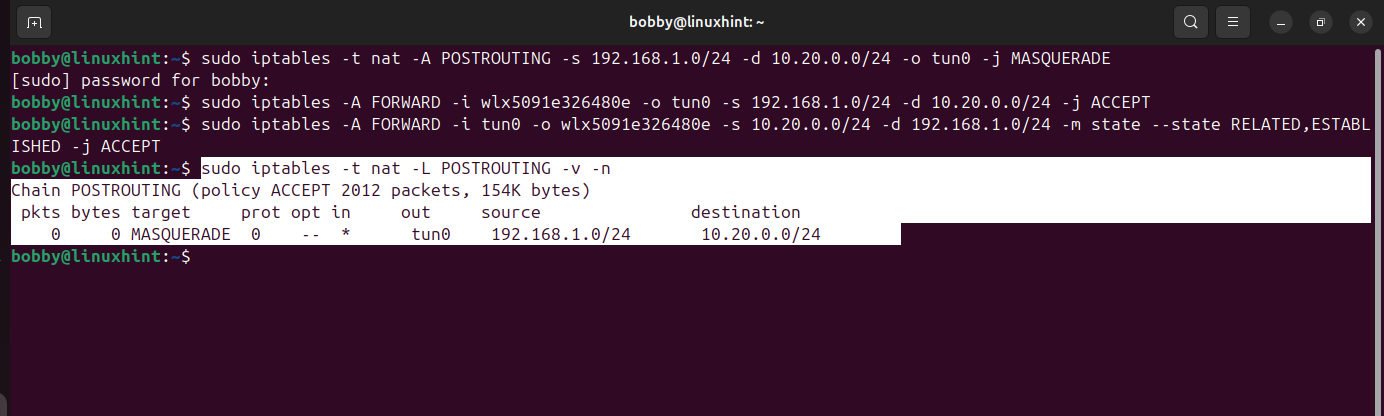
9.1 Add NAT Rule for Local LAN Traffic
To add a NAT Rule for Local LAN, we need to run this command:
This specific rule translates traffic from local LAN when this traffic goes towards Google Cloud through VPN tunnel. In more simple words, local LAN devices, all of them will appear to google cloud as mere traffic.
9.2 Allow Forwarding from LAN to VPN Tunnel
You need to allow traffic from local LAN interface to the VPN tunnel interface on a firewall level, when we enabled the IP forwarding that does the same thing essentially but at the linux kernel level, so we need to add a specific rule to allow this at the firewall level:
9.3 Allow Return Traffic from VPN Tunnel to LAN
Previously we allowed traffic from Local LAN interface to VPN Tunnel interface at the firewall level, now we need to add a rule that allows traffic from VPN tunnel to the local LAN on the firewall level:
This essentially allows the traffic to flow back from Google Cloud through the tunnel to the local LAN.
9.4 Verify the NAT Rule
Now to verify the rules that we have set, we can run this command:
You would be able to see MASQUERADE rule for source, destination and the output interface:
9.5 Verify Forwarding Rules
To verify the forwarding rules, use this command:
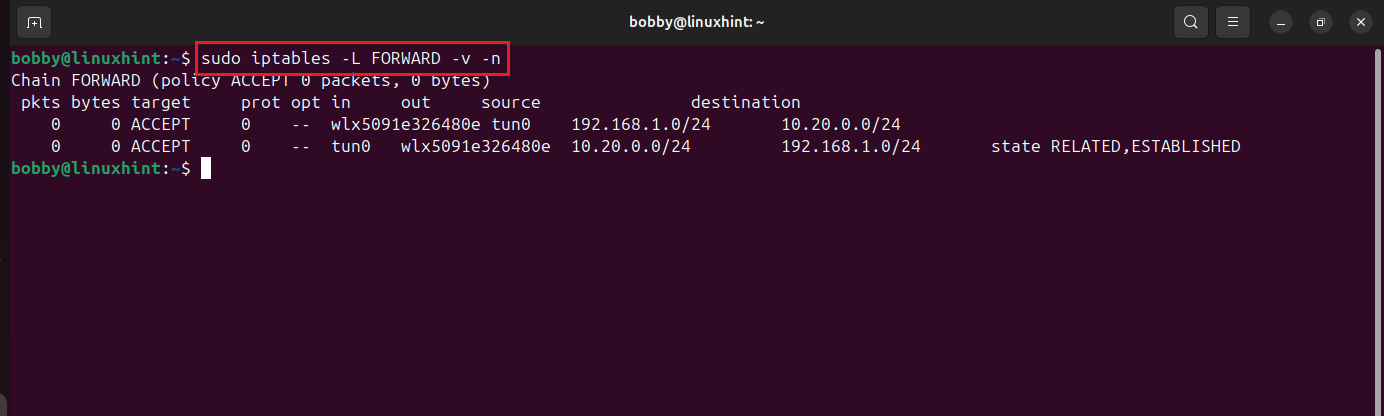
We are able to see the forwarding rules from tunnel interface to local LAN interface and from local LAN interface to tunnel interface.
9.6 Save the iptables Rules Permanently
If iptables-persistent is not already installed, then first install it:
While installing, if it prompts you to save rules, then select Yes for IPv4 rules.
Now to save the iptables rules permanently, use this:

Step 10: Create a Static Route in Google Cloud Back to the Local LAN
Now Google Cloud needs to know how to reach our local LAN. so we will create a GCP route that essentially says that to reach the local LAN subnet i.e. 192.168.1.0/24, send traffic to OpenVPN Access Server.
For that matter, go to your Google Cloud Console then go to the left side of the dashboard to VPC Network, hover over it and you will see a side drop menu in which you need to select Routes.
Now go to Route management, then click on Create route. It will take you to a form where you can create a route, so follow me and do exactly like I do, if you have been following this article. If you had different values then I will give a table below you can fill in your own vpc network and instance names and values. Below are the fields and values I am entering in the create route form.
| Field Title | Value |
|---|---|
| Name | route-to-local-lan-via-openvpn |
| Network | openvpn-s2s-vpc |
| Route type | Static route |
| IP version | IPv4 |
| Destination IPv4 range | 192.168.1.0/24 |
| Priority | 1000 |
| Next hop | Specify an instance |
| Next hop instance | openvpn-as-gcp-vm |
Take a look below, this is how it’ll look when you are filling the form:
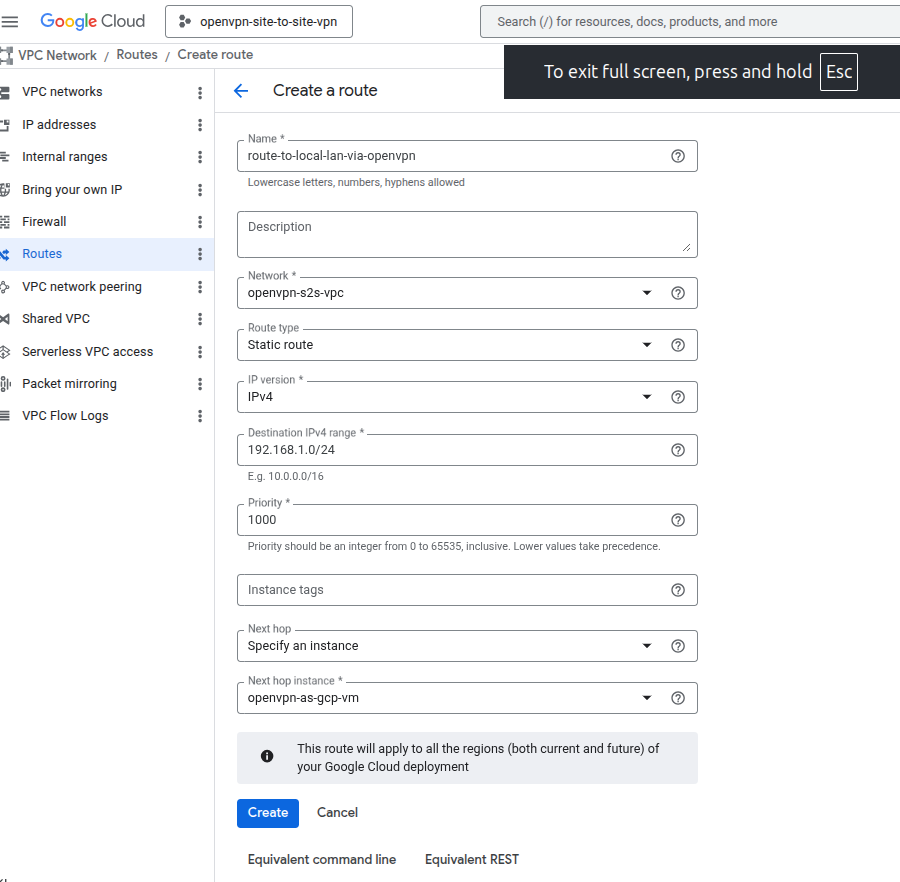
Click on Create and Static route will be created and it will also appear on the dashboard.
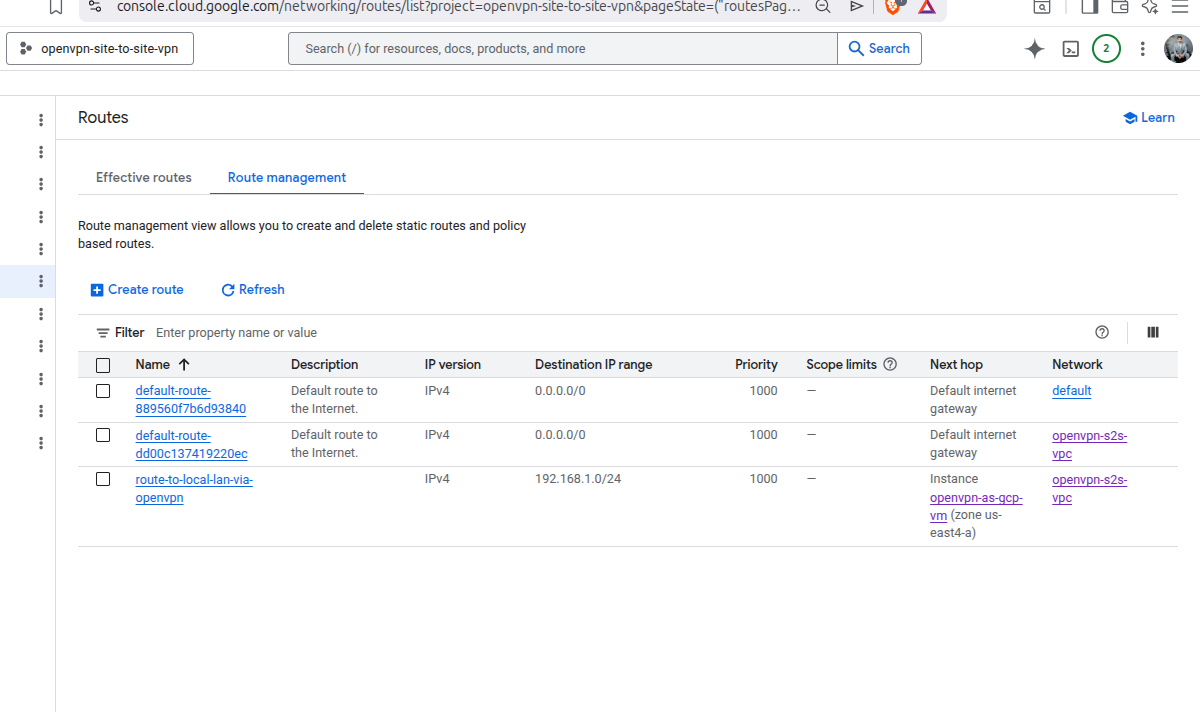
In Route management, click on Create route. You need to create another static route similarly for your tun0 interface, this is crucial if you are using a local Linux gateway:
| Field Title | Value |
|---|---|
| Name | route-to-openvpn-tunnel-subnet |
| Network | openvpn-s2s-vpc |
| Route type | Static route |
| IP version | IPv4 |
| Destination IPv4 range | 172.27.224.0/20 |
| Priority | 1000 |
| Next hop | Specify an instance |
| Next hop instance | openvpn-as-gcp-vm |
Finally click on Create to create this route.

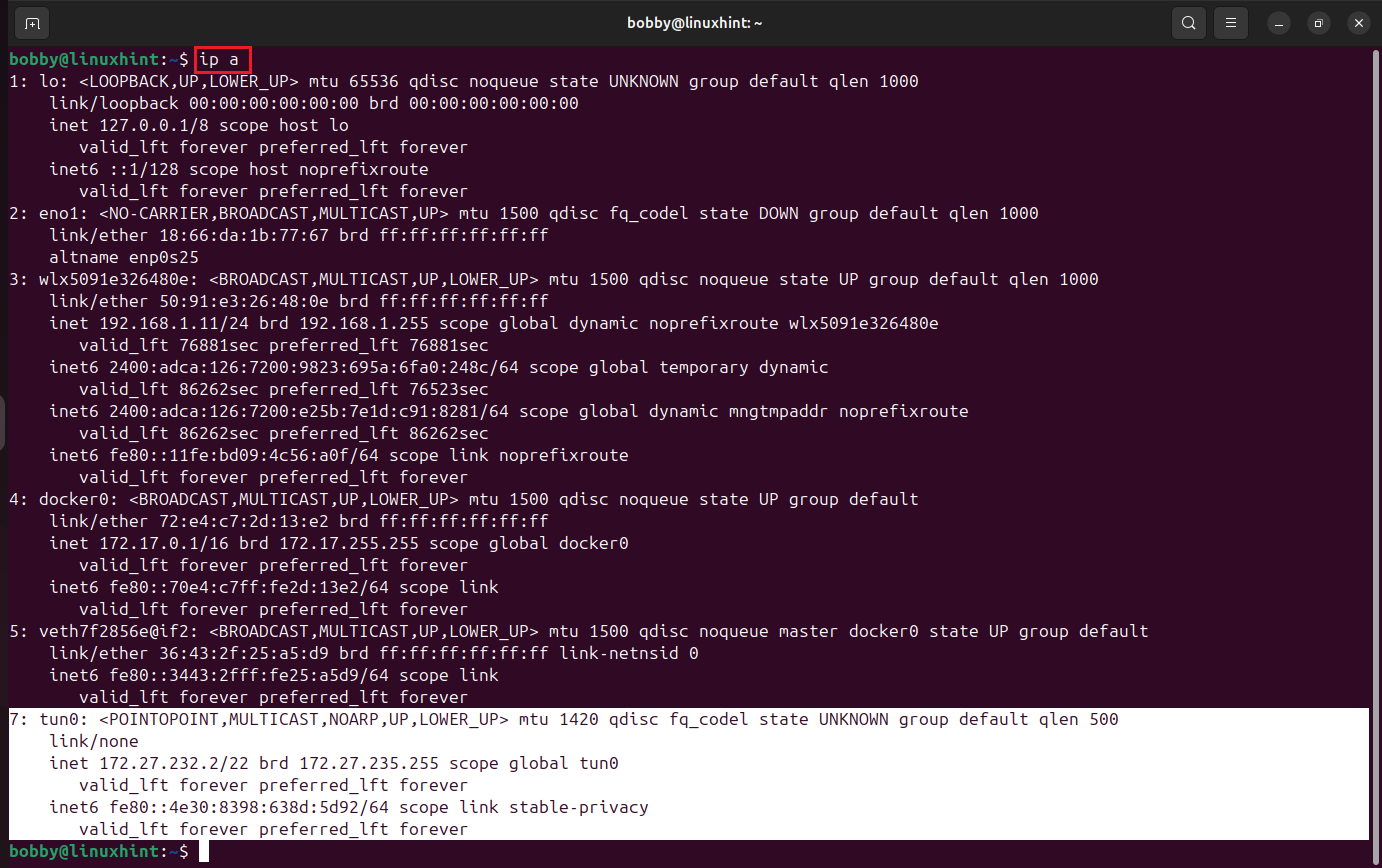
If you wanna view your tun0 interface for that matter you can use: ip a command.
Step 11: Create a Firewall Rule to Allow Local LAN Traffic into GCP
Previously, when we created a route it was to tell GCP where to send that traffic i.e. to our local LAN. Now we want to create a firewall rule inside GCP that will essentially tell GCP to allow traffic from our local LAN so that devices on our local LAN could access GCP resources. In easy words, we are telling GCP to allow traffic inside of itself from our local LAN.
To do this, go to your Google Cloud Console and go to VPC Network and then from the side drop menu click on Firewall.
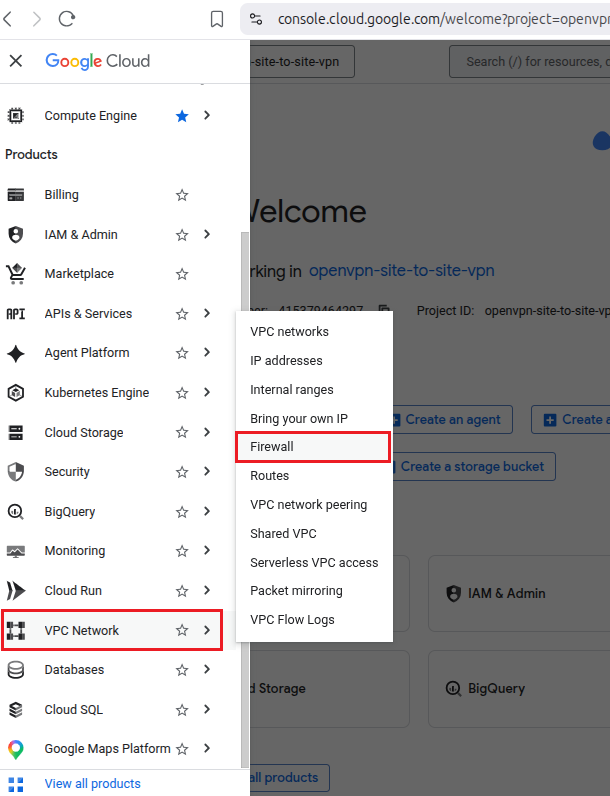
In here, click on Create firewall rule.

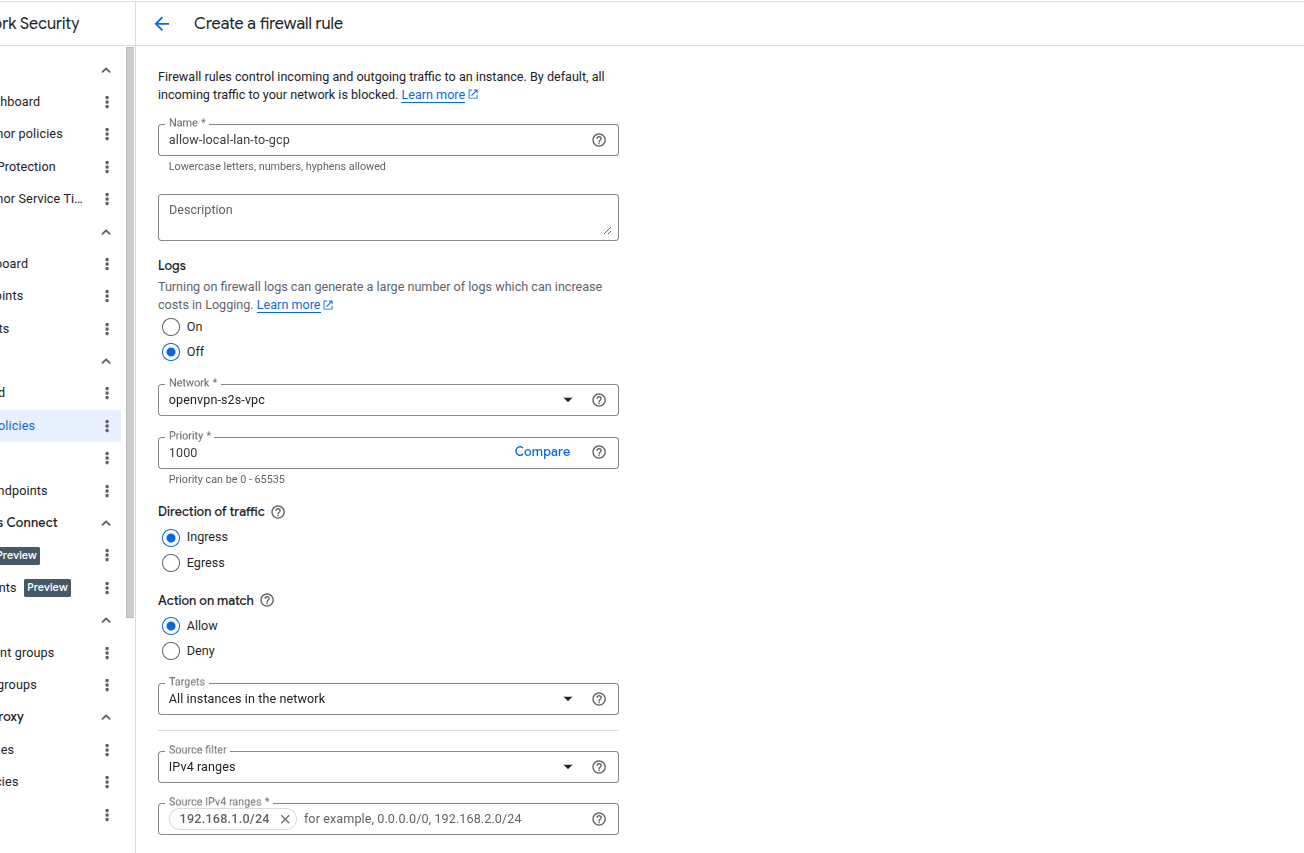
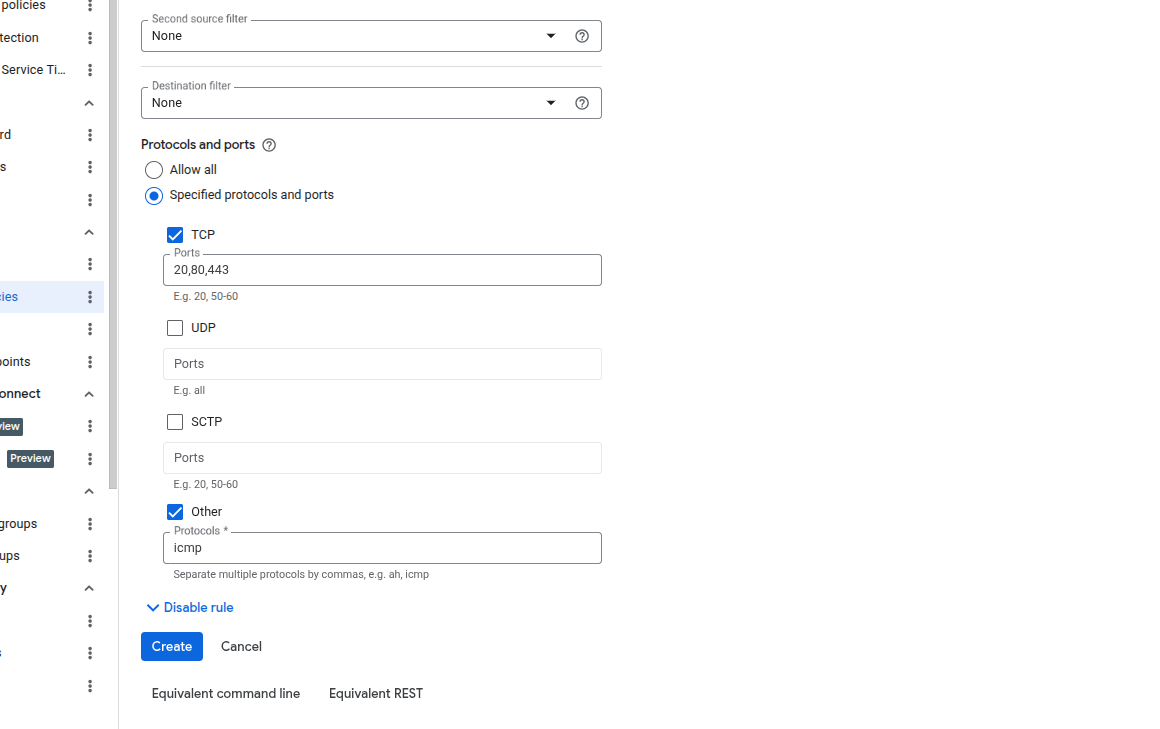
Now you will see Create a firewall rule form, fill it like this:
| Field Title | Value |
|---|---|
| Name | allow-local-lan-to-gcp |
| Logs | Off |
| Network | openvpn-s2s-vpc |
| Priority | 1000 |
| Direction of traffic | Ingress |
| Action on match | Allow |
| Targets | All instances in the network |
| Source filter | IPv4 ranges |
| Source IPv4 ranges | 192.168.1.0/24 |
| Second source filter | None |
| Destination filter | None |
| Protocols and ports | Specified protocols and ports |
| TCP | 20,80,443 |
| Other | icmp |
After filling up the form, click on Create to create this firewall rule.
Finally, our firewall rule has been created and we can see it on our dashboard:
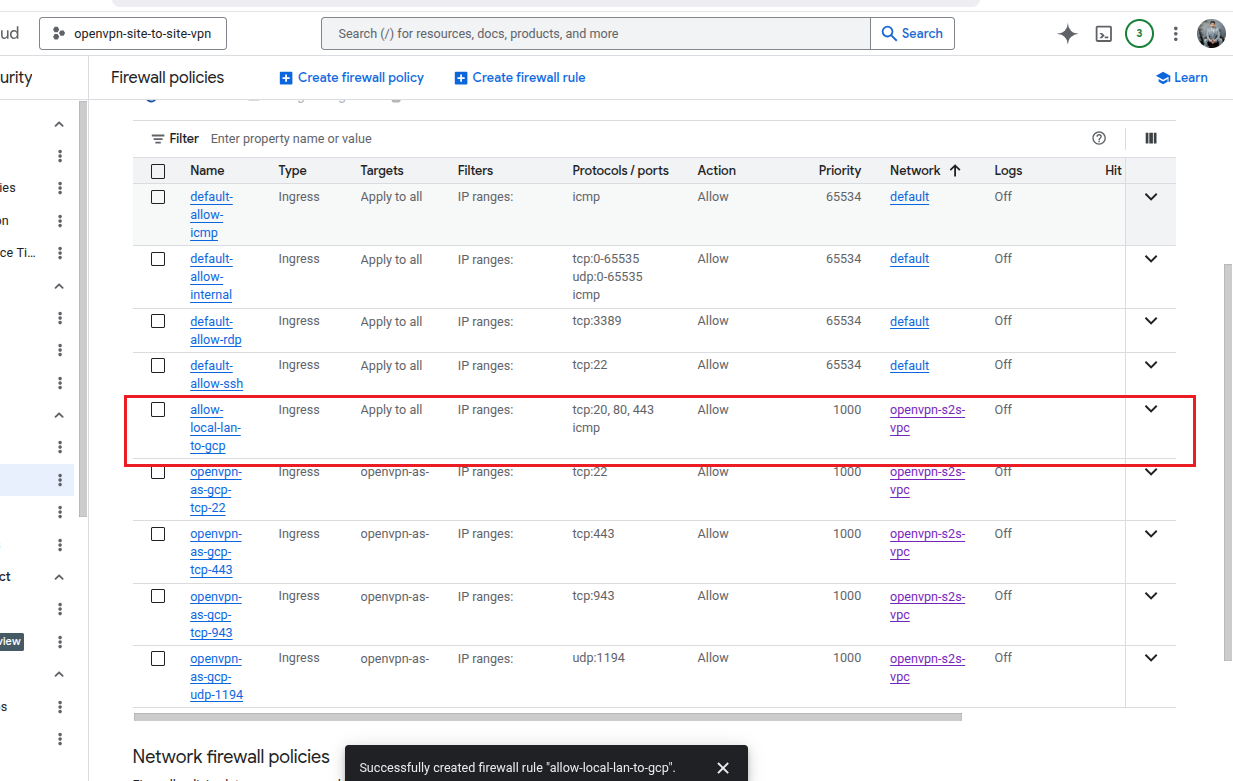
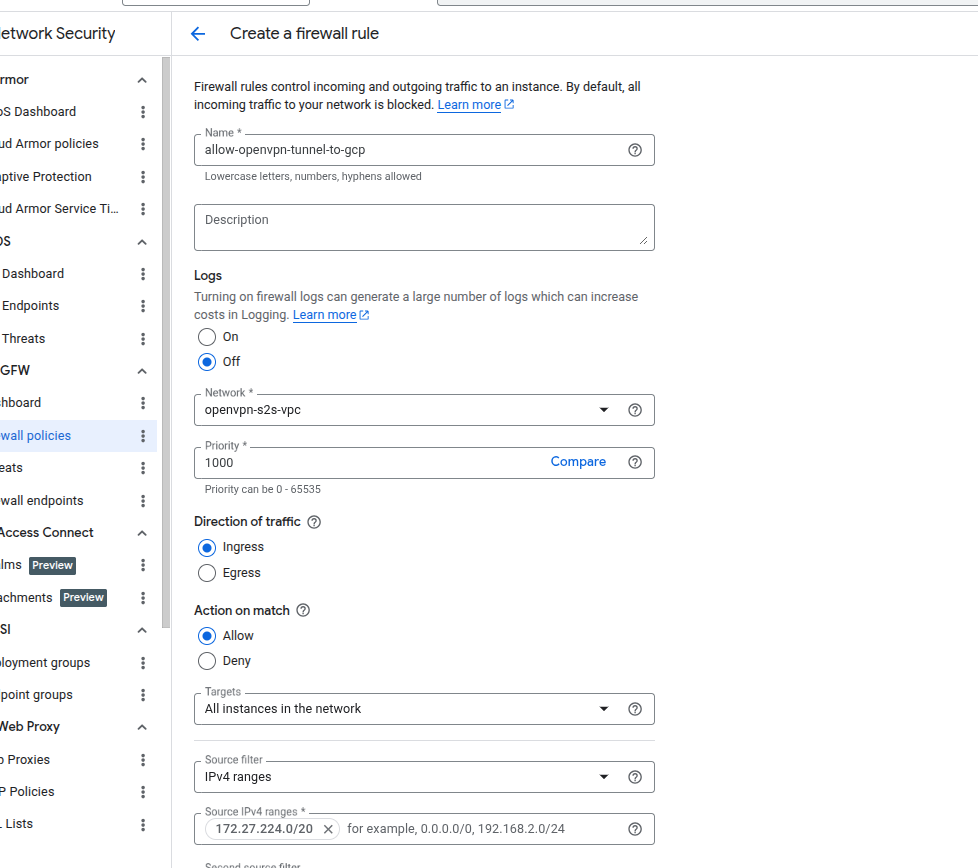
Click on Create firewall rule on the dashboard. You also need to create a firewall rule for your tun0 interface:
| Field Title | Value |
|---|---|
| Name | allow-openvpn-tunnel-to-gcp |
| Logs | Off |
| Network | openvpn-s2s-vpc |
| Priority | 1000 |
| Direction of traffic | Ingress |
| Action on match | Allow |
| Targets | All instances in the network |
| Source filter | IPv4 ranges |
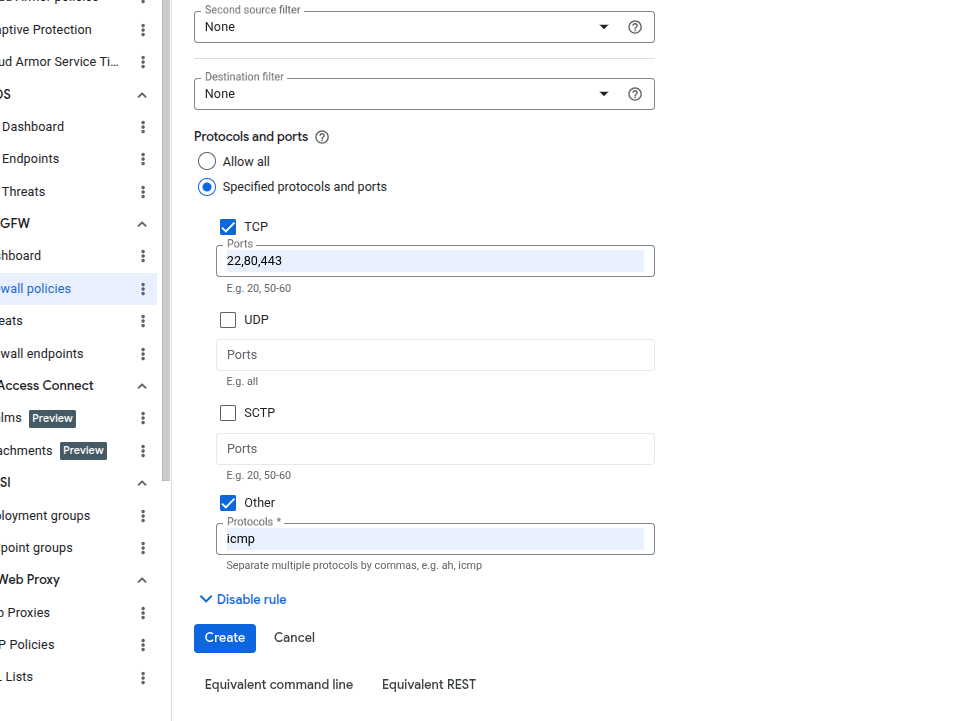
| Source IPv4 ranges | 172.27.224.0/20 |
| Second source filter | None |
| Destination filter | None |
| Protocols and ports | Specified protocols and ports |
| TCP | 22,80,443 |
| Other | icmp |
Step 12: Create a Test VM Inside the GCP VPC
To test if the local Linux gateway reaches the private GCP resources through the VPN tunnel, we create a VM inside the GCP VPC.
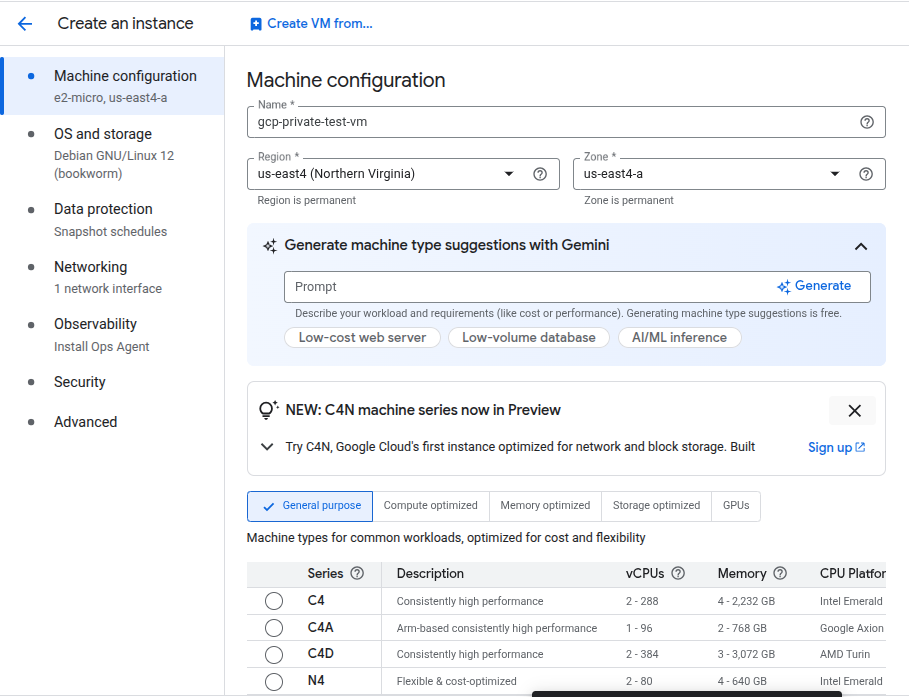
Go to Google Cloud Console and Click on Compute Engine, then go to VM Instances, and then click Create instance button.

Now we need to fill up the VM settings form and for that I will fill up the details as follows:
| Field | Value |
|---|---|
| Name | gcp-private-test-vm |
| Region | us-east4 (Northern Virginia) |
| Zone | us-east4-a |
| Machine Type | General Purpose |
| Series | E2 |
| Preset | e2-micro |
| Provisioning Model | Standard |
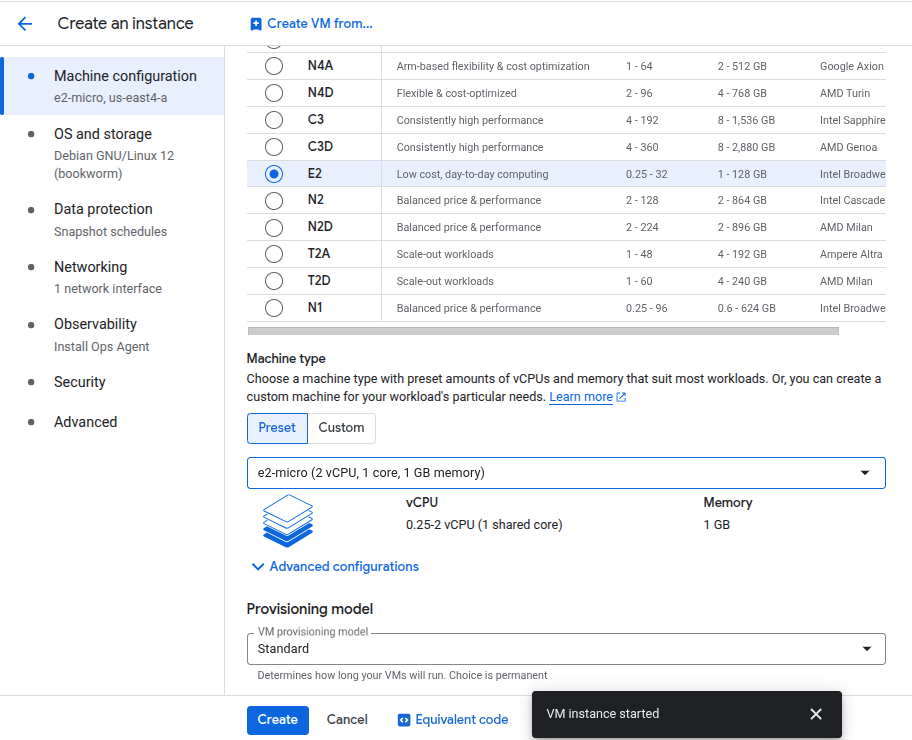
We are not done yet, leave all other tabs as it is, just go to Networking:

Under the firewall keep all options unchecked, we do not need them unless we plan on using a web server. Leave Network tags, and Hostname fields empty. DO NOT check IP forwarding Enable.
Scroll down and click on the option you see under Network interfaces, click on that and it will drop down:
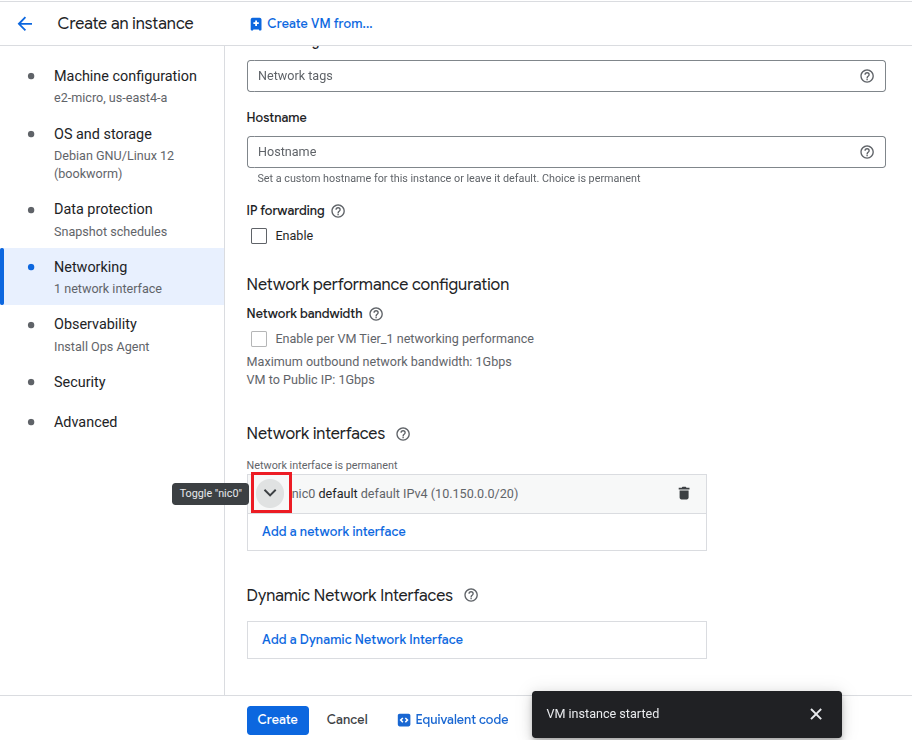
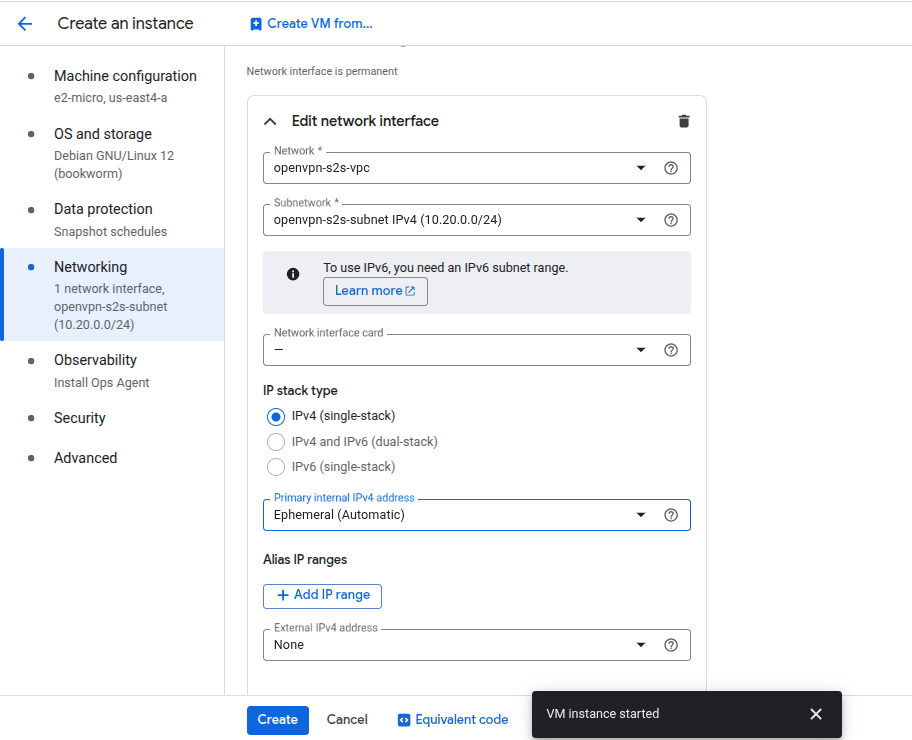
Now fill up the fields with these values and Edit network interface:
| Field | Value |
|---|---|
| Network | openvpn-s2s-vpc |
| Subnetwork | openvpn-s2s-subnet IPv4 (10.20.0.0/24) |
| IP stack type | IPv4 (single-stack) |
| Primary internal IPv4 address | Ephemeral (Automatic) |
| External IPv4 address | None |
Remember that we are setting External IPv4 address to None which means we’ll be able to ping(test) the private IP of the test VM. There is no public internet so that means if we are able to reach our GCP resource i.e. test VM then the site-to-site tunnel is working. We’ll test in the next step.
Now click on Create. Shortly, you will be able to see it on your dashboard.
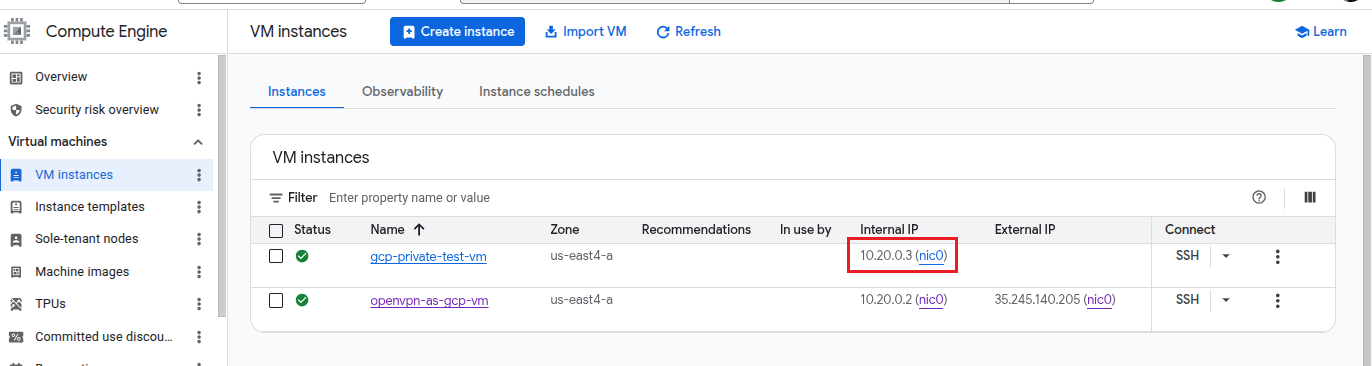
Note down the private IP that in our case is 10.20.0.3.
Step 13: Test the Site-to-Site VPN Connectivity
So, let’s verify now that the new test VM that we created, which is a private GCP resource, can be reached with our local Linux gateway machine via OpenVPN tunnel? If this test is a success then we have a site-to-site VPN ready.
Our GCP private VM has this private IP address: 10.20.0.3. As you remember, from the previous step that this VM does not have an external public IP address, so if we can reach it from the local Linux gateway, it confirms that the traffic is going through the VPN tunnel.
13.1 Keep the OpenVPN Tunnel Running
You need to ensure that the OpenVPN client terminal is still running and its showing:
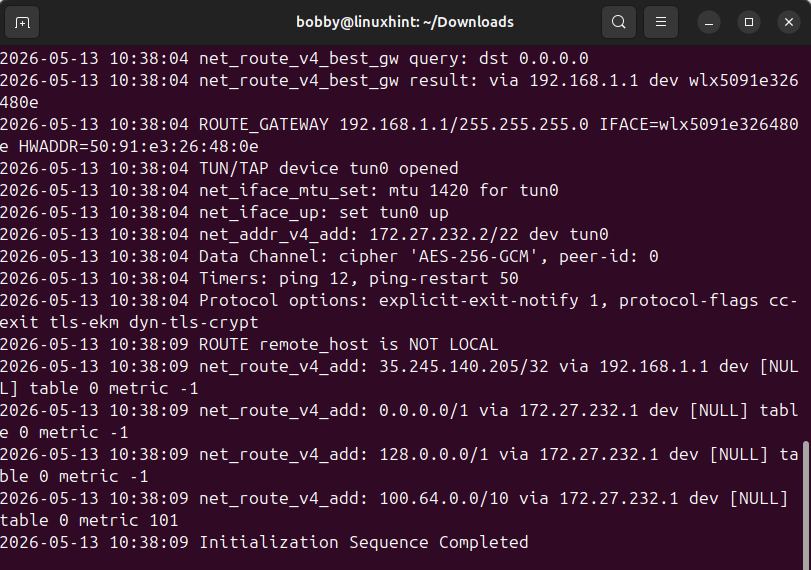
DO NOT close the terminal while testing.
13.2 Ping the Private GCP Test VM from the Local Linux Gateway
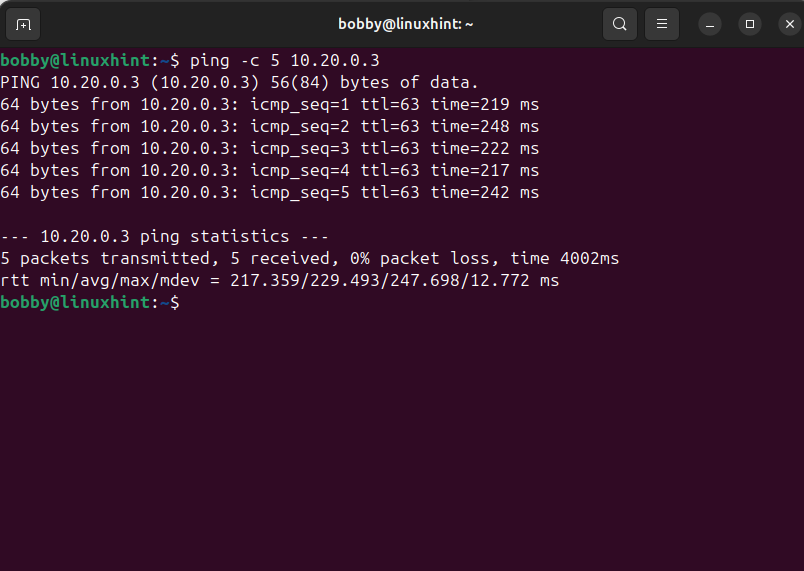
Open a new terminal on your local Linux gateway machine and ping the test VM:
This should send 5 packets from the local Linux gateway to the private GCP test VM. You can see it was a success which means our site-to-site VPN is working.
13.3 Verify the Route Used for the GCP Private IP
To figure out the route used for the GCP private IP, run this command:
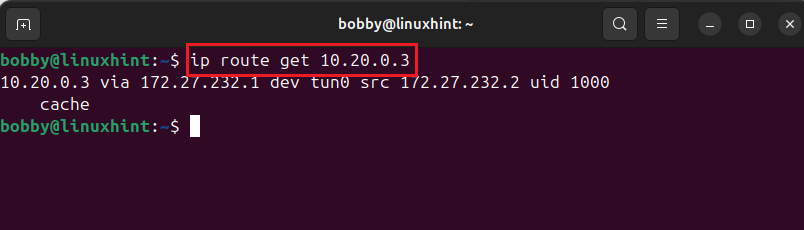
Now it’s confirmed that our traffic is going through our tunnel interface tun0. To further confirm the IP address of the tunnel interface tun0, run this command:
Remember the static route and firewall rule for the tunnel subnet we set in step 10 & 11, have played a crucial role here, so set them up properly.
Production Notes
What should you do differently in production? That’s the question, I’ll give you a few things to do differently in production while you are working on this:
1. Reserve a static external IP address for the OpenVPN Access Server VM. This is a prevention so the .ovpn file and Admin URL doesn’t break in case the deployed VM for OpenVPN Access Server restarts. (It broke in my case when I restarted my VM)
2. Restrict firewall rules instead of leaving ports open to 0.0.0.0/0. Admin UI and SSH access must be limited to only known and trusted public IP addresses.
3. Consider using a dedicated server machine or a dedicated router for the local site instead of using a temporary desktop machine.
4. Configure a static route on the local router and use a cleaner routed setup. DO NOT rely on NAT.
Conclusion
In this tutorial, we have created a site-to-site business VPN using OpenVPN Access Server from Google Cloud Marketplace. You need to have billing enabled on your Google Cloud account and you need to create a separate project for this tutorial which is highly recommended. We created our VPC, deployed OpenVPN Access Server, accessed the Access Server’s UI, configured the Access Server for site-to-site routing, downloaded the connection profile, verified the tunnel interface after connecting local Linux gateway to OpenVPN Access Server, enabled IP forwarding and rules and created static routes and setup firewall rules in our GCP VM for our tunnel interface and then finally created a test VM and tested it which resulted in a success. We didn’t have any external public IP source for this test VM so traffic still went through via tunnel which proved that we are able to access our GCP resources without traffic having to go through public internet directly, it goes through the private secure tunnel created by OpenVPN Access Server and now our setup is truly site-to-site VPN setup. If you are in production, Implement the improvements suggested in production notes above.