To run the instruction in Kubernetes, you will need Ubuntu 20.04 deployed on your Linux operating system. To run Kubernetes on Linux, you’ll also need to install the Minikube cluster on your PC. Minikube makes it simple to test commands and programmers by allowing you to do it systematically. As a result, it gives novices the best Kubernetes learning experience possible. The minikube cluster should be started first. Go to the newly installed command prompt terminal in Ubuntu 20.04. By using the Ctrl+Alt+T shortcut key or putting “Terminal” into the Ubuntu 20.04 system’s search box, you could do so. Either of the preceding ways will fully initiate the minikube on the terminal shell. The minikube will be started after that.
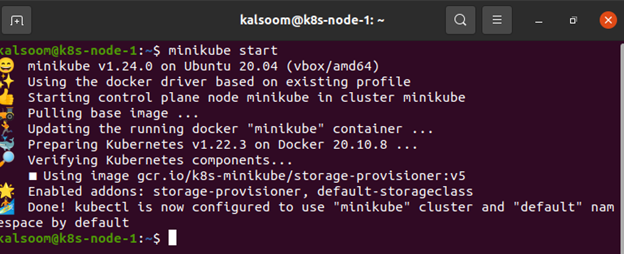
Type “minikube start” into the terminal to start the minikube. The Kubernetes cluster will be launched after a virtual machine capable of operating a single node cluster has been built. It’ll also function with the kubectl environment. This is how the cluster will interact with you.
Get a Shell to a Running Container
First, we have created a file using the touch command. It’s used to make a file that doesn’t have any content. The touch command generated an empty file. This command can also be used if the user does not have any data to store when the file is created.

With the touch command, you can make a single file at a time. See the following screenshot for a better idea. Touch, like all other commands, has a variety of possibilities. These options can be used for diverse purposes. To create a huge number of files at once, use the touch command. These files would not contain any data when they were created.
We have successfully created a Pod with one container. The nginx image is run by the container. The Pod’s configuration file is as follows:
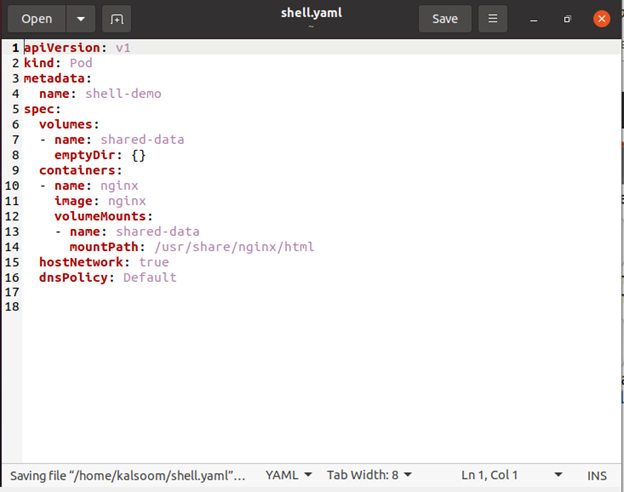
Of course, you are free to use a different image or shell. A few arguments are mentioned below:
my-shell: The name of the Deployment that is produced is usually named after this. This will be the pod title with a unique ID at its end.
—rm: When we detach, delete all resources we’ve produced. This cleans up the Deployment as well as the Pod after closing your session.
-i/—tty: It’s the combination of these two that allows us to join an interactive session.
–: Separates the positional arg from the end of the kubectl execute options (bash).
Bash: It overrides the container’s CMD with bash. We wish to use bash as our container’s command in this scenario.
Now the pod is successfully created with this command.

The following command (get pod) can be used to successfully test that the container is running.

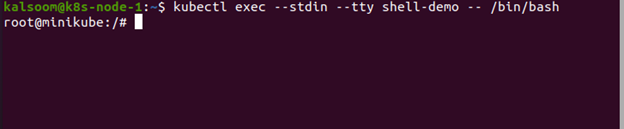
The kubectl exec command is used to perform commands inside Kubernetes Pods using Docker containers. It’s also possible to acquire an interactive shell to a Docker container running within a Pod using this command.
The kubectl exec command allows you to start a shell session inside your Kubernetes cluster’s containers. When logs alone aren’t enough, use this command to investigate the container’s file system, check the state of the environment, and use additional debugging tools. The best way to get a shell into a Kubernetes container is to use kubectl exec. It was created expressly for this purpose and eliminated all complications with determining which physical node to connect to.
There’s nothing stopping you from altering the container with kubectl exec because it gives you complete shell access. This enables you to install additional software packages to aid in troubleshooting.
List the root directory in your shell. Inside the container, type “ls /”.

Opening of console whenever a Pod has Two or More Containers
Consider the following scenario: you have two containers named main-app and helper-app in your Pod named my-pod. The following command starts a shell in the main-app container.
Conclusion
In this article, we have learned how to execute the bash command with kubectl and the prerequisites of running the instructions in Kubernetes. Additionally, we have also gone through the basics of touch and exec command and for which purpose they are used.