Environment Variable in Kubernetes
Environment variables are essential for maintaining applications in computers. We build environment variables against every application for running applications successfully. Environment variables are dynamic values that can guide processes for running in an environment. The developers generate the environment variable for Kubernetes in a computer then computers allow the Kubernetes processes to run the applications successfully. Developers must know about the Kubernetes Cluster. Kubernetes clusters are groups of nodes that efficiently run containerized apps.
How to Use Environment Variables in Kubernetes?
We will demonstrate briefly how to use environment variables in this section. First, check if we have Kubernetes clusters already in use. If yes then start. If not then firstly, we create the Kubernetes cluster with the help of minikube. Here, in this article, we used clusters having at least two nodes. One is the worker node and the other is the master node. This article is amazing for beginners learning Kubernetes and environment variable usage in Kubernetes.
Step # 1: Start Kubernetes
The first step entails opening the command line or terminal in the Linux operating system first. After that, run the ‘minikube start’ command in the terminal.
You can see if the Kubernetes cluster already exists when it has started. After that, a confirmation message will appear.
Step # 2: Create a Configuration File
In the next line, we will create a pod configuration file in which we define environment variables for the application. So, in the screenshot below, we create a configuration file with the name ‘envi’ with the extension ‘yaml’. To open a file in the system, we run the command in the terminal:
Upon running the command, ‘envi.yaml’ will appear in the system. We will see that a pod YAML configuration file has been created. A pod in Kubernetes is a group of containers and is used to handle multiple containers at once. This YAML configuration file contains different types of information such as version, kind, metadata, specs, etc.
Version ‘v1’ indicates that we are using version 1. The ‘pod’ indicates that this is a pod, not a deployment. The metadata contains information about the file such as names and labels. The specification provides specific information about containers and along with this, we add an environment variable ‘env’ in the system configuration file for multiple containers. Here, we add the first variable name, ‘DEMO_GREETING’ with the value ‘Hello from the environment’. The second variable name, ‘ DEMO_FAREWELL’ with the value ‘Such a sweet sorrow’.
Step # 3: Pod with One Container
Now, after that, we create a pod with one container named ‘envar-demo’ by running the command in the terminal. The following command has been executed, as shown in the screenshot below.
Now, we can see one container has been created successfully.
After creating containers, we can now easily see how many containers are running in the pod currently. So, we run the kubectl command in the terminal to list the pod containers.
In the screenshots below, you can see that only one pod is running right now and this command shows all the details about the pod container like its name, ready state, status, how many times it has restarted, and the age of the pod.
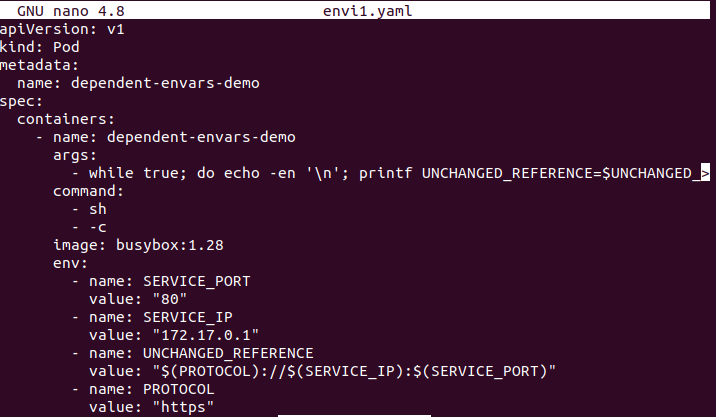
Following the definition of environment variables in Kubernetes, we explain the environment variable in the dependent state such as how to use the dependent environment variable in Kubernetes. We set dependent variables for containers that are running inside the pod. We also created a pod configuration file for creating dependent variables. Again, run the following command for creating a pod configuration yaml file:
Now, the configuration file is open and contains the details of pods and containers. To set a dependent variable, put the name of the variable($var_name) in the value of the environment variable in the configuration file.
Step # 4: Create an Environment Variable
After setting the environment variable configuration, create an environment variable pod using the kubectl command in the command line tool. Run the command in the terminal that is displayed below:
After running this command, a dependent variable is created with the name ‘dependent-envars-demo’ in the system.
After creating the pod container in the system successfully, we can check how many pods already are in the system. So, for listing all pods in the system, we will run the command for listing. Run the command in your system terminal that is given here.
After running this command, the list of dependent variables is displayed. Using this command, we can easily see the detailed list of pods with different features like name, ready, status, restarts, and age.
Step # 3: Logs for the Dependent Environment Variable
Finally, we also checked the logs for the dependent environment variable container that is running the pod. Here, we are using the kubectl command line tool. Run the following command in your terminal and the display will appear at the same time.
Logs include the unchanged_reference or protocol of your system, the service_address of your system where this pod lies, and also the escaped_reference of your system. By using this, you can also configure your IP address or protocols in detail.
So, in this way we include or use environment variables in Kubernetes.
Conclusion
This article taught us how we can use an environment variable in Kubernetes. It allows us to easily use containers in applications. As a beginner, it is not easy to remember the commands and use them for a different purpose. But here, we have helped you learn how to run commands and create environment variables. After creating variables then use the environment variables in the system.


