What is a Headless Service in Kubernetes?
In Kubernetes, a headless service is created without the use of a cluster IP address. In some cases, we do not need a single service IP for the cluster, so we used Kubernetes’ headless service. In this headless configuration, the service can still be used to maintain the network identity and DNS for a collection of pods even when it cannot be accessed via the cluster IP. We mostly used headless when individual pod access was required without the use of a proxy. We cannot use a load balancer here because we cannot fetch IP addresses. This service is often used for stateful applications, like databases, where it is crucial to have a consistent network identity for each iteration.
Pre-Requisites
The user must have the most recent version of Ubuntu installed on their system and understand which command is used to start all processes. The user must be familiar with Kubernetes, clusters, pods, and the kubectl command line, as well as have them installed on the system. For Windows users, Virtual Box or VMware provides the facility of using another operating system at the same time. For Windows users, Virtual Box must be installed, and Ubuntu or Linux should be running efficiently. After installing all packages like Kubernetes in the application, install a minikube in the application and then we move towards the headless service description, which we split into different steps with proper examples for your understanding. So, take a look at the following:
Step 1: Create a Configuration File
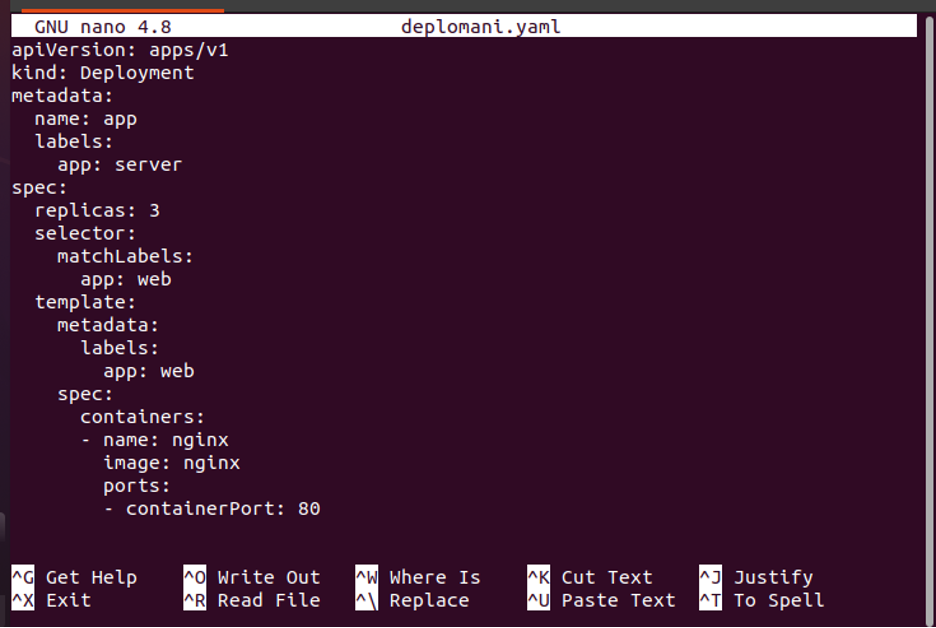
At first, we create a configuration file in which we explain everything about headless services in detail. So, we run the command on the minikube local cluster for the configuration file:
When the above-mentioned command is executed, the configuration file is opened with the name “deplomani.yaml”. The configuration file for the container was successfully created, as we can see in the attached screenshot.
Step 2: Deploy the Configuration File in Kubernetes
In this step, we will learn how to deploy the configuration file defined in the previous step in Kubernetes. We run the command for file deployment as follows:
![]()
The deployment is created after this command’s execution. The container, or pod, is successfully created here.
Step 3: Create Service Manifest in Kubernetes
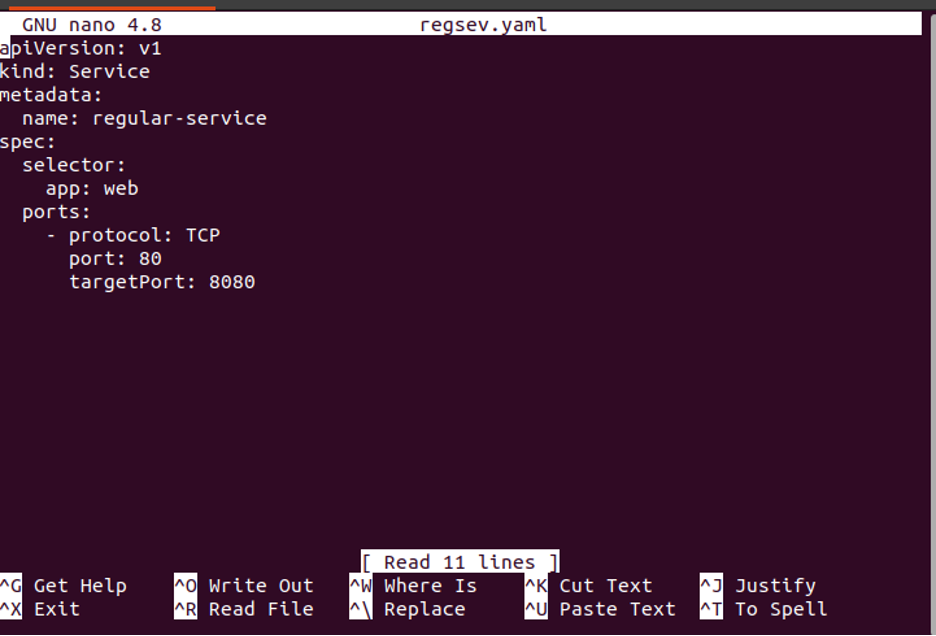
In this step, we create a file to start a regular service in Kubernetes. So, we run the command to create a manifest for regular service, which is:
Run the command in the terminal and press enter. When the command is run, the “regsev.YAML” file is successfully created, as shown in the screenshot below. Here, the type of pod is service, the name of the pod is regular-service, and the ports are linked with IP addresses.
Step 4: Deployment of the Regular Service Manifest
In this step, we deploy the defined regular service manifest in Kubernetes. So, we run the command here for this purpose:
![]()
The service is deployed and created successfully after command execution.
Step 5: Create a Headless Service Manifest
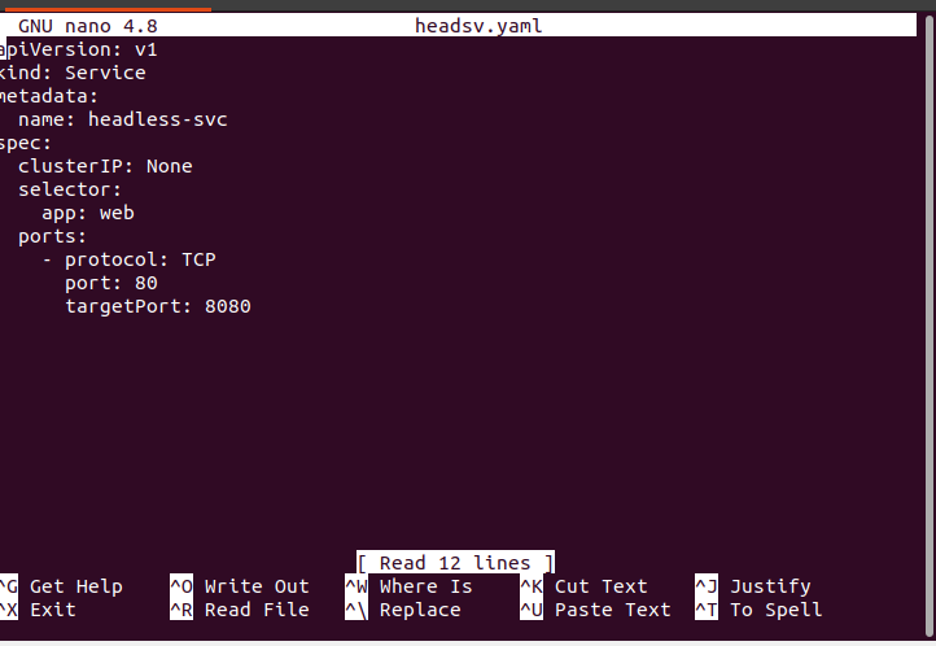
In this step, we want to create a service manifest in which we define headless services. So, we run the command to create a YAML file:
Enter the command into the kubectl command line and press enter. When we create a manifest for a headless service in Kubernetes, we can specify “None” as the cluster IP when defining the service in the manifest file.
Step 6: Deploy Headless Service
This step involves deploying this headless yaml file to Kubernetes. So, we run the command here:
![]()
Following command execution, the system’s headless service “headless-svc” is successfully created. This command creates a service without a cluster IP, but it nevertheless creates DNS records for the pods that fit the selector so that we may reach them by their DNS names.
Step 7: Add temporary Cluster in Kubernetes
In this step, we run the command to create a few temporary clusters by setting their image in the application.

When we run the command, the screenshot attached above displays temporary clusters that have their own spaces in the application of Kubernetes.
Step 8: Get the Server and IP Address of the Headless Service
In this step, we want to see the server address and IP address of the headless service in Kubernetes. We run the command that returns a value like an address and serves it from the DNS server. The lookup command-line tool is used to query DNS servers for information.

This command gave us a server and IP, and the lookup returned us a hostname of “headless svc.” If the hostname is not resolved, then DNS returns an error message.
Step 9: Delete All Running Services in Kubernetes
In this step, we terminate all running services because these services engage space and storage in Kubernetes applications. Firstly, we delete the regular service from Kubernetes by running the command:
When we run this command, “regular-service” is successfully deleted.
![]()
Now, we delete the headless service from the Kubernetes cluster. We run the delete command by entering the headless service name “headless-svc” in the kubectl command-line tool.
This command successfully terminates the headless service from the Kubernetes cluster.

The next step is the deletion of deployments after the termination of all services from Kubernetes applications. We run the command to delete the deployment of the application.
As a result, the deployment of the application can be easily deleted using a command.

Lastly, we created a temporary pod in the above session. Here, we also see the deletion of these temporary pods from Kubernetes. We run the command for deletion:
![]()
Kubernetes services and pods were successfully deleted.
Conclusion
Headless services are very helpful for handling services in Kubernetes. The headless services provide us cluster without IP. We also learned how we deleted the running services from Kubernetes when there is no need for these services. You can also practice these examples in your application.