This article acknowledges about
Create Scrollspy
Scrollspy can be applied on the two components:
- Navbar
- List Group
ScrollSpy with Navbar
To create a scrollspy, use the data-bs-spy=” scroll” attribute to make the required area scrollable. For example, we choose html body as the scrollable area. Give ID or class name of the navigation bar to data-bs-target attribute to connect navbar or list-group with scrollable area.
Code for head section
body
{
position: relative;
}
.navbar-dark .navbar-nav .nav-link.active, .navbar-dark .navbar-nav .show>.nav-link
{
color: red;
}
</style>
Code for body section
<nav class="navbar navbar-expand-sm bg-dark navbar-dark fixed-top">
<div class="container-fluid">
<ul class="navbar-nav">
<li class="nav-item">
<a class="nav-link" href="#section1">Section 1</a>
</li>
<li class="nav-item">
<a class="nav-link" href="#section2">Section 2</a>
</li>
<li class="nav-item">
<a class="nav-link" href="#section3">Section 3</a>
</li>
<li class="nav-item">
<a class="nav-link" href="#section4">Section 4</a>
</li>
<li class="nav-item">
<a class="nav-link" href="#section5">Section 5</a>
</li>
<li class="nav-item">
<a class="nav-link" href="#section6">Section 6</a>
</li>
</ul>
</div>
</nav>
<div id="section1" class="container-fluid bg-Light" style="padding:100px 20px;">
<h1 style="margin-top: 20px; margin-left: 40%;">Section 1</h1>
</div>
<div id="section2" class="container-fluid bg-primary" style="padding:100px 20px;">
<h1 style="margin-top: 20px; margin-left: 40%;">Section 2</h1>
</div>
<div id="section3" class="container-fluid bg-warning " style="padding:100px 20px;">
<h1 style="margin-top: 20px; margin-left: 40%;">Section 3</h1>
</div>
<div id="section4" class="container-fluid bg-secondary" style="padding:100px 20px;">
<h1 style="margin-top: 20px; margin-left: 40%;">Section 4</h1>
</div>
<div id="section5" class="container-fluid bg-danger" style="padding:100px 20px; height: 500px;">
<h1 style="margin-top: 50px; margin-left: 40%;">Section 5</h1>
</div>
<div id="section6" class="container-fluid bg-success " style="padding:100px 20px;">
<h1 style="margin-top: 20px; margin-left: 40%;">Section 6</h1>
</div>
</body>
This is how a scrollspy is created in bootstrap 5.
ScrollSpy with List Group
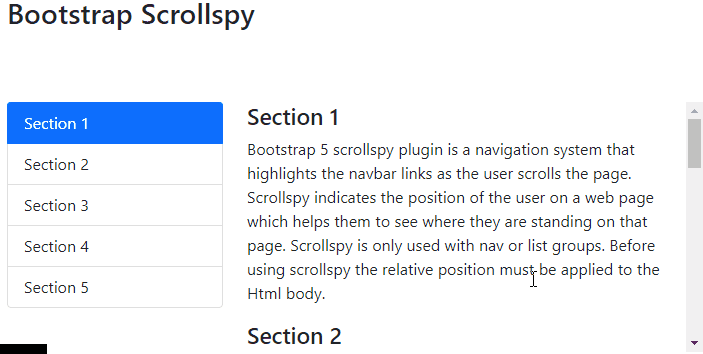
Below is an example of scrollspy with a list group. The attribute data-bs-spy=”scroll” is used to make the div scrollable and data-bs-target attribute is used to make sure that content is connected to scrollable area. Lastly, to enable the scrollspy use javascript code and set body position to relative.
Code for Head Section
$(function(){
$('#work').on('activate.bs.scrollspy')
});
</script>
<style>
body
{
position: relative;
}
</style>
Code for body section
<h2 class="py-3" text-center>Bootstrap Scrollspy</h2>
<div class="row py-5 justify-content-center">
<div class="col-md-4">
<div id="lex" class="list-group sticky-top">
<a class="list-group-item list-group-item-action" href="#sec1">Section 1</a>
<a class="list-group-item list-group-item-action" href="#sec2">Section 2</a>
<a class="list-group-item list-group-item-action" href="#sec3">Section 3</a>
<a class="list-group-item list-group-item-action" href="#sec4">Section 4</a>
<a class="list-group-item list-group-item-action" href="#sec5">Section 5</a>
</div>
</div>
<div class="col-md-8">
<div class="scrollspy-example" data-bs-spy="scroll" data-bs-target="#lex" id="work" data-offset="20" style="height: 250px; overflow: auto;">
<h4 id="sec1">Section 1</h4>
<p>
Bootstrap 5 scrollspy plugin is a navigation system that highlights the navbar links as the user scrolls the
page. Scrollspy indicates the position of the user on a web page which helps them to see where they are
standing on that page. Scrollspy is only used with nav or list groups. Before using scrollspy the relative
position must be applied to the Html body.
</p>
<h4 id="sec2">Section 2</h4>
<p>
Bootstrap 5 scrollspy plugin is a navigation system that highlights the navbar links as the user scrolls the
page. Scrollspy indicates the position of the user on a web page which helps them to see where they are
standing on that page. Scrollspy is only used with nav or list groups. Before using scrollspy the relative
position must be applied to the Html body.
</p>
<h4 id="sec3">Section 3</h4>
<p>
Bootstrap 5 scrollspy plugin is a navigation system that highlights the navbar links as the user scrolls the
page. Scrollspy indicates the position of the user on a web page which helps them to see where they are
standing on that page. Scrollspy is only used with nav or list groups. Before using scrollspy the relative
position must be applied to the Html body.
</p>
<h4 id="sec4">Section 4</h4>
<p>
Bootstrap 5 scrollspy plugin is a navigation system that highlights the navbar links as the user scrolls the
page. Scrollspy indicates the position of the user on a web page which helps them to see where they are
standing on that page. Scrollspy is only used with nav or list groups. Before using scrollspy the relative
position must be applied to the Html body.
</p>
<h4 id="sec5">Section 5</h4>
<p>
Bootstrap 5 scrollspy plugin is a navigation system that highlights the navbar links as the user scrolls the
page. Scrollspy indicates the position of the user on a web page which helps them to see where they are
standing on that page. Scrollspy is only used with nav or list groups. Before using scrollspy the relative
position must be applied to the Html body.
</p>
</div>
</div>
</div>
</div>
This is how scrollspy is created using list-groups.
Conclusion
Scrollspy is created by using attribute data-bs-spy=” scroll” and data-bs-target attribute on the body tag to make it scrollable and if you want to apply these attributes on a div then add data-offset attribute and set overflow to auto. In the above article, the creation process of a scrollspy is explained in detail and to make scrollspy work properly always make sure that the position of its body is set to relative.


