Just like the C language, the Golang language is also an open-source language that can be executed on many tools on Windows and Linux/Unix systems to create records. Like C++ and Java, we can make a connection between a MongoDB client system and Go language using any golang tool. To do this, we will be performing several very important and necessary steps in Ubuntu 22.04 by utilizing the Visual Studio code tool for a program. Before making a connection with MongoDB compass, we tend to install MongoDB and Visual Studio Code along with “go” and required extensions in the guide to help you out in the Go language.
Install MongoDB
We have downloaded the “deb” package of the MongoDB server from its official website. The “Deb” package can also be executed in Ubuntu using the “dpkg” command tool on the Terminal.
Executed the MongoDB server file on the terminal with “sudo” rights and provided a passcode.
If you found the MongoDB service inactive at your end after trying the “systemctl” instruction of Ubuntu to check for the status, you can update it as well. To activate the MongoDB, try the systemctl instruction with the “start” and “enable” keywords.
saeedraza@virtualbox:~$ sudo systemctl enable mongod
saeedraza@virtualbox:~$ sudo systemctl status mongod
Launch MongoDB
After the installation, quickly launch the MongoDb shell using the “mongo” query. Switch to the “admin” database to perform the proceeding steps.
MongoDB shell version v5.0.14
connecting to: mongodb://127.0.0.1:27017/?compressors=disabled&gssapiServiceName=mongodb
Implicit session: session { "id" : UUID("34cc8e0f-b6b0-4191-adea-676411f66cf5") }
MongoDB server version: 6.0.3
We are creating a new user with admin rights using the createUser() function.
switched to db admin
> db.createUser(
... {
... user: "Saeed",
... pwd: "12345",
... roles: [{role: "userAdminAnyDatabase", db:"admin"}, "readWriteAnyDatabase"]
... })
Successfully added user: {
"user" : "Saeed",
"roles" : [
{
"role" : "userAdminAnyDatabase",
"db" : "admin"
},
"readWriteAnyDatabase"
]
}
Authorized the user “Saeed” using credentials in the “auth” function and displayed the currently owned databases of MongoDB.
1
> show dbs
admin 0.000GB
config 0.000GB
local 0.000GB
Install MongoDB Driver for Golang
Open the terminal in Visual Studio Code and move within the folder “Golang” in which you wanted to add your source code files. Run the “go mod init” instruction with the folder name to create a “go.mod” file. Load the MongoDB driver for the Go language via the “go get” query.
In some cases, it is required to load the bson format MongoDB driver for Golang as well.
Make sure to add the necessary extension packages like “gopls” in Visual Studio code using the Extensions panel without using any instruction.
Along with “gopls”, the Golang might require the “dlv” tool to be installed for sure.
Golang Code Example
The code file “main.go” has been started with the import of some useful packages going to be utilized in the whole code for connection. A total of 7 imports have been made here. After importing the packages, we created a new structure named MongoField with 4 JSON type data members in it. 2 of these data members are strings and 2 of them are integers.
After this, a constant type of variable “uri” has been declared with a client address or you have to add your localhost address in it according to the username and password. The main() functions start with the use of connect() function of Golang to connect with MongoDB through a “mongo” object. The ApplyURI() function will be taking the “uri” variable as its argument to apply on the Client() function so that a connection can be established through a host address. The context package has been playing the main role to call the TODO() function for requesting a connection. If the connection got established between the Visual Studio code and the MongoDB successfully, the client-returned signal will be added to the “client” variable; otherwise, the error will be stored in the variable “err”.
The “if” statement is here to display the messages accordingly. If the “err” variable got a value other than “nil”, the Println() function from the format package “fmt” package will be printing that error on the output screen, the terminal. The “os” package will be used to exit the program if the error occurs. The context package is again utilized here to manage the timeout for the connection to be established through this program. For the particular timeout value “ctx”, our program will be executing. A new collection “Person” along with a new database “New” will be created in the client MongoDB through Golang. The Println() will be displaying the type of a collection “c” using the “TypeOf” function from the reflect package.
A record “Rec” got created using the structure MongoField data members which are initialized here one by one. The record type got displayed and the record “Rec” will be inserted into client MongoDB using the insertOne function with the collection object “c”. The successful insertion leads to a “result” variable holding the success value while the “insertErr” variable will be holding the failure value. The “if” statement is used again to check and display the error in inserting a record only if the “insertErr” variable holds other than the “nil” value. Else, the “else” part of the statement will be holding some Println() statements to display the type of a record to be inserted, the record ID, and the success message for the connection and insertion that has taken place. The Golang code is now complete.
import (
"context"
"fmt"
"os"
"reflect"
"time"
"go.mongodb.org/mongo-driver/mongo"
"go.mongodb.org/mongo-driver/mongo/options"
)
type MongoField struct {
Name string `json: "Field Str"`
Email string `json: "Field Str"`
Age int `json: "Field Int"`
Salary int `json: "Field Int"`
}
const uri = “mongodb://User:Password@localhost:27017/?maxPoolSize=20&w=majority”
func main() {
client, err := mongo.Connect(context.TODO(),options.Client().ApplyURI(uri))
if err != nil {
fmt.Println("Mongo.connect() error: ", err)
os.Exit(1)
}
ctx, _ := context.WithTimeout(context.Background(), 15*time.Second)
c := client.Database("New").Collection("Person")
fmt.Println("Collection Type: ", reflect.TypeOf(c), "\n")
Rec := MongoField{
Name: "EDEN",
Email: "[email protected]",
Age: 45,
Salary: 50000}
fmt.Println("Record Type: ", reflect.TypeOf(Rec), "\n")
result, insertErr := c.InsertOne(ctx, Rec)
if insertErr != nil {
fmt.Println("InsertOne Error: ", insertErr)
os.Exit(1)
} else {
fmt.Println("InsertOne result type: ", reflect.TypeOf(result))
newID = result.InsertedID
fmt.Println("Inserted Record ID: ", newID))
fmt.Println("Successfully Connected and Inserted Records!")
}}
Save the Golang code and open the terminal within the Golang folder. Now, use the “go” instruction with the “run” keyword to execute the “main.go” code file. The debugging was successful and the collection “Person” has been successfully generated in the MongoDB. The output is showing the collection type, record type, result type, and the “ID” of a record.
Collection Type: *mongo.Collection
Record Type: main.MongoField
InsertOne result type: *mongo.InsertOneResult
Inserted Record ID: ObjectID(“63a8535ac97b4218230664b6”)
Successfully Connected and Inserted Records.
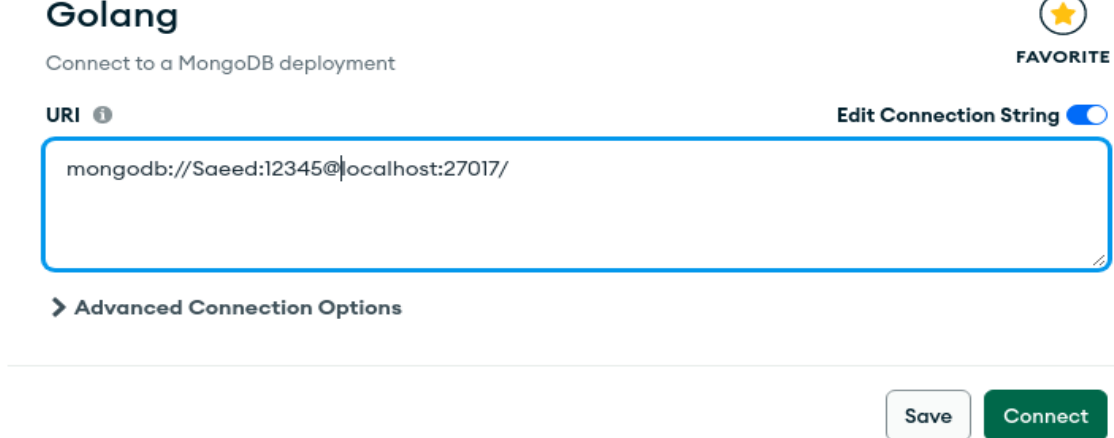
Open the “MongoDB” compass at your end and connect with its local host using the “URI”.
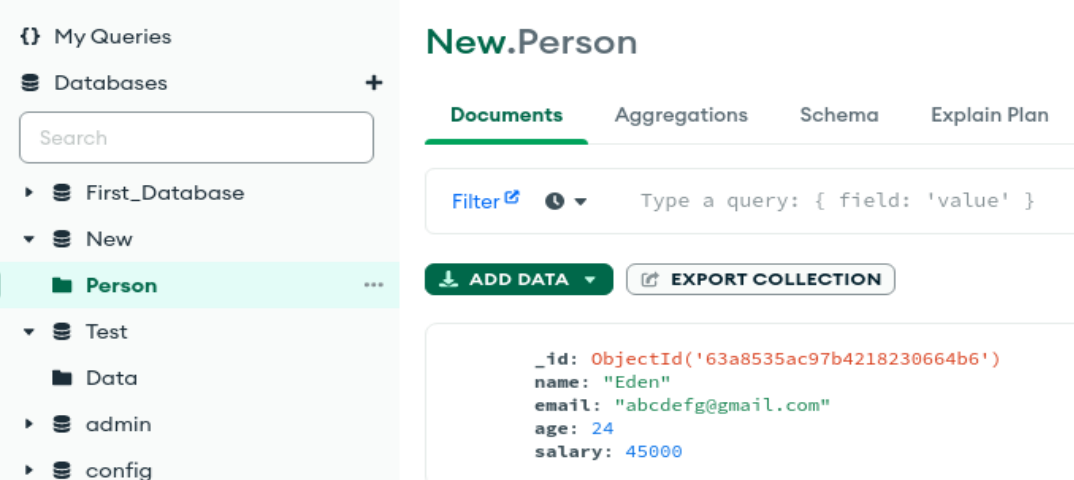
After moving within the “New” database, we have got the collection “Person” displayed in the “Documents” section along with the record that we have added.
Conclusion
This guide illustrates the use of Go language to add records in the MongoDB client using a Visual Studio Code tool in the Linux system. For this, we have installed the mongodb along with the mongodb driver for “golang” in the system. Using a Golang language, we have created a “go” file in MongoDB and discussed the variety of packages and functions of Golang to create a connection to MongoDB and insert records. In the end, we have demonstrated the results on the MongoDB compass which shows that you can connect any Golang tool to MongoDB.


