
Network Time Protocol or NTP, synchronizes the time on the network or computers. NTP allows the system to ensure consistent and reliable timekeeping, which is essential for different factors such as security, operation, compliance, and coordination. This technology applies to both protocol and client-server programs running on the computer.
NTP regularly communicates with the particular server to maintain time sync accurately. Furthermore, NTP servers utilize network measurements and algorithms to evaluate the accurate time. However, as a Linux user, you must configure the NTP before using it properly. So in this guide, we will explain the brief method to install and configure NTP time on Rocky Linux 9 (RHEL-based OS).
How to Configure the NTP Time on Rocky Linux 9
Before configuring NTP, please run the following command to ensure that the system is up-to-date:
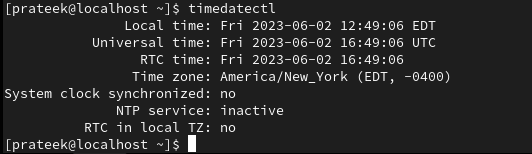
Once you are done with the update, check the current timezone through the below command:

As the above image shows, the time zone of the current device is America/New_York. However, if you want to change the time, please run the following commands one by one:
sudo timedatectl set-time 12:49:00
In the above command, 12:49:00 is current to which we want to implement in the device:
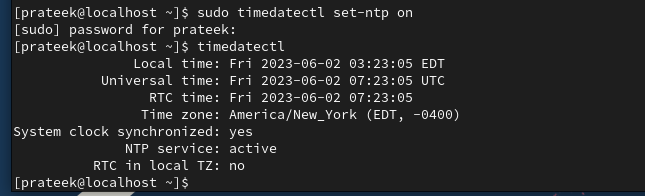
Now you can sync the NTP time with the current timezone by running the below command:
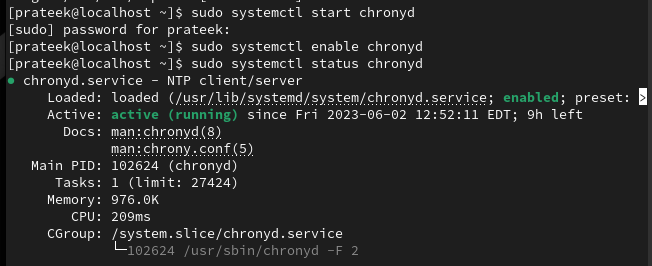
Once you activate the NTP service, it is time to configure the NTP service using Chrony. Although Chrony is already available in Rocky Linux 9, if you want to install it, then please run the below command:

Now, start, enable, and check the status of Chrony by executing the following commands one by one:
sudo systemctl enable chronyd
sudo systemctl status chronyd
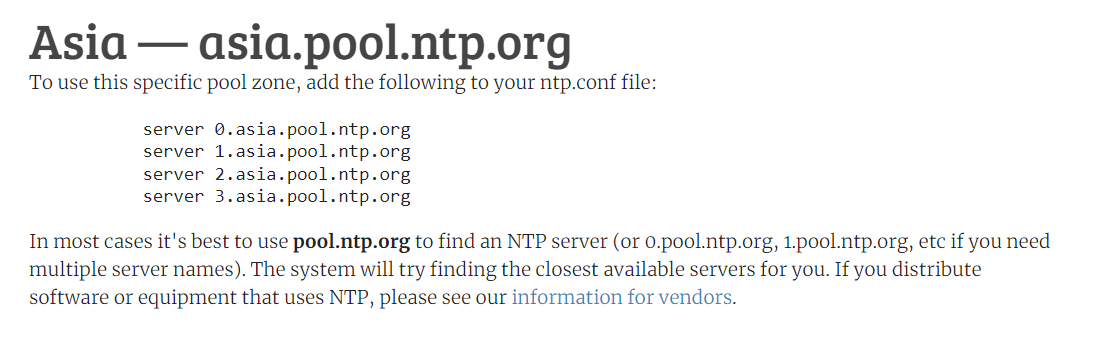
After enabling the Chrony server, you can configure the Chrony as per the current time and region. If you want to know the active server of NTP, please visit the official website of the NTP server to get the information. For example, let’s configure the system according to the Asia time zone.
Please run the below command to open the Chrony config file:

Here, you need to add # before the “pool 2.rocky.pool….” line and then add the servers:

Once you are done, please save the file and exit the config file. Now you can enable the NTP sync by running the below command:

You can also restart the Chrony service to make changes successful:
![]()
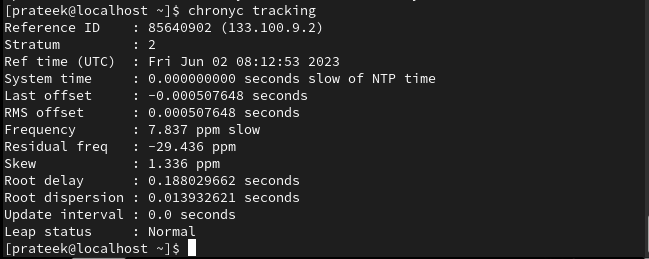
Finally, you can run the below command to display the Chronyd tracking that shows the complete statistics about the system:
Furthermore, you can use the chronyc sources command to verify that NTP is using Chrony for the time sync:

Configure the NTP Server
If you want to go one step further, use an NTP server for Chrony Synchronization. So open the Chrony config file again and add the IP address of the server that corresponds to the NTP:

Now again restart the server and display the Chronyd tracking and receiving the time from the NTP server:
chronyc tracking
Conclusion
So this is how you can configure the NTP time on Rocky Linux 9. We have included various methods to set up the NTP time from the local machine and receive the time from the NTP server. Moreover, we recommend you use the commands carefully, or else you may get errors while using Chrony services.