How To Check the Disk for Errors in Linux Mint 20.3
To check the disk for errors in Linux Mint 20.3, you have to follow the following steps:
Step 1: Choose a Disk Partition That You Want To Check for Errors
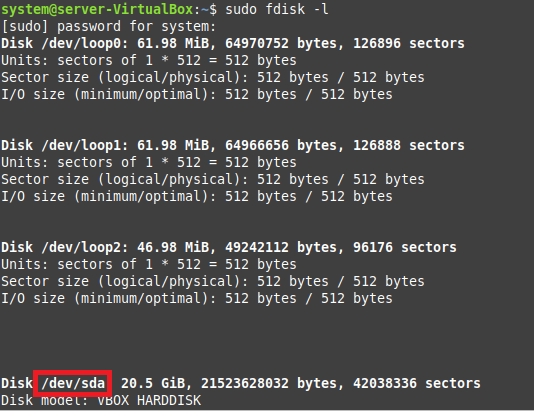
First, you must identify and select a disk partition that you want to examine for potential errors. For that, you can list down all of your disk partitions with the following command:
![]()
All the partitions of your Linux Mint system will appear on the terminal after executing this command. From here, you can easily pick one partition for checking errors. In our case, we have chosen the “/dev/sda” partition as highlighted below:
Step 2: Save the Errors in a Text File
Now, for scanning the selected partition for errors and saving them for later usage, we will execute the following command:
This command will look for the bad blocks within the specified disk partition and save them in the file “badsectors.txt”.
Step 3: Pass the Text File to the “fsck” Tool
Finally, we need to pass this information on to our Linux Mint system so that it can take preventive measures to avoid these bad blocks. We can do this by running the following command:
The previous command will ensure that our system does not use the bad blocks conveyed to it via the “badsectors.txt” file while working with the specified disk partition to avoid all sorts of associated issues.
Conclusion
This article was intended to explain to you the procedure of checking the disk for errors on a Linux Mint 20.3 system. Now, by using this procedure, you can conveniently examine any disk partition of your choice for errors. This way, you can save yourself from getting into a mess later.

