In AC and DC circuits, capacitors fulfill various applications like power factor correction, rectification, removing noise from the signals, and more. The capacitors work by accumulating electrical charge between their plates for a short period and then dissipating the charge when needed. This way, the capacitors maintain the voltage level in the circuit, which in turn reduces the voltage pulsation in the circuit.
Outline:
How to Charge a Capacitor
The charging of the capacitors primarily depends on their types as there are some capacitors that are only for DC circuits, often named polarized capacitors. Whereas for AC circuits the AC capacitors are used, often named non-polarized capacitors. Therefore, the charging method for both is different, as one includes a DC supply and the other includes an AC supply.
- Charging a DC Capacitor
- Charging an AC Capacitor
Charging a DC Capacitor
The DC capacitors have fixed polarities as the direct current flows in only one direction, so to charge a DC power supply is required. The DC capacitor blocks the flow of current when it gets fully charged, as both the plates of the capacitor get saturated. To charge a DC capacitor, there are two ways:
Method 1: Through Battery with Resistors
Resistors in electrical circuits are used to limit the flow of current which proves to be helpful in protecting the connected device if voltage or current exceeds its safe value. Similarly, using resistors for charging the capacitors can actually prevent the capacitor from being damaged if the battery is connected to it for a longer period. Moreover, it also slows down the charging rate preventing any damage caused by the fast charging, to charge a capacitor using the resistor are some steps:
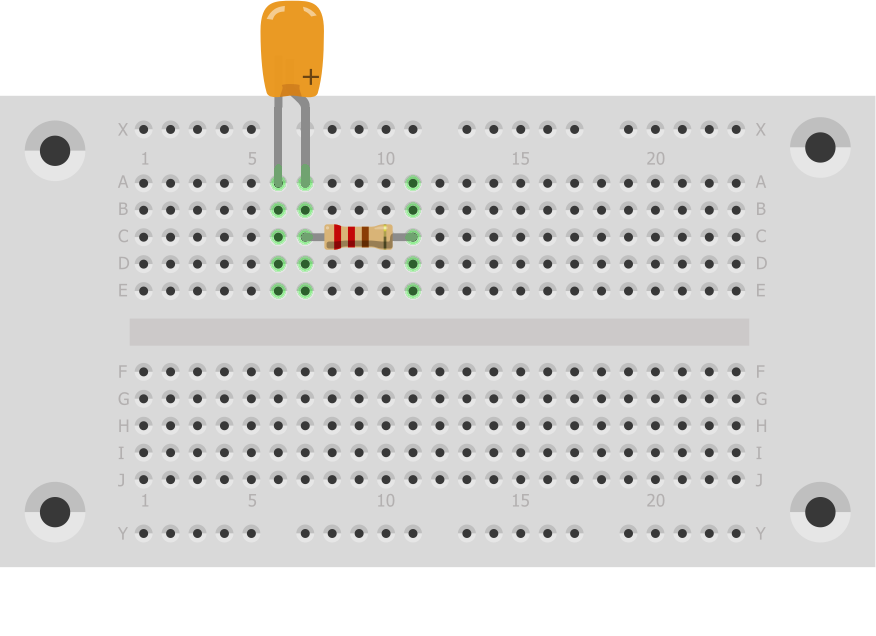
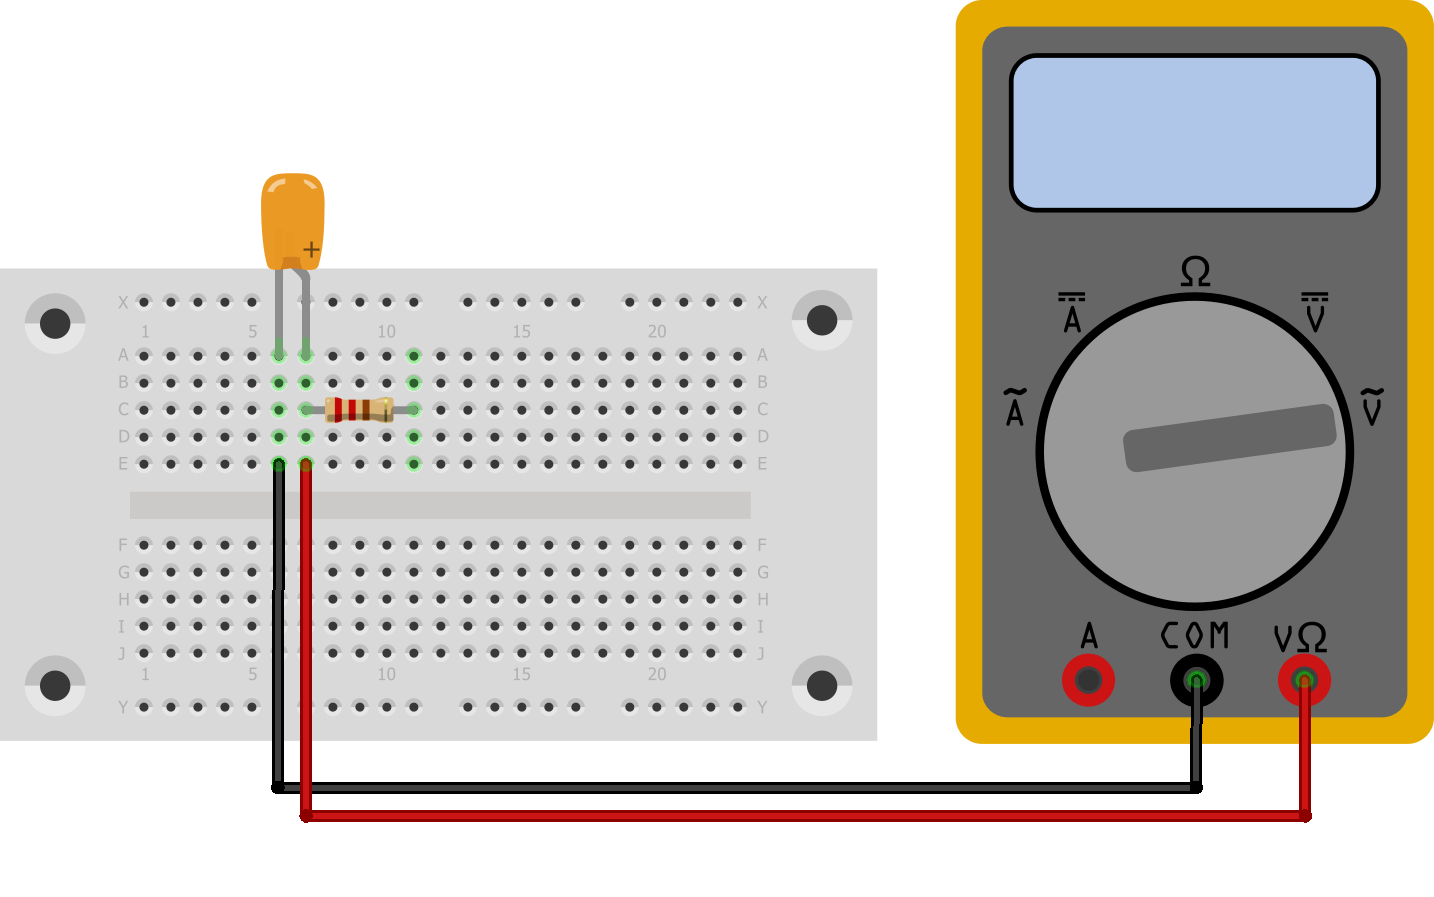
Step 1: Connect the Capacitor to the Resistor
First, check if the capacitor you are going to charge as some capacitors come with a built-in resistor and for that search it in the capacitor datasheet. If there is no resistor with the capacitor, then connect the resistor with the capacitor in series with the positive terminal of the capacitor:
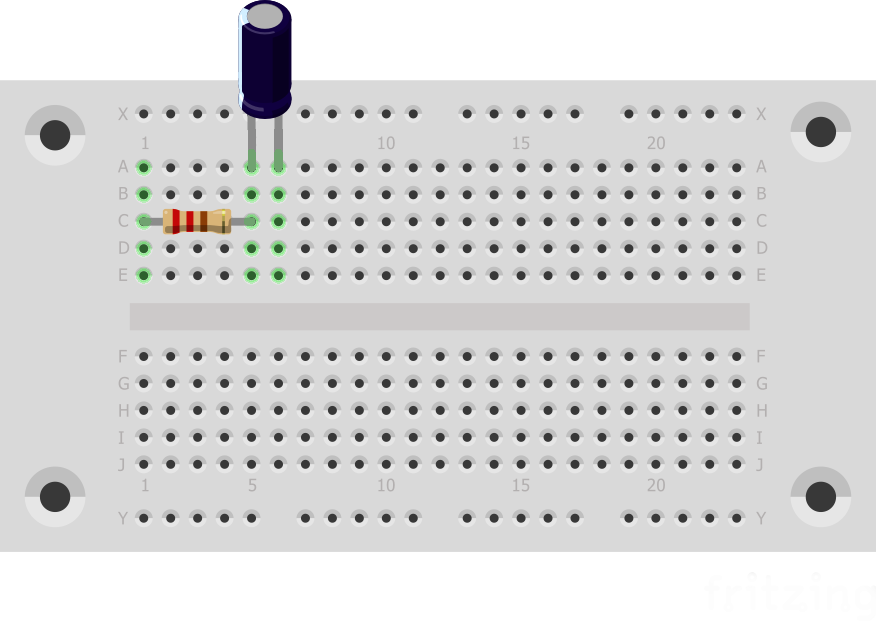
The value of the resistor should be around 1K Ohms as the higher the impedance the more slowly the capacitor will be charged and thus there will be chances of the capacitor being damaged.
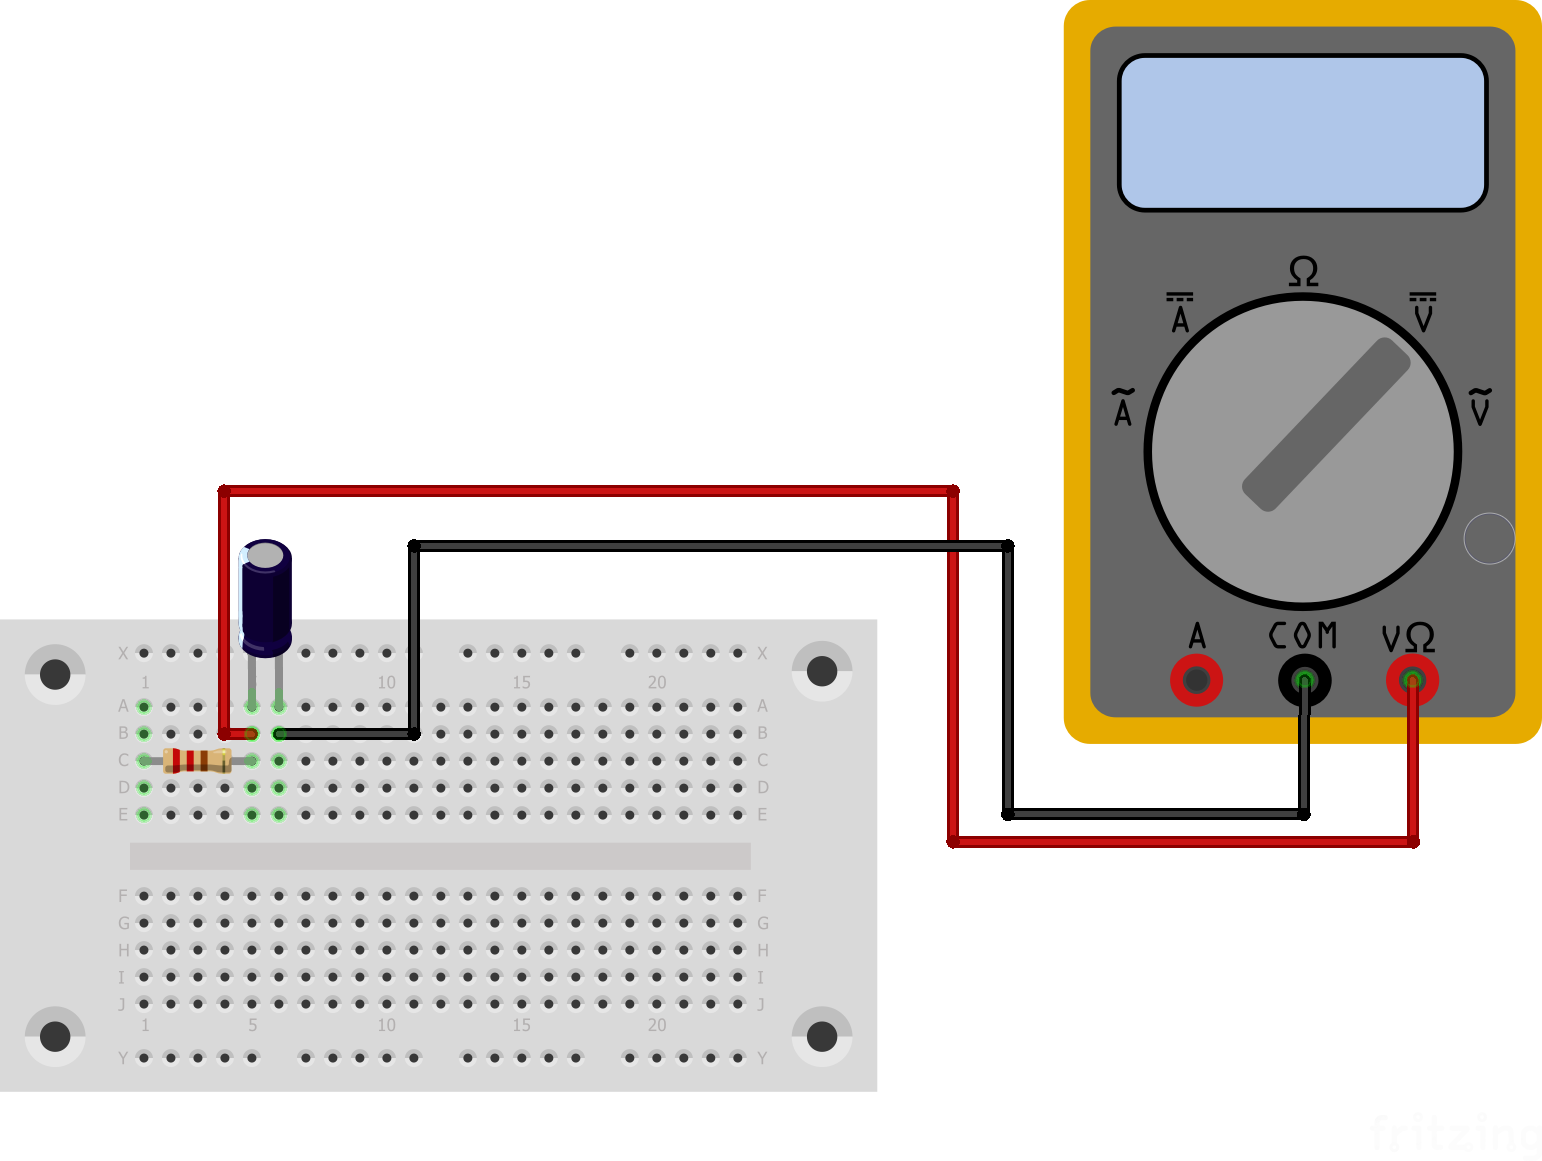
Step 2: Connect the Multimeter with Capacitor
First, move the dial of the multimeter and set it to voltage, then connect the positive terminal of the capacitor with the positive probe of the multimeter and the negative probe of the multimeter with the negative terminal of the capacitor:
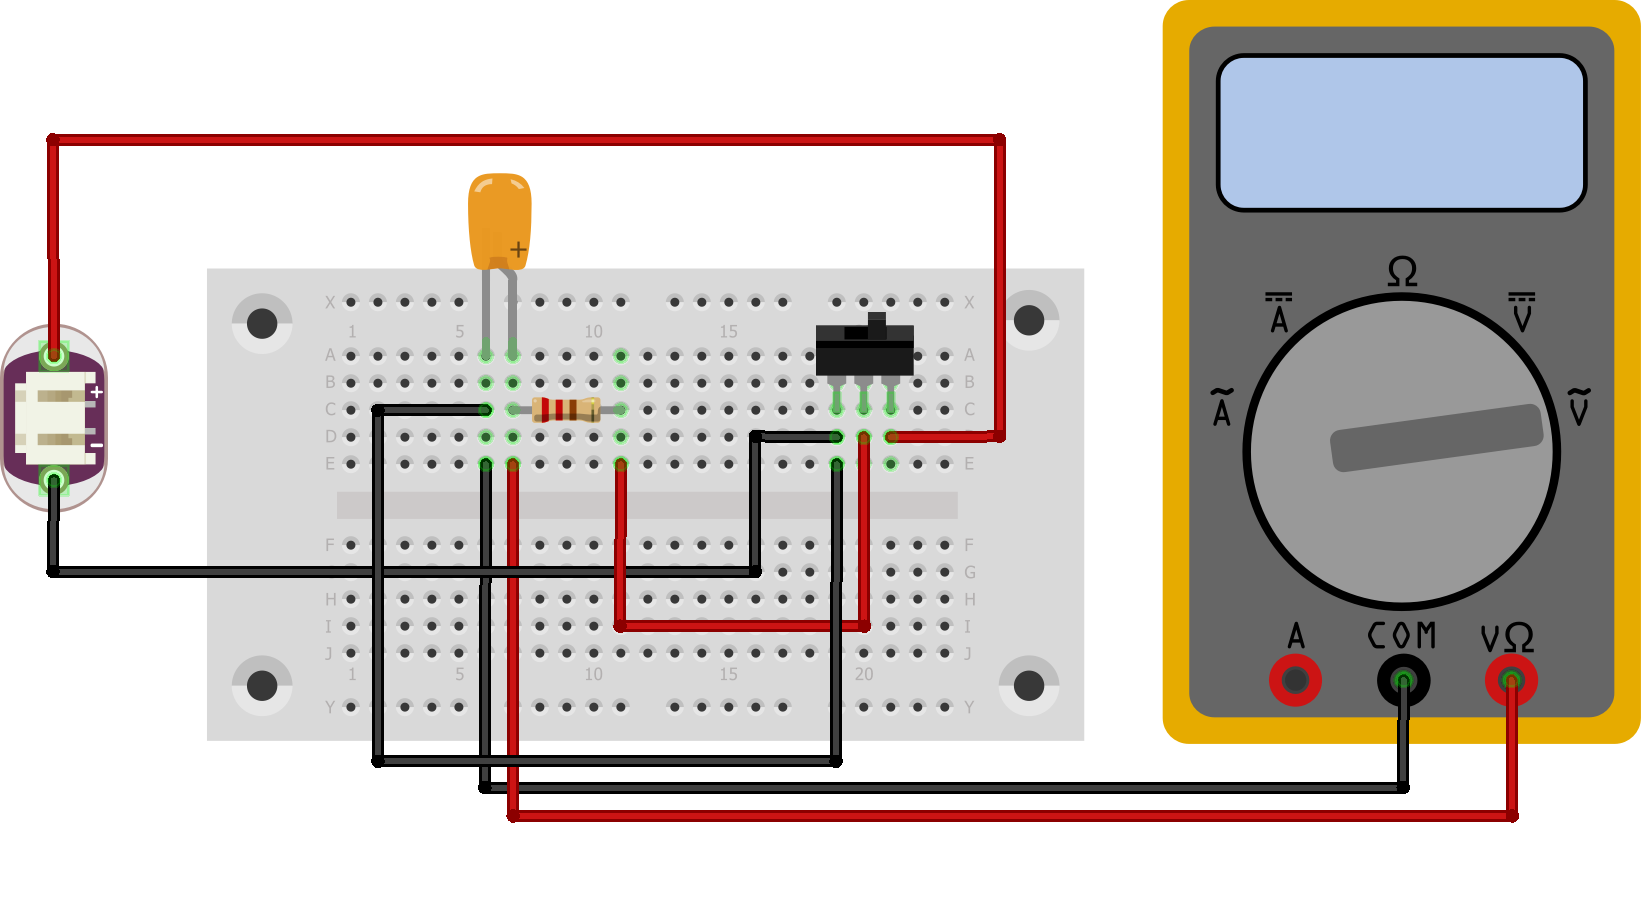
Step 3: Connect the Battery with the Capacitor
Once the multimeter is connected with the capacitor now connects the battery with the capacitor. It would be better if you could add a switch to the battery as you can turn it off once the capacitor is charged instead of plucking the wires which can cause any damage:
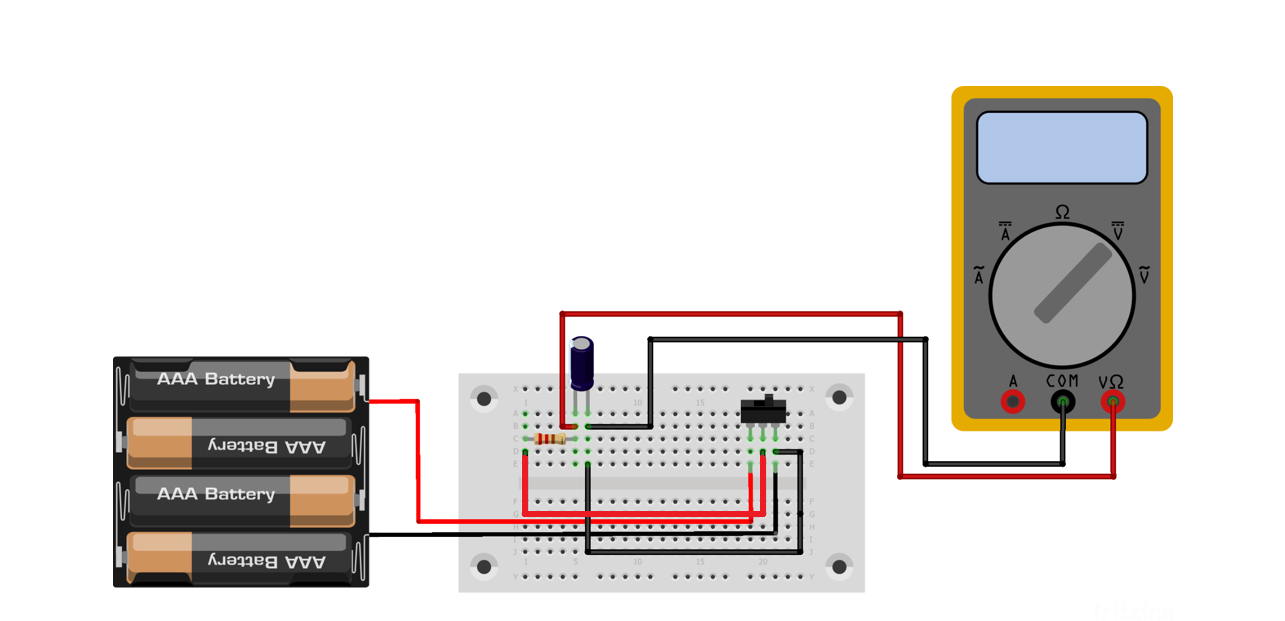
The voltage of the battery should not be higher than the rated voltage of the capacitor and for that check the rated voltage that is written on the capacitor.
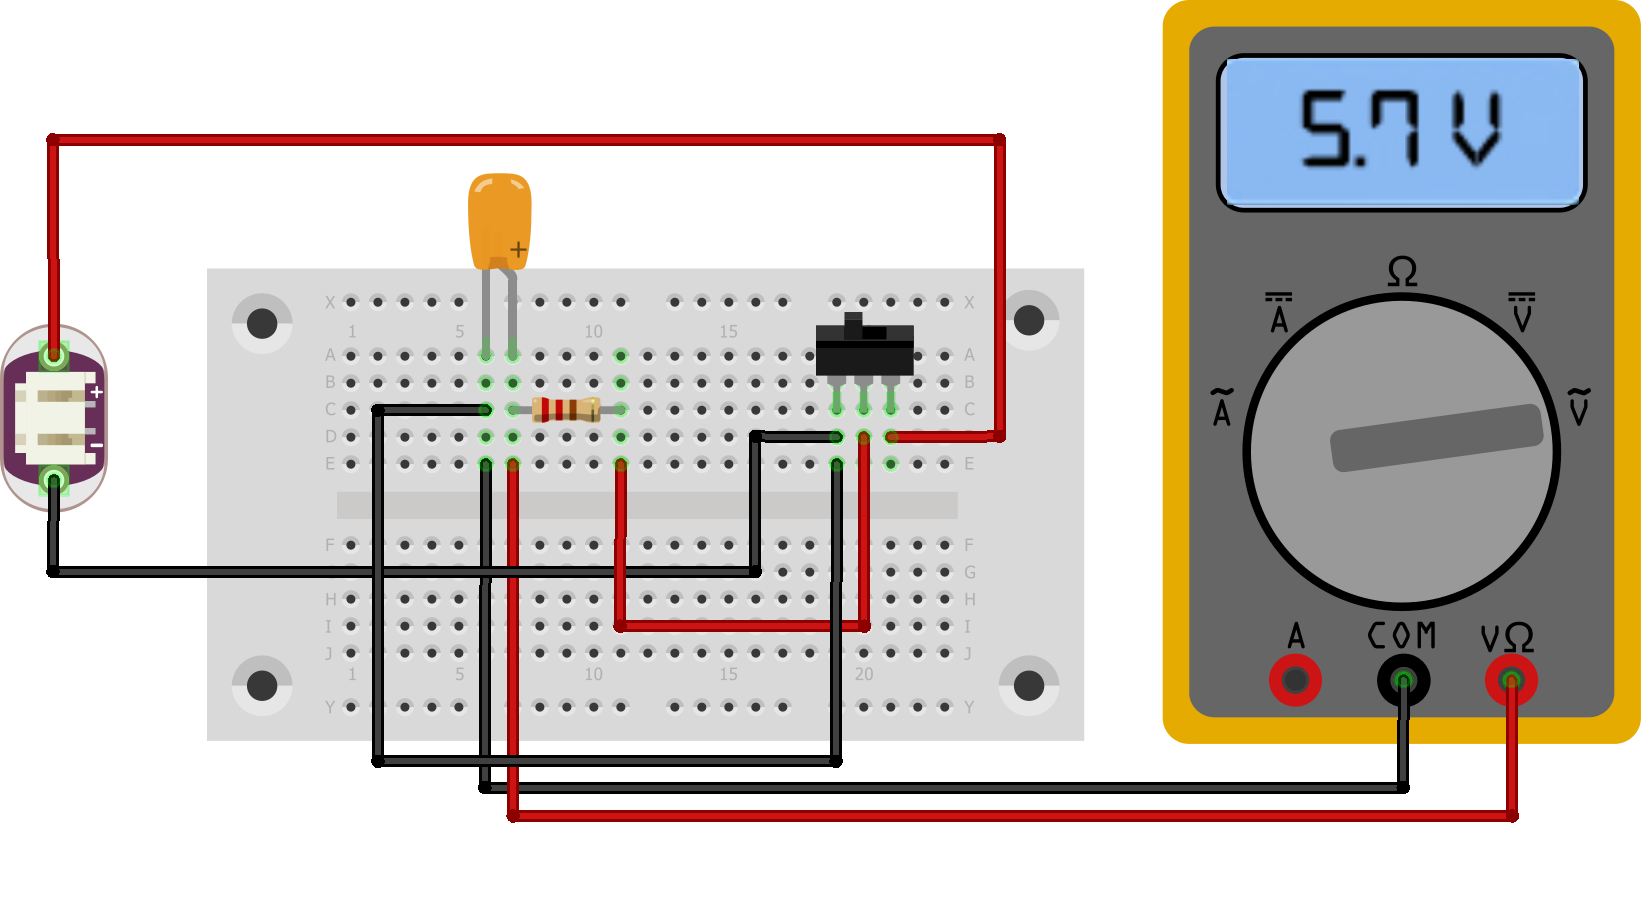
Step 4: Charge the Capacitor with Battery
Once everything is in place, turn on the switch for the power supply or plug in the positive wire of the battery. On the multimeter, you will see the voltage will begin to rise and as soon as the capacitor voltage reaches the same voltage level as that of the battery then this means that the capacitor is fully charged. Now turn off the supply, either by turning the switch off or by plucking out the positive wire of the battery.

Now you will see that the voltage on the multimeter is decreasing and that is why the capacitor is discharging. The capacitor charge is dissipated to the multimeter.
Method 2: Through Battery with Light Bulb
Another way to charge a DC capacitor is by using the light bulb instead of the resistor, as the filament of the bulb is a sort of resistor that is made to glow when the electricity is passed through it. Moreover, this method makes it easy to detect if the capacitor has reached the same voltage level as the battery as it turns off. This is because both the capacitor and the battery are on the same potential due to which the flow of electrons stops. So, to charge a capacitor through the battery by using the light filament bulb here are some steps:
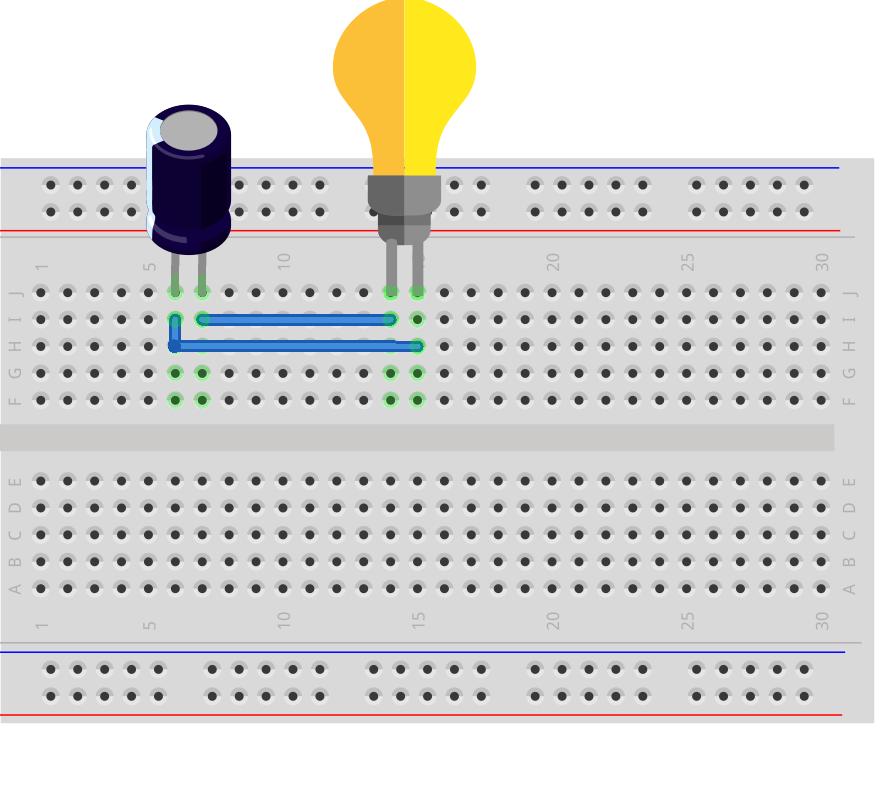
Step 1: Connect the Capacitor to Bulb
First, connect the bulb’s positive terminal with the positive of the capacitor and the negative of the capacitor with the negative terminal of the bulb.
Step 2: Connect the Multimeter with Capacitor
First, move the dial of the multimeter and set it to voltage, then connect the positive terminal of the capacitor with the positive probe of the multimeter and the negative probe of the multimeter with the negative terminal of the capacitor:
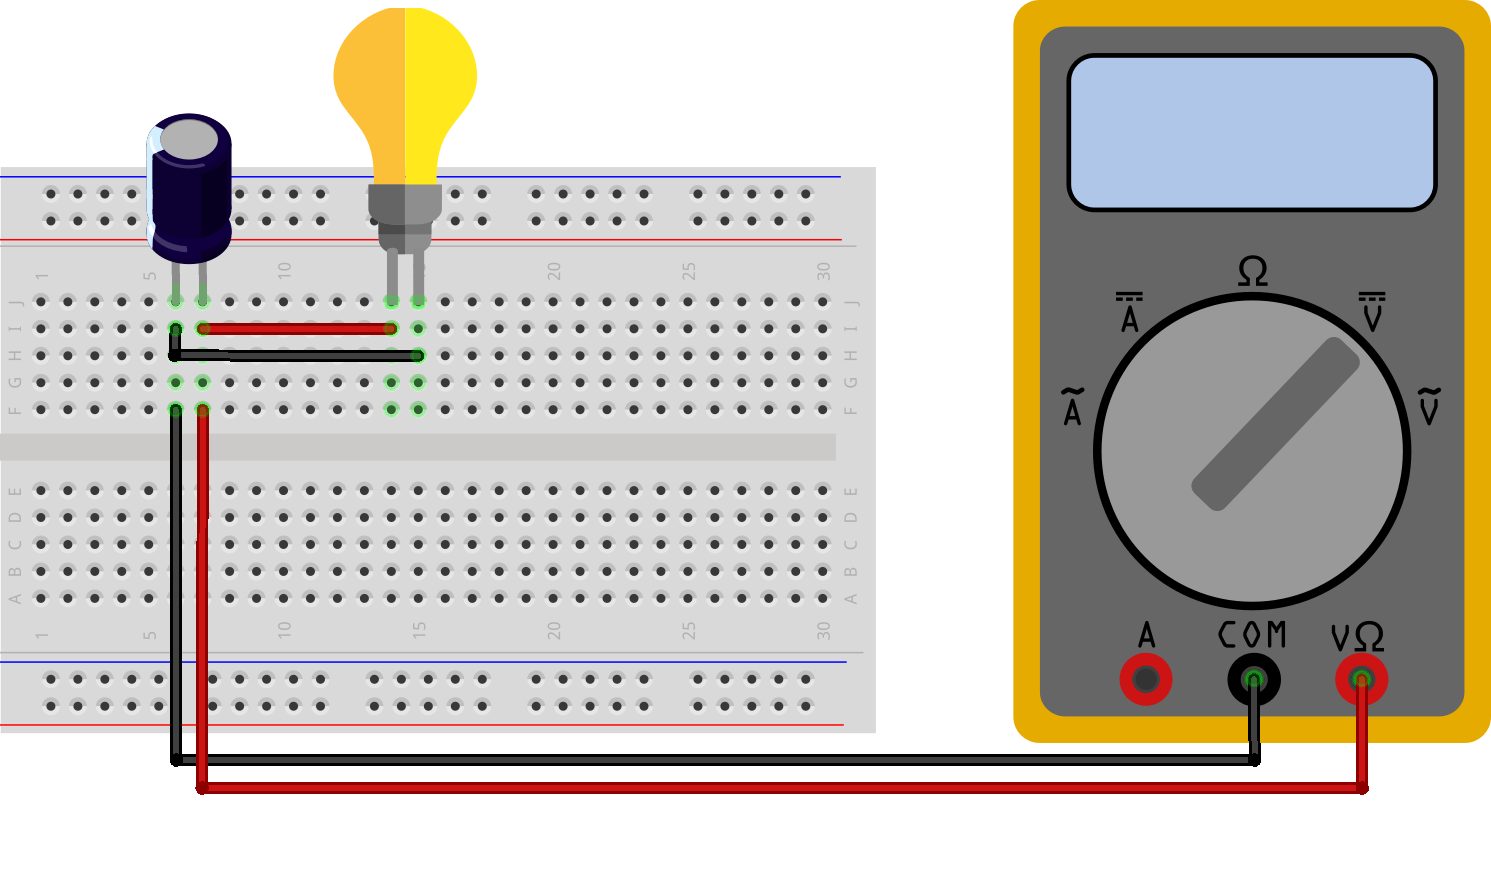
Step 3: Connect the Battery with the Capacitor
Once the multimeter is connected with the capacitor now connects the battery with the capacitor. It would be better if you could add a switch to the battery as you can turn it off once the capacitor is charged instead of plucking the wires which can cause any damage.
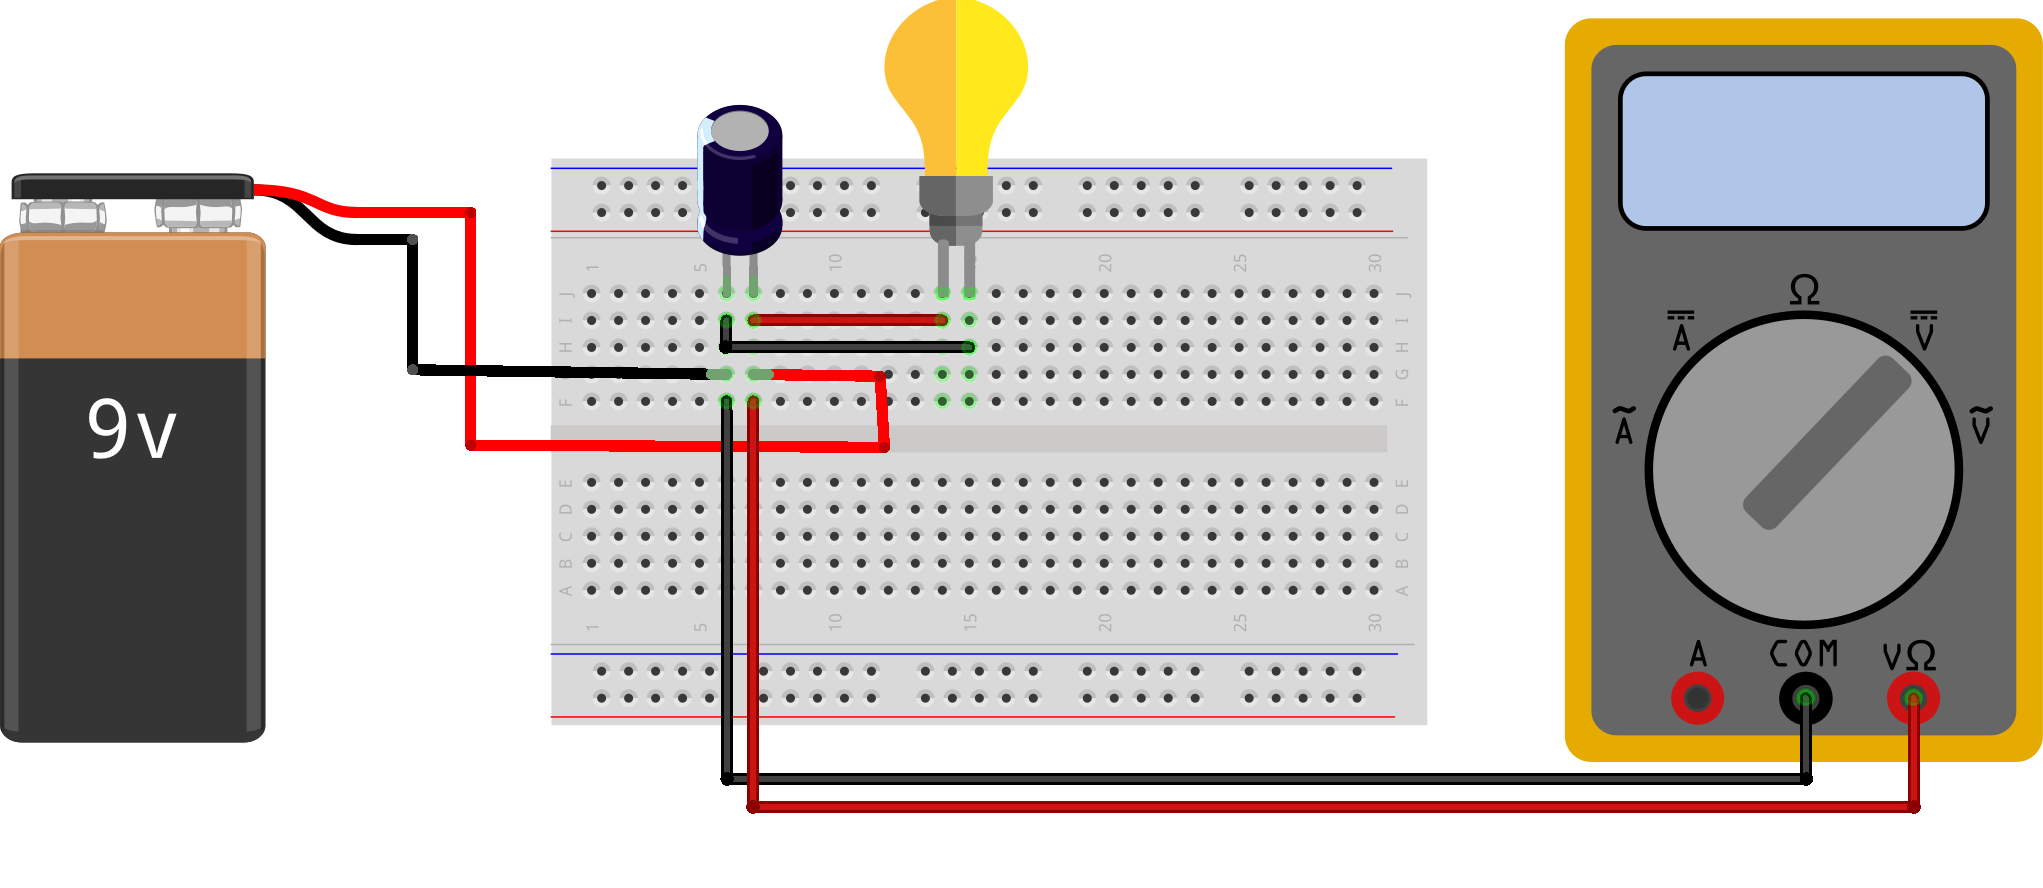
Step 4: Charge the Capacitor with a Battery
Once everything is in place, turn on the switch for the power supply or plug in the positive wire of the battery. On the multimeter, you will see the voltage will begin to rise and as soon as the capacitor voltage reaches the same voltage level as that of the battery then this means that the capacitor is fully charged.
Also, the bulb will start to glow, and the intensity of the bulb will increase when the capacitor voltage increases. Similarly, when the battery and capacitor start to reach the same potential the bulb light intensity will start to decrease, and the bulb will eventually turn off. Now turn off the supply, either by turning the switch off or by plucking out the positive wire of the battery.
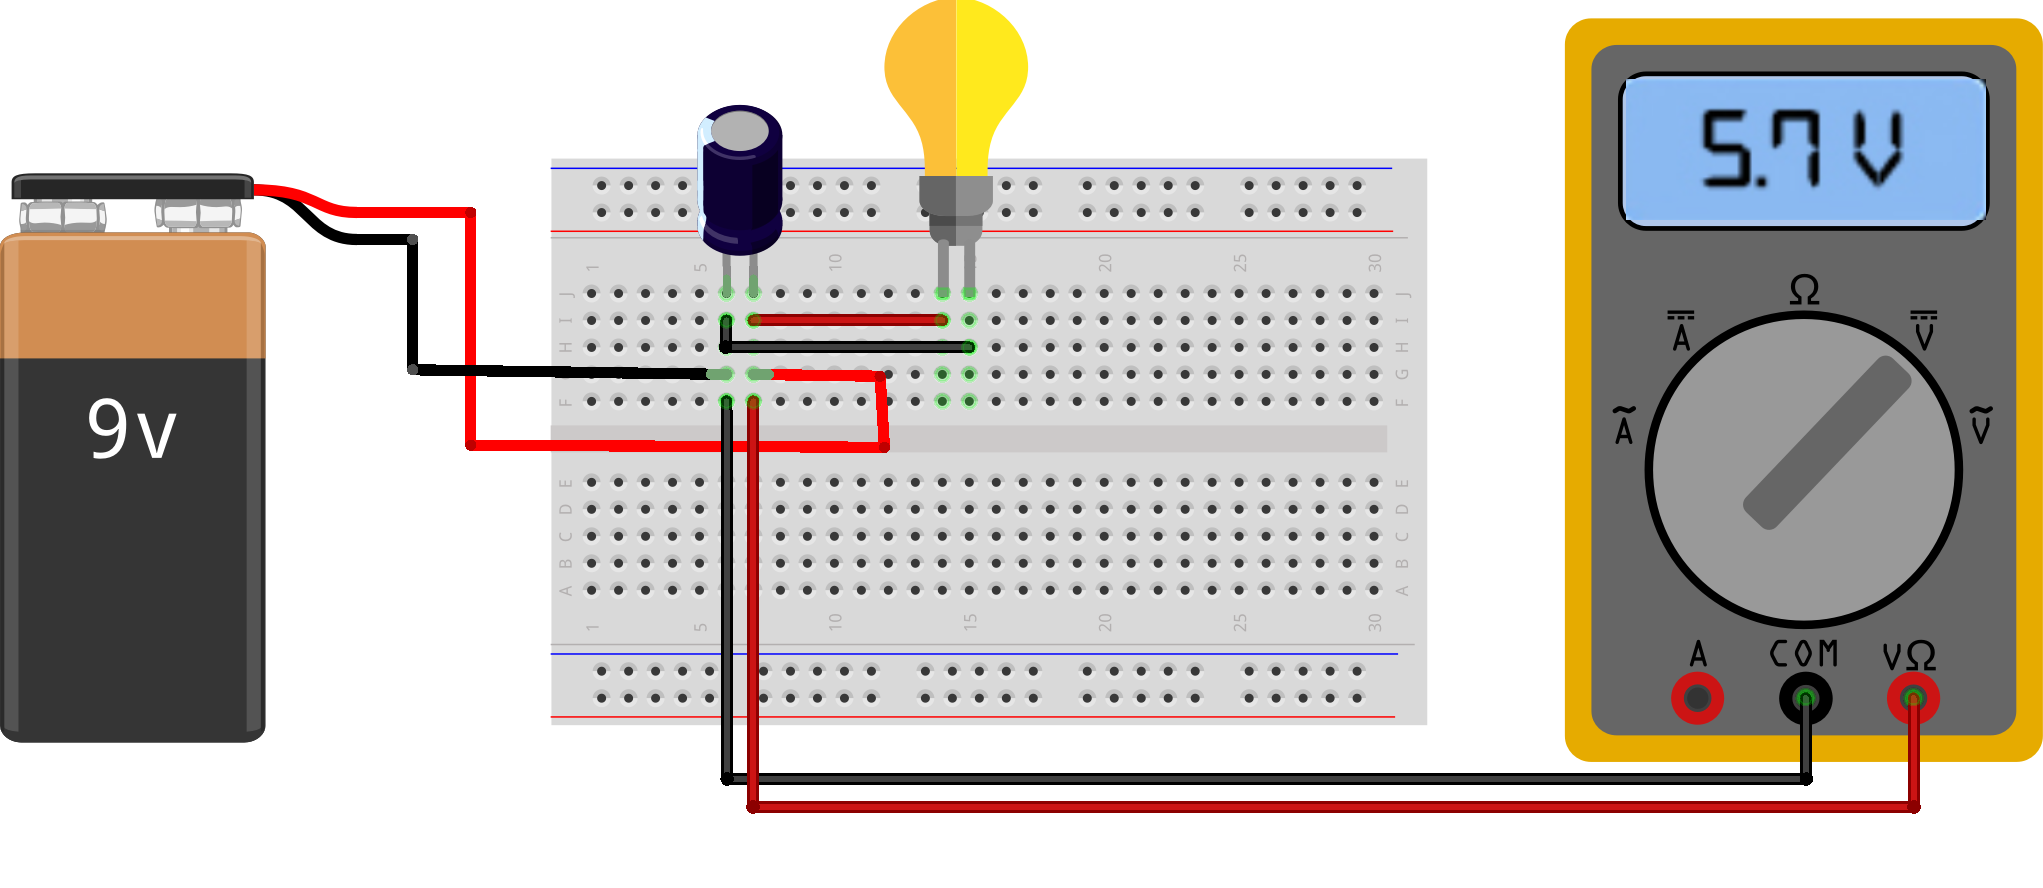
Now you will see that the voltage on the multimeter is decreasing and the bulb starts to glow as the capacitor is now discharging. When the bulb turns off this means that the capacitor is discharged.
Charging an AC Capacitor
The primary difference between the AC and DC capacitors is that the AC capacitor do not have any polarity, whereas the DC capacitor has a fixed polarity. Moreover, AC capacitors can be used instead of DC capacitors as they do not have a fixed polarity. So to charge an AC capacitor we can use an AC power source and here are some steps to charge an AC capacitor.
Step 1: Connect the capacitor with the Resistor
First, check if the capacitor you are going to charge as some capacitors come with a built-in resistor and for that search it in the capacitor datasheet. If there is no resistor with the capacitor, then connect the resistor with the capacitor in series with the positive terminal of the capacitor:
Step 2: Connect the Multimeter with the Capacitor
First, move the dial of the multimeter and set it to voltage, then connect the positive terminal of the capacitor with the positive probe of the multimeter and the negative probe of the multimeter with the negative terminal of the capacitor:
Step 3: Connect the AC Power Supply to the Capacitor
Once the multimeter is connected with the capacitor connect the AC power supply with the capacitor. Before that, turn off the switch for the power supply as the capacitor can get damaged due to overcharging or sudden voltage:
Step 4: Charge the Capacitor with AC Power Supply
Once everything is in place, turn on the switch for the power supply, and on the multimeter, you will see the voltage will begin to rise as soon as the capacitor voltage reaches the same voltage level as that of the supply voltage, then this means that the capacitor is fully charged. Now turn off the supply:
Note: While charging a capacitor, great care is to be taken because these capacitors are a little sensitive to higher voltages. If any excessive current or voltage passes through the capacitor, then it gets damaged. Moreover, to try all these methods, one should wear safety equipment where needed to prevent any injury.
Conclusion
Capacitors store electrical energy in the electric fields between their plates, which is then dissipated into the circuit due to the other components connected with it. Capacitors functionally differ when it comes to AC and DC circuits as in a DC circuit the capacitor blocks the flow of current when it is fully charged.
On the other hand, in AC circuits capacitors allow the two-way flow of current which serves a number of applications. To charge a capacitor, simply connect a resistor with it in series and then connect it to the AC or DC power supply for not more than 2 to 3 seconds, depending on the type of capacitor.