
It is essential to build a framework that is simple for the new readers to understand in order to avoid this situation. A table of contents is a very helpful approach to illustrate the procedure and can even aid in developing an initial strategy.
In this article, we will demonstrate how to create a table of contents using a Jupyter notebook.
How to Add a Table of Contents in a Jupyter Notebook
No matter how big or little the project is, adding a table of contents makes it clear with what path the project will take. The only tools required to include a table of contents in a Jupyter notebook are the “anchor tags” in the appropriate places. The links that point to the other sections of the notebook’s table of content are translated into such links.
Creating a table of content in a Jupyter notebook is quite easy and simple. You can complete it in the following number of steps:
Step 1: Select the Markdown Format
We can add the table of content in the Jupyter notebook using the HTML anchor. This is a simple two-step process. Open the Jupyter notebook and select the markdown cell format instead of the code.

Step 2: Create the Structure of the Table of Content
First, create a table of contents using the markdown in the notebook. Here, we also need to link the anchors that we will create in the next step. Use the following text and paste it into the markdown cell:
* [Chapter 1](#chapter1)
* [Section 1.1](#section_1_1)
* [Sub Section 1.1.1](#sub_section_1_1_1)
* [Chapter 2](#chapter2)
* [Section 2.1](#section_2_1)
* [Sub Section 2.1.1](#sub_section_2_1_1)
* [Sub Section 2.1.2](#sub_section_2_1_2)
* [Section 2.2](#section_2_2)
* [Sub Section 2.2.1](#sub_section_2_2_1)
* [Sub Section 2.2.2](#sub_section_2_2_2)
* [Chapter 3](#chapter3)
* [Section 3.1](#section_3_1)
* [Sub Section 3.1.1](#sub_section_3_1_1)
* [Sub Section 3.1.2](#sub_section_3_1_2)
* [Section 3.2](#section_3_2)
* [Sub Section 3.2.1](#sub_section_3_2_1)
* [Sub Section 3.2.2](#sub_section_3_2_2)
Press “Shift + Enter” to run the previous lines in the Jupyter notebook. The table of content should display like this:
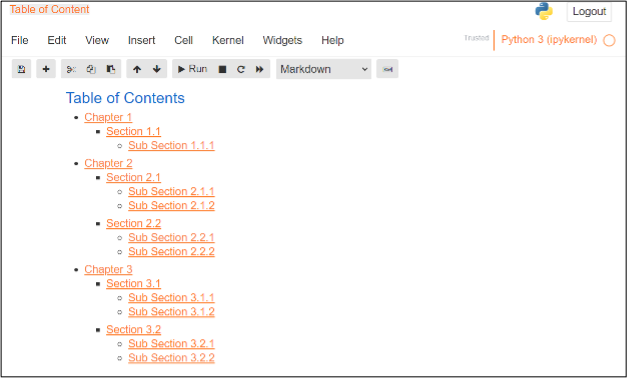
The structure of the table of content follows the markdown format available in the Jupyter notebook. In the previous screenshot, the displayed name of the link is enclosed in brackets [] and the reference to the anchor tags is placed in parenthesis preceded by a hash (#) symbol.
The markdown cell in the anchor tag is included in either a title to go with the operation or a description of the current processes.
Step 3: Create Anchor Tags
Now, we will create the anchor tags in order to link with the table of contents. Create the chapters, sections, and subsections. Enter the following text in the next markdown cell:
This is chapter number 1
### Section 1.1 <a class="anchor" id="section_1_1"></a>
This is section 1.1
##### Section 1.1.1 <a class="anchor" id="sub_section_1_1_1"></a>
This is sub section 1.1.1
## Chapter 2 <a class="anchor" id="chapter2"></a>
This is chapter number 2
### Section 2.1 <a class="anchor" id="section_2_1"></a
This is section 2.1
#### Section 2.1.1 <a class="anchor" id="sub_section_2_1_1"></a>
This is sub section 2.1.1
#### Section 2.1.2 <a class="anchor" id="sub_section_2_1_2"></a>
This is sub section 2.1.2
### Section 2.2 <a class="anchor" id="section_2_2"></a>
This is section 2.2
#### Section 2.2.1 <a class="anchor" id="sub_section_2_2_1"></a>
This is sub section 2.2.1
#### Section 2.2.2 <a class="anchor" id="sub_section_2_2_2"></a>
This is sub section 2.2.2
## Chapter 3 <a class="anchor" id="chapter3"></a>
This is chapter number 3
### Section 3.1 <a class="anchor" id="section_3_1"></a>
This is section 3.1
#### Section 3.1.1 <a class="anchor" id="sub_section_3_1_1"></a>
This is sub section 3.1.1
#### Section 3.1.2 <a class="anchor" id="sub_section_3_1_2"></a>
This is sub section 3.1.2
### Section 3.2 <a class="anchor" id="section_3_2"></a>
This is section 3.2
#### Section 3.2.1 <a class="anchor" id="sub_section_3_2_1"></a>
This is sub section 3.2.1
#### Section 3.2.2 <a class="anchor" id="sub_section_3_2_2"></a>
This is sub section 3.2.2
Press “Shift + Enter” or run this cell to see the effects. The following output should display on your notebook:
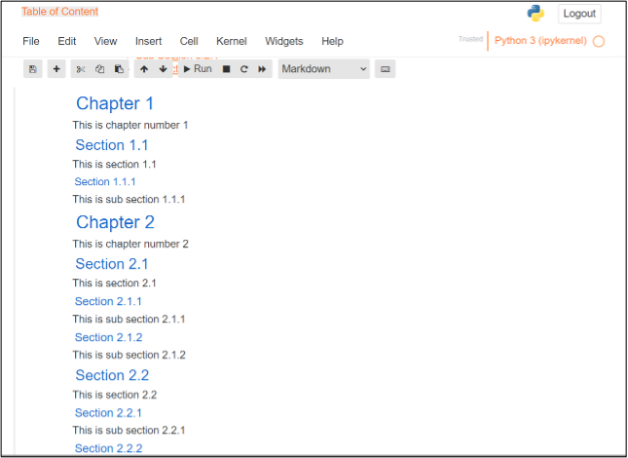
Here, you will notice that you can easily navigate to the desired section from the table of content.
Conclusion
We demonstrated in this article how to create a table of content in a Jupyter notebook. Using a table of content, you can easily manage all the content and can easily navigate to the desired section of your document. We can also add a table of content in a Jupyter notebook using the pre-build extensions. I hope this article increases your understanding about the Jupyter notebook.