- Primary key constraint
- Foreign key constraint
- Unique constraint
- Check constraint
We will add all these constraints with examples in this guide ahead.
Syntax
ADD constaint_type (column_name);
This is the basic syntax used to add a constraint containing the column name of a specific table. Other attributes are added according to the condition of constraint.
ADD Primary key constraint
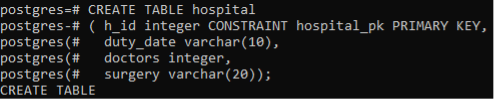
The primary key constraint is created by declaring a column whose all values are unique from one another. It means that each row contains a unique or a different value. The affected column is ten, known as a primary key. We will see the primary key constraint in two ways. The first way is to define the constraint in the create command. Second, when a simple table is created earlier without any constraint, we will add the constraint to that already created table after the creation.
A table named hospital is created to store the information regarding doctors.
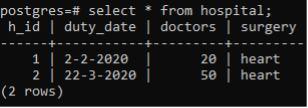
After creating the table, we will now insert a few rows in the table to make it working condition.
![]()
After the data entry, you can see the entered data by using a select statement.
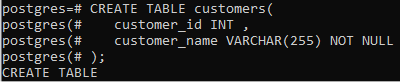
Now we will come towards that situation where we have to apply a primary key constraint to the column of the table that does not have a constraint before. So at first, we have created a simple table with its attributes without inserting any data.
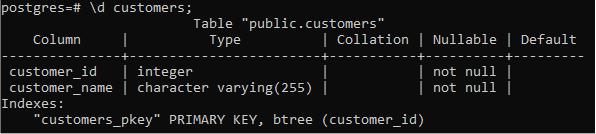
As we have created a table recently, we know the attributes of the table. But In case you are not familiar with the details of a column in PostgreSQL, we can check any relation details by using a simple command with the name of a specified table.

All the details, including the column name, are displayed as a resultant value. Usually, this detailed description contains information about the columns, indexes, and constraints with it. After applying constraints, we will see the detailed view of the relation customer.
Now we will use an ALTER command to make changes in the table customers. First, have a look at the basic syntax of the Alter command.
So for the customer’s table, we have applied constraints on the customer_id.

After the change, we will again see the details of the table to view the constraint applied.
ADD CHECK constraint
A check constraint is also known as an integrity constraint. This constraint works in a way that it specifies the condition that should be applied and specified by every row of the table in the database. First, check the data of the table student.
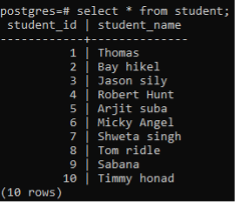
We will apply the constraint on the student_id column to ensure that all the entered ids and those that will be entered hereafter will have a positive number to ensure the attendance of the students. The name of the constraint is attendance.

Now we will check the details of the table.

The description of the above table shows that a check constraint with its name is applied to the table having ids greater than 0.
ADD foreign key constraint
A foreign key is a column or columns that are used to identify a row very uniquely of a different table. Any table can have more than one foreign key making a relationship with other tables. A foreign key constraint is known to avoid invalid data being entered in a foreign key column. The basic syntax of foreign key constraints is:

First, we write the name of the child table, and then the ADD CONSTRAINT keyword is used. Then the constraint name is written. The foreign key keyword contains the column of the child key referenced by the parent table, and then at the end, the parent table is written along with the parent primary key.
We will now consider a table practical with some information related to the student table as described above. Here we will apply a foreign key constraint to the table “practical’. Here the practical table is a child table containing reference to the parent table ‘student’. Here the name of the constraint is written as fk_constraint.
![]()
See the description of the table by using the below command.

You can see the foreign key constraint in the result.
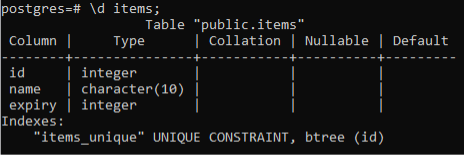
ADD unique constraint
A unique constraint is applied on the column in the table by following the rule that the values are valid only if they are unique. Here we have taken a table name items that were already created; we have now added a unique constraint on the id column of it. The syntax contains the constraint name following the column name you want to add the constraint.

Now see the relation’s details.
Add constraint via pgAdmin
To add the constraints on the dashboard, we will use the left navigation panel. First, create a connection and then expand the current database you are working on. On the further expansion of schemas, you will lead to the tables. Pick any one table. For instance, we have selected table ‘hospital’ to see the constraints we have applied on it via psql shell.
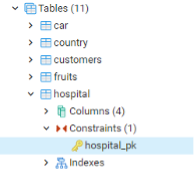
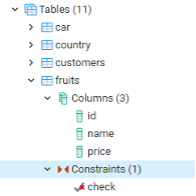
Expand the constraints option inside the table. You will see the primary constraint we have created earlier. In this way, all the constraints are mentioned on the dashboard.
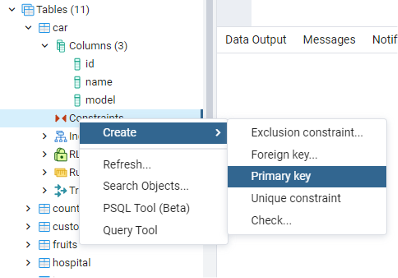
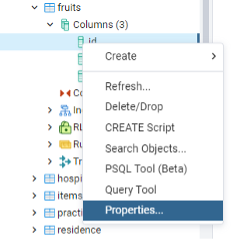
Similarly, we can add a constraint to the table. Like we have selected a table named car, right-click on the constraint option and then select the ‘CREATE’ option from the dropdown.
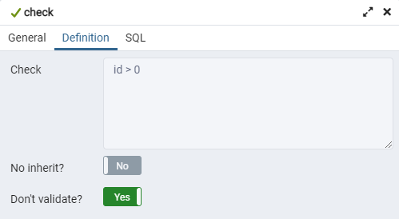
Another way is to go to the properties, select the check constraint, add the details there in the dialogue box by providing a check condition that the id must be a positive value.
And then save the changes to proceed further.
You will see that a constraint will be added in this way.
Conclusion
The article ‘Postgres add constraint if not exists’ contains all the constraints PostgreSQL possesses and adds to its tables in the database. Each constraint description contains examples to explain the implementation of constraints. Each constraint is applied according to the demand of a specific command. We hope this guide will help escalate your current knowledge regarding Postgresql constraints.