In this article, we will show you how to set up a static/fixed IP address for your WiFi network from the command line on modern Linux distributions that use the NetworkManager to manage the network devices.
This article should work on the following listed Linux distributions and other Linux distributions (not listed) that use the NetworkManager to manage the networks and have the “nmcli” command line tool available.
- Ubuntu
- Debian
- Linux Mint
- Elementary OS
- Fedora
- RHEL
- CentOS Stream
- AlmaLinux
- Rocky Linux
- openSUSE
- SUSE Linux Enterprise Server (SLES)
- Oracle Linux
Topic of Contents:
- Connecting to a WiFi Network from the Command Line on Linux Using Nmcli
- Finding the Current IP Addressing Information of the WiFi Network Interface on Linux
- Setting Up a Static/Fixed IP Address for WiFi Network from the Command Line on Linux Using Nmcli
- Checking for Internet Connectivity from the Command Line
- Conclusion
Connecting to a WiFi Network from the Command Line on Linux Using Nmcli
Before you get started, make sure that your WiFi network interface is enabled and you’re connected to your desired WiFi network using NetworkManager.
Finding the Current IP Addressing Information of the WiFi Network Interface on Linux
While setting up a static/fixed IP address for your WiFi network, learning about the current IP addressing information will be helpful as most of the IP information (i.e. DNS server, gateway, subnet mask) will remain the same; only the IP address might be changed.
To find the name of the WiFi network interface and the currently active NetworkManager connection name, run the following command:
In our case, the WiFi network interface’s name is “wlp7s27u1” and the currently active NetworkManager connection’s name is “NodeKite-2.4G”. Take a note of these information as you will need them shortly.
To find the currently configured IP addressing information (i.e. IP address, subnet mask, gateway, DNS server) of the “wlp7s27u1” WiFi network interface, run the following command:
As you can see, the IP address that is assigned on our “wlp7s27u1” WiFi network interface is 192.168.0.113, the subnet mask is /24 (or, 255.255.255.0), the gateway IP address (the IP address of the connected WiFi router) is 192.168.0.1, and the DNS server address is 1.1.1.1.
Setting Up a Static/Fixed IP Address for WiFi Network from the Command Line on Linux Using Nmcli
To set up a static/fixed IP address for your WiFi network, you need to know the NetworkManager connection name that is configured for your WiFi network interface to connect to your WiFi network.
To find the NetworkManager connection name, run the following command:
In our case, the NetworkManager connection name for our WiFi network is “NodeKite-2.4G”.
To configure a static/fixed IP address of 192.168.0.25 (let’s say) for the “NodeKite-2.4G” WiFi network (let’s say) with all the other IP information (i.e. subnet mask, gateway, DNS server) intact, run the following command:
Once the “NodeKite-2.4G” NetworkManager connection is configured with a static/fixed IP address, run the following command to apply the changes:
As you can see, a static/fixed IP address is set for the “wlp7s27u1” WiFi network interface.
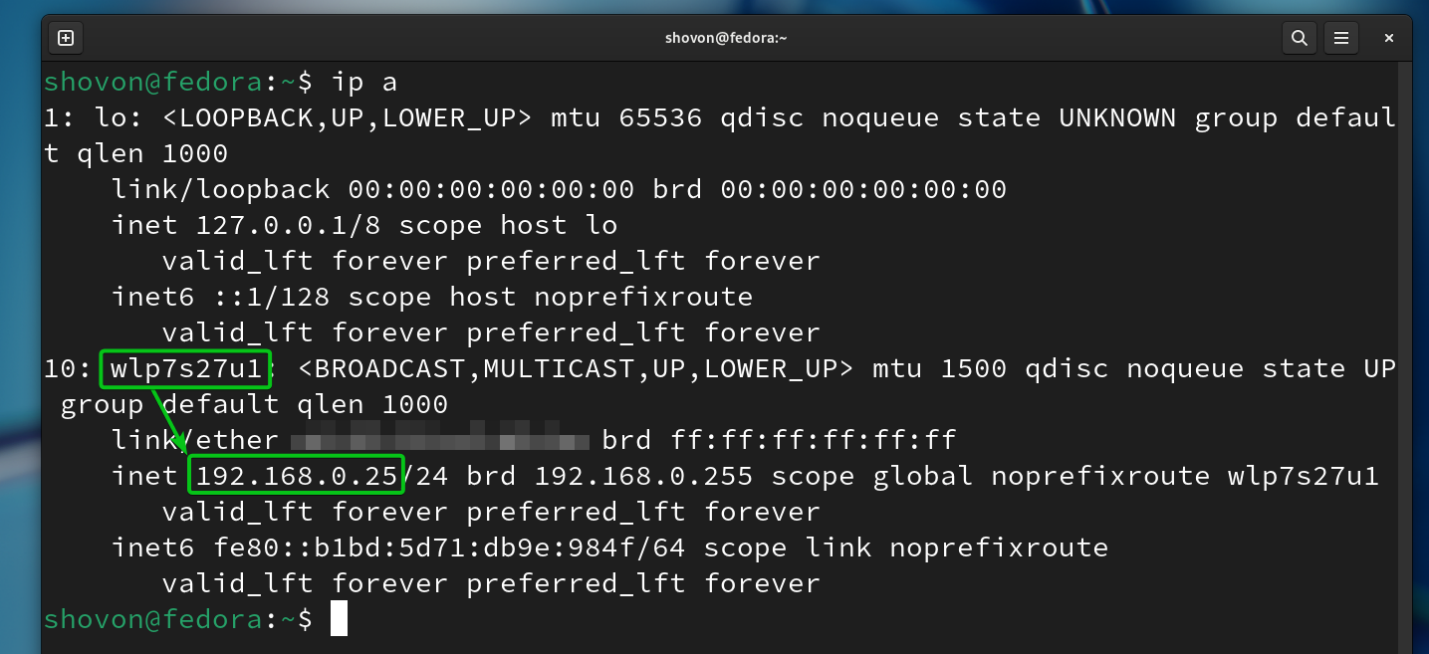
You can confirm that the static/fixed IP address of 192.168.0.25 is set for the “wlp7s27u1” WiFi network interface using the “ip” command as well:
Checking for Internet Connectivity from the Command Line
If you configured a static/fixed IP address on the WiFi network interface correctly, you should be able to ping “google.com” (or the domain names of any other popular websites) to verify that you have an internet connectivity.
Conclusion
In this article, we showed you how to find the current IP addressing information of your WiFi network interface. We also showed you how to configure a static/fixed IP address for your WiFi network interface on Linux from the command line using NetworkManager. Setting a static/fixed IP address is essential for hosting some sort of servers/services on your computer.


