Highlights
Here are some of the tutorial’s highlights which help us determine the categories of the tables that will be addressed:
- Markdown Table Syntax
- Markdown Table Formatter
- Markdown Table Formatting Text
- Markdown Table Alignment
- Markdown Center Align Table’s Column
- Markdown Right Align Table’s Column
- Markdown Left Align Table’s Column
- Markdown Table with Header
- Markdown Table without Header
When choosing the software where we execute the markdown code, “Visual Studio Code” is the ideal tool for the task, and we will also utilize it in this tutorial. We are allowed to pick a language when we start the newly created text file. There, we just pick Markdown. We then pick the right side to launch the preview window using the icons in this software’s upper right.
Markdown Table Syntax
Before the creation of the table in Markdown, we must be familiar with the syntax that aids in the creation of tables. We have to utilize two symbols to create the table in Markdown.
- The vertical lines “|”
- The hyphens “-”
When we need to align the table, we have three different options:
- For the right alignment, we utilize “——-:”
- For the left alignment, we utilize “:——–“
- For the center alignment, we utilize “:——-:”
Markdown Table Formatter
Here, we build the table. Pipes or vertical lines (“|”) and hyphens (“—-“) are the two symbols that we will use for this. Each column’s heading is created using “hyphens”, and the pipes or vertical lines are used to divide each column in the table.
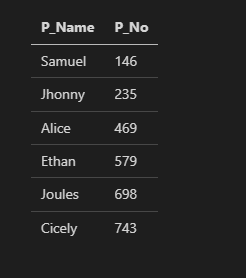
Here, we first add the “|” vertical line before placing “P_Name” and then adding another “|” pipe. It denotes that we construct one table cell. Now, we add “P_No” and insert the symbol “|” again. Right now, we are in the table’s second cell. The “P_Name” that we placed here is the header of the table because we inserted the “hyphens” below the “p_Name”.
Additionally, we insert these hyphens between the vertical lines just below “P_No”, creating the table’s “P_No” header of the table. After that, we add the names and numbers to the columns that we already constructed here.
For this, we place the “|” vertical bar again below this line and type “Samuel”. Then, we place one more “|” vertical line here. After this, we type “146” below the “P_No” column and close it by placing the vertical bar “|” at the end. Now, we move ahead to the next line and repeat the same steps to insert more names and numbers in these columns. The table’s data is given in the following. We may learn from the given code about creating a table in Markdown.
Code #1:
|------------ |---------|
| Samuel | 146 |
| Jhonny | 235 |
| Alice | 469 |
| Ethan | 579 |
| Joules | 698 |
| Cicely | 743 |
Output:
Now, on the preview window, the output is also rendered. Here is the table that we made in the previous code. As we might notice, the words “P_Name” and “P_No” are in bold since these are the header names of the table. A bold vertical line also appears beneath these names. As we input the code, all the information are entered correctly in these columns.
Markdown Table Formatting Text
Here, we will design a table, but this time, the text that is entered into the table will be bold and italic. We apply a formatting to the text which we add to the table here. The “Simple_Text” and “Formated_Text” columns are added as the headers to this table. We insert these headers by placing the vertical lines “|” before and after the header name, and the hyphens “-” are put inside the vertical lines “|” beneath each header name.
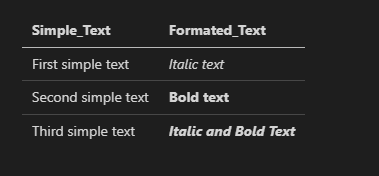
After that, we add the “First Simple text” to the first column. Then, by inserting a “|” there, we add some text to the second column. “Italic text” is added inside the asterisks “*” in the second column. We insert this text inside two “*” asterisks which causes it to be displayed in italic format. After this, we put the vertical line “|” again.
In the following, we add the “Second simple text” to the first column. We now add two “**” asterisks to the second column, enter “Bold text”, and then add two more “**” asterisks. Now, the content in between them is highlighted in bold. Now that we desire the text to be both bold and italic, we add three asterisks (“***”) before the text and three (“***”) after the text to achieve this.
Code #2:
|------------ |---------|
| First simple text | *Italic text* |
| Second simple text | **Bold text** |
| Third simple text | ***Italic and Bold Text*** |
Output:
The top row’s “Formatted_Text” column contains a content that is formatted in italics. Afterward, the text from the second row of this column is displayed in bold, and the text from the last row of the same column is shown in both formats which are “bold” and “italics”.
Markdown Table Alignment
We may also adjust the alignment of the column or table’s text. We have three alignment options: right, left, and center. To apply the alignment, we need “:” and “-”. Here, we will explore all three alignments separately.
1. Markdown Center Align the Table’s Column
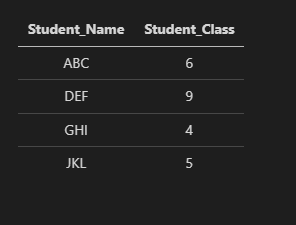
When we need to center-align the columns or text of the table here, we utilize the colons and hyphens in this manner “:——:”. This makes the column or text align in the center. First, we create the header of this table named “Student_Name” and “Student_Class” by placing the vertical lines. In the next line, we put “:—–:” between the vertical lines just below each header name. After this, we enter the data in this table as in the previous examples, but this time, the data will be aligned in the center.
Code #3:
| :------: | :------: |
| ABC | 6 |
| DEF | 9 |
| GHI | 4 |
| JKL | 5 |
Output:
The output shows that the data of both columns are aligned to the center. This is because we utilized the “:—–:” colons and hyphens just below each header name.
2. Markdown Right Align the Table’s Column
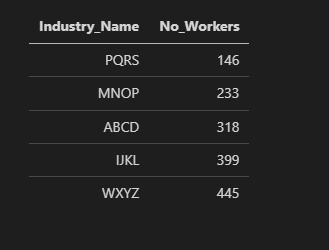
We can also align the table’s column to the “Right” by utilizing the hyphens and colons like this “—-:”. We put the hyphens first and then a colon to align the table’s column or the text to the right side. In the given code, we first use the vertical lines to create the “Industry_Name” and “No_Worker” headers for this table.
Then, in the following line, we insert “—–:” between the vertical lines immediately below each heading name. With these hyphens and a colon this time, the data will be aligned right. Following that, we enter the data in this table similarly to how we did in the previous instances.
Code #4:
| -----: | -----: |
| PQRS | 146 |
| MNOP | 233 |
| ABCD | 318 |
| IJKL | 399 |
| WXYZ | 445 |
Output:
The result demonstrates that the data in both columns is aligned right. This is because we placed the colons and hyphens directly below each header name in this manner “—–:”.
3. Markdown Left Align the Table’s Column
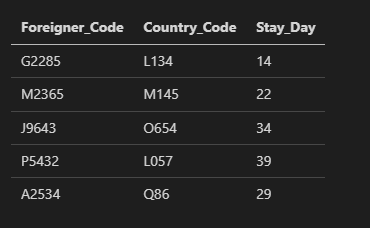
Now, we have another alignment option which is the left align. In this instance, we align the table’s column to the left using “:—-”. Here, we place the “:” colon and then the hyphens “-” because we must align the table’s column or text to the left. The table that we create here is given ahead.
Here, we create three columns, and the names of these are “Foreigner_Code”, “Country_Code”, and “Stay_Day”. After this, we place the colon and the hyphens “:—-” in the next line. We put the vertical line and then “:—–” below the first header name. In the same way, we put this colon and hyphens below the second and third header names.
After this, we need to insert some data in this table to align the text to the left side of the column. The data is now entered using the vertical lines to separate each column’s data. After completely putting the data in this table, we just move toward the preview window where the code result is displayed.
Code #5:
| :---- | :-----| :----- |
| G2285 | L134 | 14 |
| M2365 | M145 | 22 |
| J9643 | O654 | 34 |
| P5432 | L057 | 39 |
| A2534 | Q86 | 29 |
Output:
The preview windows show the table in which the data of all three columns are aligned to the left side. In this way, we align the table’s column in Markdown.
Markdown Table with Header
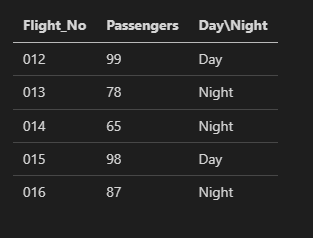
In this instance, we will design and show the table and the header. To create the header, we first insert the names of the headers which are “Flight_No”, “Passengers”, and “Day\Night”. We add the pipes or vertical lines before and after each header name. In the next line, we place the vertical line, put the hyphens, and put one more vertical line after this. In the same way, we also put the hyphens below the second or third column’s name or header. We don’t need to put the colon (:) here because we don’t have to align the table’s column. These hyphens help in creating the table’s header. The data is now entered into this table after creating the table headers.
Code #6:
| -------| ----- | ------ |
| 012 | 99 | Day |
| 013 | 78 | Night |
| 014 | 65 | Night |
| 015 | 98 | Day |
| 016 | 87 | Night |
Output:
The header which we created in the previous code is shown here. The header is written in bold, and the remaining data of the table’s column is displayed in simple text without making them bold.
Markdown Table without Header
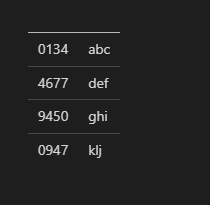
Markdown doesn’t facilitate us in creating the tables without a header. However, we have an option that helps in generating a table with no header. We utilize one approach here that aids us in generating a table with no header. We have to use “<! –>” instead of the header name for this. The following code helps us create the table without a header:
Code #7:
| ----- | ----- |
| 0134 | abc |
| 4677 | def |
| 9450 | ghi |
| 0947 | klj |
Output:
Here, we might notice that the table has no header because we utilized the “<! –>” in place of the header, making the empty header in this table.
Conclusion
This tutorial explains the “Markdown table” approach and how the “Markdown” language aids in creating tables. We covered how to make the tables as well as how to customize a table’s column names. We also discussed how to style the content that is inserted inside the table’s columns. Additionally, we described how to change the column of the table’s textual alignment. This tutorial has thoroughly covered all of the “Markdown tables” concepts.

