In this tool, we will learn how to configure and integrate the logging features using external libraries. Keep in mind that you can use the default logging features; it is low-level and requires a custom configure to be robust for a large application.
What Is NLog?
For this tutorial, we will take advantage of the NLog library which encapsulates the low-level logging features into an easy-to-configure and use library.
But what is NLog exactly? In simple terms, NLog is a free and open-source logging library for “.NET” ecosystem which includes the “.NET” standard. NLog is incredibly easy to configure and use. It also comes with a lot of features to write the logs to a wide variety of targets such as databases, files, console and more.
Install NLog
As you can guess, the first step is installing the Nlog library as it is not part of the “.NET” standard lib.
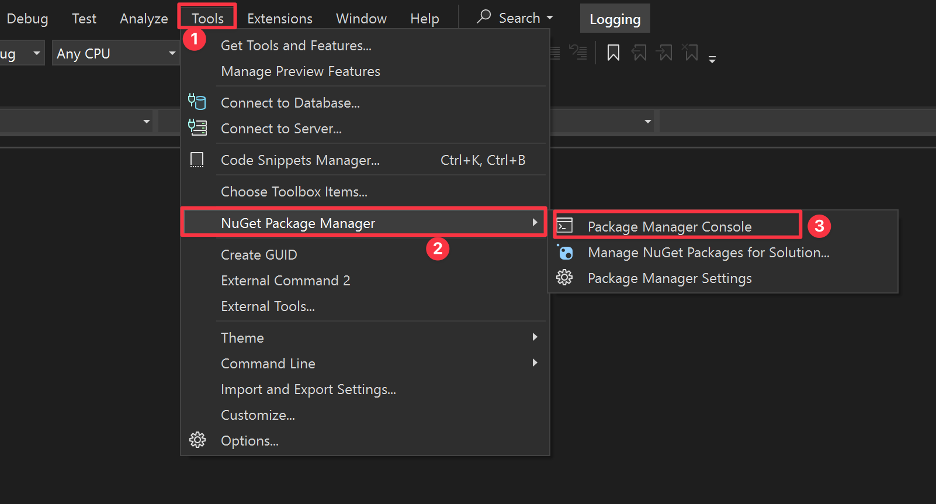
Similar to all “.NET” libraries, we can use the NuGet package manager to install it as shown in the following steps.
In your Visual Studio Window, select the “Tools Option” from the top bar. Then, navigate to the “NuGet Package Manager” option and select the “Package Manager Console”.
In the resulting console window, run the following command to install the package:
This should download and install the resulting package as follows:
Configuring NLog
Once we have the package installed, we can proceed and configure the logging option. This involves us creating a configuration file in the root of our project.
From the solutions explorer, click on Add > New Item and select “XML”. Give the name the Nlog.config file.
In the config file, add the entry as follows:
<nlog xmlns="http://www.nlog-project.org/schemas/NLog.xsd"
xmlns:xsi="http://www.w3.org/2001/XMLSchema-instance">
<targets>
<target name="file" xsi:type="File"
layout="${longdate} ${logger} ${message}${exception:format=ToString}"
fileName="${basedir}/logs/logfile.txt"
keepFileOpen="true"
encoding="utf-8" />
</targets>
<rules>
<logger name="*" minlevel="Debug" writeTo="file" />
</rules>
</nlog>
In this example, we tell the NLog library to use a “File” target to produce a single log file under the “logfile.txt” name.
We also include the other attributes such as the encoding and layout.
The minlevel=”Info” attribute tells the logger to only log all the message with a level of Info or higher.
You can learn all about the NLog configuration in the following resource:
https://nlog-project.org/config/
Using NLog with a C# App
In our C# code, we can use the NLog package by first importing it in the main file as follows:
Once imported, we can create a logger instance in the class as follows:
Finally, we can use the logger instance as follows:
using NLog;
class Program
{
public static Logger logger = LogManager.GetCurrentClassLogger();
static void Main(string[] args)
{
logger.Info("App Running...");
try
{
int res = 10 / int.Parse(args[0]);
logger.Info(res);
}
catch (Exception ex)
{
logger.Error(ex, "Error occurred when running operation");
}
finally
{
logger.Info("Exec finished...");
}
}
}
In this example, we use the “logger.Info” method to log the informational messages at the start and end of the execution of the application. If an error occurs in the application, we use the logger.Error() method to log the error message with the exception details.
Conclusion
In this tutorial, we learned how to configure the basic logging features in a C# application using the NLog library. Feel free to check the documentation to learn more.


