We typically define a Jenkins job in a Jenkinsfile, a text file which contains the instructions on how a project is built, tested, and deployed. A Jenkinsfile has various parameters and steps including invoking the shell commands, analyzing the source code, and more.
Jenkins supports two main methods of declaring a Jenkinsfile: as a Groovy script or using the Jenkinsfile declarative syntax. Once we define the job, steps, and the actions required, we can tell Jenkins to run the job and execute the instructions that are provided in the file.
Such tasks include building a software project, running the tests, deploying the software to production, or automating the execution of other jobs.
This tutorial teaches you how to clone a Jenkins job in simple steps. Cloning a job refers to creating a copy of an existing job with similar configurations as the source job.
Job cloning can be helpful if you want to create a job of a similar configuration with minor modifications. Instead of re-defining the job again, you can create a clone, make the desired changes, and re-run the job.
Jenkins Configuration
For writing this tutorial, we use a Jenkins controller version 2.283 which runs on Debian 11. We also have a Jenkins agent which runs on the Jenkins version 2.375 LTS on Windows 11.
Feel free to replicate a similar environment or use your existing setup.
Setting up a Sample Jenkins Job
Let us start by creating a simple hello world pipeline in Jenkins to demonstrate how we can clone a job.
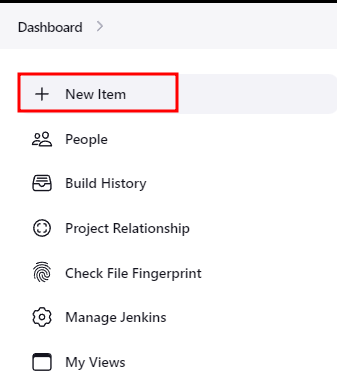
Log into your Jenkins dashboard and click “New Item”.
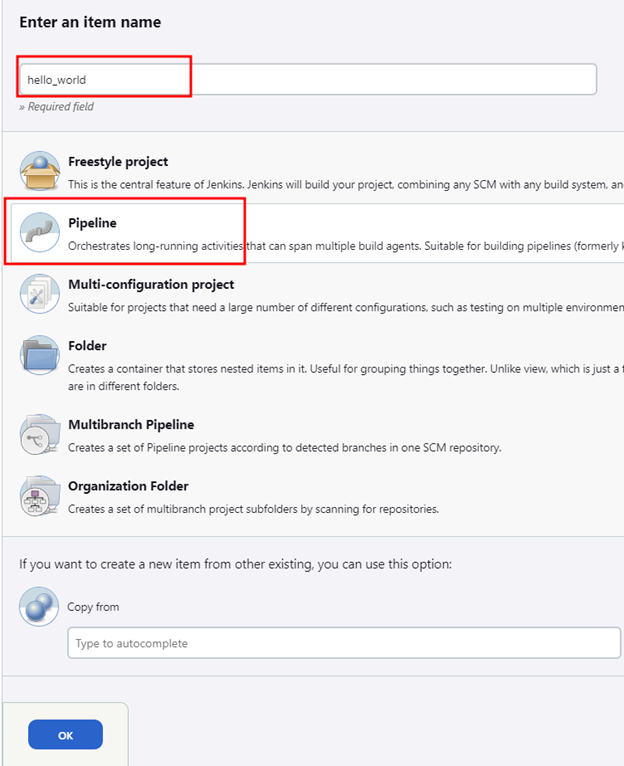
Give the job a name and call it “hello_world”. Select the job type as a pipeline.
Skip the other configuration and head down to the pipeline section. Here, we will provide a simple Jenkinsfile script as shown in the following:
agent any
stages {
stage('Hello') {
steps {
echo 'Hello World'
}
}
}
}
In this case, the pipeline outputs a “hello world” message upon completion. Click “Save” to finish editing your pipeline.
Clone a Job in Jenkins
To clone a job in Jenkins, start by logging into your Jenkins web interface.
- Click on “New Item” to add a new Jenkins job.
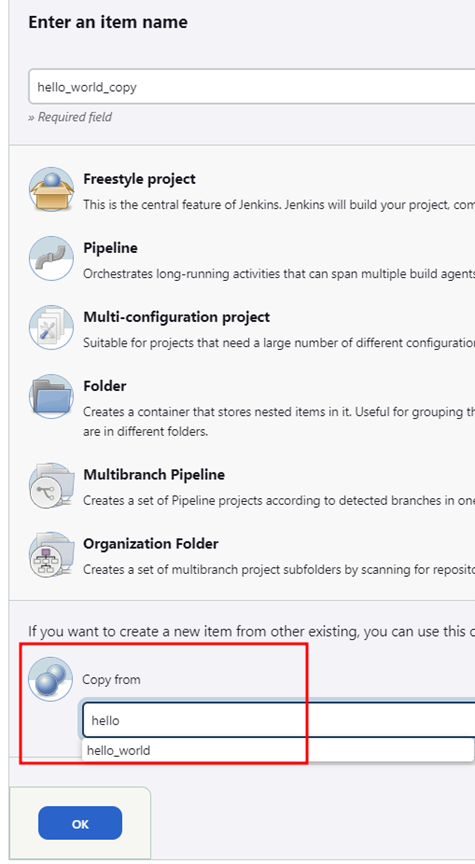
- Next, enter the name of the job that you wish to create. In our example, we call it hello_world_copy.
- Next, instead of choosing the job type as “Pipeline”, navigate to the bottom and select “Copy from”. Here, enter the name of the existing job that you wish to clone.
Once satisfied, click “OK” to initiate a new job. Jenkins creates a new job with the same configuration as the original. You can then make any necessary changes to the Pipeline of the new job and click on “Save” to apply the changes.
Note: Cloning the job in Jenkins does not copy the build history or artifacts of the original job. The new job starts with a clean build history and does not have any associated build artifacts.
Clone the Jenkins Job Via CLI
You can also clone a job using the Jenkins CLI. The command syntax is as follows:
The SRC refers to the name of the existing job and DST is the name of the new job to be created.
Example:
NOTE: Using the CLI does not allow you to change the configuration of the new job. You need to access the Jenkins dashboard to make any modifications to the newly created job.
Conclusion
You learned how to use the Jenkins clone feature to quickly create a job with a similar configuration with the already existing job. As mentioned, cloning a job does not include the build history and artifacts of the original job.


