
Secure Shell (SSH) is a network protocol to securely connect to a computer over a network. It is often used to remotely access a computer’s CLI such as a Bash shell on a Unix-like operating system or a command prompt on Windows.
SSH is commonly used to access the servers, configure the network devices, and automate the processes. As a result, it is an essential tool for system administrators and network engineers.
In this tutorial, we will learn how to install and use the SSH Agent Plugin in Jenkins to pass the SSH credentials to Jenkins builds.
Requirements:
The followings are the tools and requirements to follow along with this tutorial.
- A Jenkins controller that is running on Windows
- A Jenkins Agent that is running on Debian 11
Installing the SSH Agent Command on Linux
Before using the SSH Agent plugin in Jenkins, we must ensure that the ssh-agent command is installed on the target Agent.
On Debian, we can install the ssh-agent command as follows:
Install the OpenSSH Client using the following command:
The previous command installs the OpenSSH client package which includes the ssh-agent service and other utilities to connect to the SSH servers.
Once installed, we can install the SSH Agent Plugin on Jenkins.
Install the SSH Agent Plugin on Jenkins
Open the Jenkins Dashboard and select “Manage Jenkins” from the left-hand pane. Next, choose “Manage Plugin -> Available Plugins” and search for “SSH Agent”.
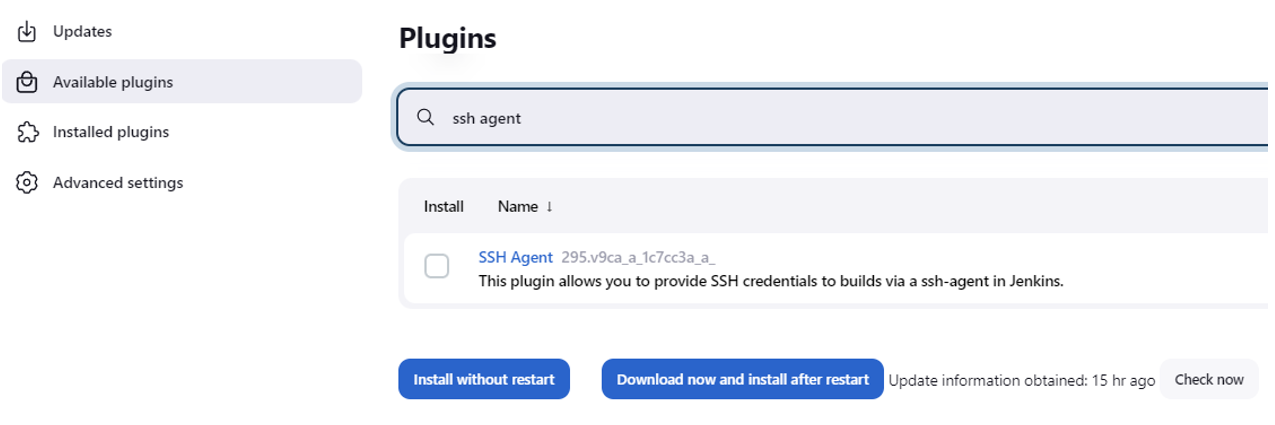
Once installed, restart Jenkins to apply the changes.
SSH Agent Configuration on Jenkins
The next step is to configure the SSH credentials and the SSH Agent Plugin.
To start, we need to add the SSH credentials for the target Agent. We can do this by navigating to Jenkins Dashboard -> Manage Jenkins -> Manage Credentials.
Select “Global Credentials” and choose the “Add Credential” option.

Choose the “SSH Username with Private Key” under the “Kind” option on the credentials page.
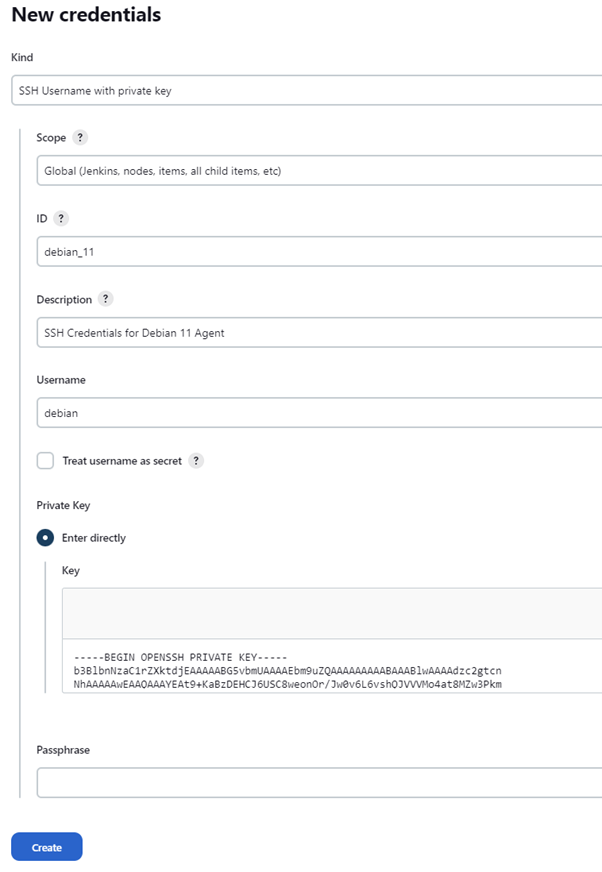
Provide all the required details including the credentials ID, the SSH username, and the private key. If the private key is encrypted with a passphrase, ensure that you create the passphrase in the block.
Once satisfied with the options, click “Create” to add the new SSH creds.
Configure Build to Use the Credentials on Jenkins
To configure a Jenkins job to use the provided credentials, use the sshagent step as shown in the following example:
sshagent(credentials: ['debian_11']) {
sh '''
[ -d ~/.ssh ] || mkdir ~/.ssh && chmod 0700 ~/.ssh
ssh-keyscan -t rsa,dsa 192.168.0.100 >> ~/.ssh/known_hosts
ssh [email protected]
'''
}
Where “debian_11” represents the id of the credentials that we specified earlier.
Conclusion
This post discussed how to install and configure the SSH Agent Plugin on Jenkins to allow the SSH credential access from a Jenkins job.