Tags Used for Underline Text in Markdown:
We can use two tags in Markdown, which help us underline the text or paragraphs. These tags are discussed below:
Both tags help us by underlining the text or paragraphs in Markdown. Below, we will demonstrate some practical examples where we use these tags and underline the text.
Example # 01: By Using <u>………</u> Tags
The tool we use here for writing the Markdown codes in this article is the “Visual Studio Code,” and when we are working on this tool, we have to select the language after opening the text editor. We choose “Markdown” there and then move ahead. We have also opened the preview window along with the text file in this Visual Studio Code. This preview window helps in rendering the output of the codes, which we will write in the text file here. We are developing code to add underlines to Markdown.
There is no syntax available in Markdown that helps in adding the underline to the text or paragraphs and also, we have discussed that we can do this by using the HTML “<u>…… </u>” tags. In this example, we are utilizing these tags for adding the underline. We first write simple text and then place the “<u>” tag and also insert some text into it. Then, we have to close this tag by utilizing the “</u>” tag, which is the closing tag. These tags will add an underline to the text that we have written inside these tags. Now, look at the preview window and check how the outcome is shown there.
As we have already opened the preview window and this preview window is also shown where the outcome of the above code is displayed. Here, you can see that the underline appears. The underline is shown on the text which we have added inside the “<u>……</u>” tags.
Example # 02:
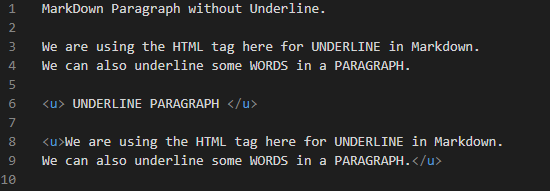
Now, we are adding an underline to the entire line in this example. First, we type a line without using tags, and then we place the “<u>” tag below this, in which we add a line and close that tag by putting the “</u>” tag. Now, the line that is added in between the opening and closing “u” tags will also appear in the preview window, and the underline is added to this line there.
See the underline, which is shown here in the second line, as we have added this line in the HTML tags. This underline appears due to the “<u> … </u>” tags which we have inserted in the code for this line.
Example # 03:
We can also add the underline to the whole paragraph with the help of HTML’s “<u>….. </u>” tags. We put the opening tag and then insert a paragraph there. After completing this paragraph, we are closing this tag by putting the “</u>” tag at the end. Now, the paragraph text will be underlined and will also show in the preview window.
The result of the above Markdown code is displayed below. The underlined paragraph is shown in this image, and this underline is added by using the “<u>….. </u>” tags.
Example # 04:
We can also add an underline to some words that are present inside the paragraph. We type a paragraph here and then we utilize the “<u>” tags at the start of the word where we want to add the underline and close this tag by using the closing tag “</u>” at the end of the word. We first put “HTML” inside these tags, and then we add the “UNDERLINE” word in between the opening and closing tags. After this, we write “WORDS” in these HTML tags, and also the “PARAGRAPH” is written in between “<u>….. </u>” tags. Now, the underline will be added to these four words, which are present in this paragraph.
The whole paragraph is not underlined here. Only those words are underlined in this outcome, which we have added inside the “<u> …. </u>” tags. The “HTML, UNDERLINE, WORDS, and PARAGRAPH” words are underlined in this example as shown.
Example # 05:
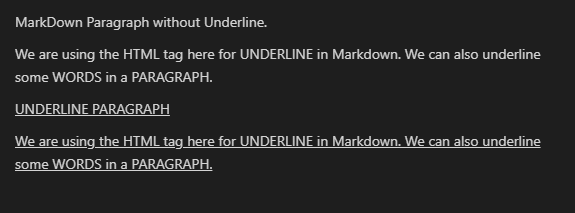
We have added two paragraphs in this example. The first paragraph is added without using any tags, and the second paragraph is added in between two tags, which are “<u>” and “</u>”. Now, the first paragraph will appear without underlining, and the second paragraph will be underlined as it is placed between the HTML tags, which help in adding the underline.
Both paragraphs are displayed below, in which the first paragraph is not underlined but the second paragraph is underlined as we have utilized the “<u>… </u>” tags at the start and end of this paragraph.
Example # 06: By using <ins> …… </ins> Tags
We are underlining the text in this example with the help of “<ins>… </ins>” tags. We have added “<ins>” and then put the words where we want to add the underline and then close this tag by putting “</ins>” after the end of the text.
This works the same as the HTML “<u>” tags. The “<ins>” opening and closing tags help in adding this underline, which is shown below.
Example # 07:
We add the “<ins>” tag and write a line and close this tag. Then in the next line, we again do the same and add the line in between the “<ins>” and “</ins>” tags. After this, we have added the whole paragraph in the “<ins>” and “</ins>” tags. Now both lines and the paragraph will be underlined.
The lines, as well as the paragraph, are underlined in this outcome because we have utilized the “<ins>….. </ins>” tags in the code above to create the underlines.
Example # 08:
We can underline a few of the words in the paragraph. Here, we’ve typed a paragraph. To underline a word, we’ve used the “<ins>” tag at the beginning of the word. We’ve also closed this tag with the “</ins>” tag at the end of that word. The word “ins TAG” is added between the opening and closing tags. After this, we place the word “UNDERLINING” inside these tags. The “SOME WORDS” and “PARAGRAPH” are also written inside these “<ins>” and </ins> tags. Only these four words in the paragraph will now be highlighted.
Here, only certain words are underlined. In this result, only the words that we added inside the “<ins>” and “</ins>” tags are underlined. In this example, as seen, the words “ins TAG, UNDERLINING, SOME WORDS, and PARAGRAPH” are underlined.
Conclusion:
We have gone through the “Markdown underline” notion in this article. We have discussed that the Markdown doesn’t facilitate us with any syntax that helps in underlining the text or paragraph. So, we have utilized the HTML tags for adding underlines to the text or paragraph in Markdown. We have explained about “<u> ….. </u>”, and “<ins> …. </ins>” tags in this article and have shown how these tags add the underline in Markdown.


