“We can say that “Markdown” is the “markup language”. Adding formatting components to plaintext text files using Markdown is common practice. In Markdown, all of the HTML’s features are readily available. It is very easy to write the Markdown code than the HTML code. We may accomplish a wide range of operations with “Markdown,” like adding headings, bolding and italicizing text, making tables, including links, images, and many more. In Markdown, we can also generate a strikethrough.
The strikethrough is the line that we can create horizontally in the middle of the text like this strikethrough. The Markdown allows us to create the strikethrough by putting two tildes ~~ at the start of the line or word and two at the end, where we want to add the strikethrough. This tutorial will help in understating how we generate the strikethrough in Markdown. We will utilize these tildes in our Markdown codes here for putting the strikethrough to our text or paragraphs.”
Example # 01
This tutorial uses Visual Studio Code to create the markdown codes. In Visual Studio Code, we must first open the new text file and then choose Markdown language. When we choose this Markdown, the “.md” file extension is automatically applied when we save the document. We also install the Markdown’s extension before writing any Markdown codes. We install it from the setting by pressing install on the “Markdown All in One”. This extension is now set up. After that, we needed the preview window to get the output. From the visual studio code’s right top corner, we can quickly open the preview window. Both the preview window and the text editor are currently open in front of us. Now, we type “SIMPLE TEXT”, then we put two tildes in the next line and write “STRIKE THROUGH” there and again add two tildes. Now, after placing two tiles, the horizontal line is created on the text that we have added here. Now, when we check the preview window, then there will be no tildes appearing with this text, but the strikethrough will appear on that text.
The outcome that we get on the preview window is given below, and you can easily note that the horizontal line appears in the middle of the text where we have added the tildes, but in this outcome, those tildes are not shown.
Example # 02
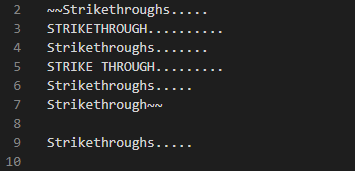
We can also apply the strikethrough on multiple lines with the help of the same tildes (~~). Here, we add six lines in which we add some words. We have placed two tildes at the start and two tildes at the end. Now, when these lines appear on the preview window, then the strikethrough will also be added to them. Below we have also added one word without using tildes, so there will be no strikethrough on the last text, which we have added here.
The strikethrough or we can say that the horizontal line, is added in the middle of the text here because we have placed the tildes at the start and the end of the text. The last text has appeared here without any strikethrough because we don’t add tildes with this last text.
Example # 03
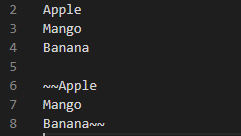
We simply add “Apple, Mango, and Banana” there. Then, we again put “Apple, Mango, and Banana,” but this time, we added two tildes ~~ before the Apple and at the end, which means after adding “Banana,” we again put two tildes ~~. We can say that we have inserted “Apple, Mango, and Banana” in between four tildes, two tildes at the start and two tildes at the end. Now, see the outcome of what happens to them.
There is no strikethrough added on the first “Apple, Mango, and Banana,” but below the strikethrough is added in “Apple, Mango, and Banana”. As we have added the tildes so, this strikethrough is generated here.
Example # 04
We can also insert the strikethrough on some text in a paragraph. Here, we add a paragraph, but inside this paragraph, we have generated the strikethrough on some text or words. We add the tildes where we want to add the strikethrough on the text. When we want to generate the strikethrough, then we have added two tildes before the text and two tildes after the text where we need to generate the strikethrough. You can see below that we have added the tildes on some text because we want to create the horizontal line in the middle of these texts. Here, the tildes are also shown with the text.
Now, the paragraph is also shown here, and also the strikethrough is added on the text where we have added the tildes, but the tilde symbols are not shown here in the preview window.
Example # 05
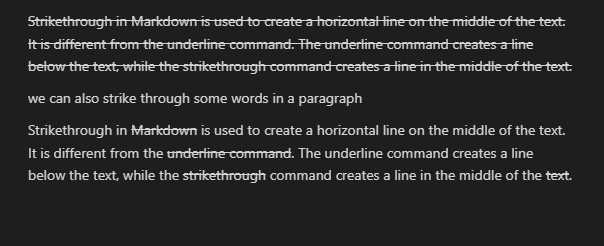
We can also generate the strikethrough on the whole paragraph by utilizing the same tildes as we have utilized in our above examples. We have added tildes before and after the paragraph, so the strikethrough is added to this paragraph. After this, we also add a simple paragraph without placing tildes. Now, we can easily note the paragraph with the strikethrough and the simple paragraph in the preview window.
The first paragraph, which is shown here, contains the horizontal line in the middle of the text or the strikethrough, so it means we have utilized the tildes with this paragraph. The paragraph below doesn’t contain the strikethrough, which means we don’t add the tildes with this paragraph.
Example # 06
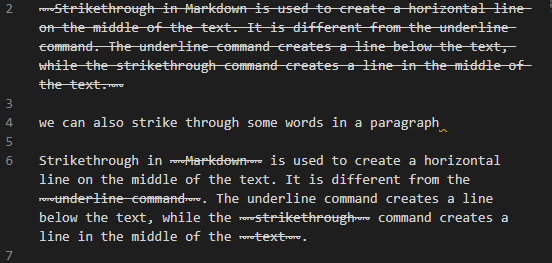
In this example, we generate the strikethrough on the entire paragraph as well as some words of the paragraph. We put two tildes and then wrote the paragraph. After completing this paragraph, we again put two tildes. So, the strikethrough appears in this paragraph. Now, we have inserted one more paragraph, but here we don’t add the tildes at the start and end of the paragraph. We just want to add the strikethrough on some words of the paragraph.
As shown below, we have added the “Markdown” word in between four tildes, and the strikethrough is generated. Then we add “underline command” in between tildes, so the strikethrough is also added to these words. After this, we put tildes before and after the word “strikethrough,” and this horizontal line is also generated in the middle of the word like this “strikethrough”. We also generate the strikethrough on the word “text”.
The strikethrough is shown in this image. The strikethrough is first added to the entire paragraph, and then the strikethrough is added to some words in the second paragraph. This is all done with the help of using tildes with the text or paragraph in the Markdown.
Conclusion
The strikethrough is discussed in detail in this tutorial. We have written this tutorial to explore the concept of the strikethrough in the Markdown. We have discussed that the strikethrough is the line that we have added on the text’s middle horizontally. We have also explained that for creating the strikethrough in the Markdown, we need to put two tildes at the start and two tildes at the end of the paragraph or text where we want to add the strikethrough. We have generated the strikethrough on the entire paragraph. Also, we have added the strikethrough on some words by utilizing the tildes “~~” in this tutorial.


