Kubectl works with the Kubernetes cluster. It is a command line tool that is used for the implementation of the Kubernetes cluster. The “kubectl” is the representation of the “Kubernetes command line tool” used to execute commands for the Kubernetes clusters. The kubectl platform allows you to deploy, inspect, and manage Kubernetes applications and cluster resources. This article is specifically designed to learn about the kubectl commands used with the Kubernetes cluster.
What Is kubectl?
The kubectl is an official CLI tool that allows communication with the control panel of Kubernetes clusters via Kubernetes API. It authenticates the master node cluster and makes API calls to perform various management actions. When you start working with Kubernetes, you need to spend a lot of time with kubectl.
Using the latest version of kubectl, which is entirely compatible with your Ubuntu version, helps you avoid unforeseen circumstances. There are different methods to install the kubectl to use the Kubernetes clusters, native package management, the “curl” command to install binary on Linux, etc. We will discuss the installation of kubectl in detail and guide you on how to install the kubectl in the further sections.
How To Use the kubectl Command?
Using kubectl commands is very easy. The same syntax is followed for every command. See the general syntax of the kubectl command provided below:
This same syntax is followed for every command by changing the command, type, name, and flag with kubectl.
<command>: It represents the main command that performs the apply, create, get, delete, etc. functions.
<type>: It represents the resources of the Kubernetes, like pods and nodes.
<name>: It represents the name given to the resources. If you do not specify the name, kubectl will return all the resources represented by the <type>.
<flags>: It represents any additional specific or global command to execute on the cluster resource.
Here are several basic kubectl commands which are used with the Kubernetes clusters:
| Commands | Description |
| get | Used to list down all the resources, packages, and everything specified by the <type> |
| run | Start running the instances of the image on the cluster |
| Create | Create the pod, node, namespace, or everything specified by <type> |
| deployment | Create a deployment specified by the <name> |
| namespace | Create a namespace specified by the <name> |
| Delete | Delete the resources, pods, namespace, etc. specified by the <type> |
| Apply | Apply the configuration on the <type> |
| Attach | Attach the resources specified by <type> with the container |
| Cp | Copy file, folder, resources, or anything specified by <type> |
| describe | Describe the resources specified by the <type> |
| api-version | List down all the available versions of API |
| cluster-info | Returns the address of services and control panel |
| api-resources | List down all the available supported resources of API |
| Config | Modify the configuration of the resources in the Kubernetes cluster |
These are the basic kubectl commands that run with a variety of <name>, <type>, and <flag> providing different services. To execute all these commands, you must have a minikube installed in your Ubuntu 20.04. Proceed to the next section to learn about the minikube.
What Is minikube?
A single node of a Kubernetes cluster runs on every operating system, including Windows, Linux, macOS, Unix, etc. In simple words, minikube is a local Kubernetes engine that supports all Kubernetes features for its local application development. It creates a virtual machine in a local machine to enable Kubernetes implementation by deploying a simple single node cluster consisting of dockers that allow the containers to run inside the node.
The command-line interface of minikube allows the basic bootstrapping operations to work with the cluster, which includes start, delete, status, and stop. The main goal of minikube is to be the perfect tool for local Kubernetes application development. It provides the perfect local environment to test Kubernetes implementation without using extra resources.
This tutorial demonstrates the complete procedure to install minikube on Ubuntu 20.04.
How To Install Minikube on Ubuntu?
Working with minikube is straightforward. It supports all the latest releases of Kubernetes and is capable of working with multiple containers simultaneously. It simplifies all kinds of local Kubernetes implementation by providing a development platform. For testing, implementation, or execution of any kind of Kubernetes application, a minikube needs to be installed in the system.
Before we begin the installation of the minikube, let us see what prerequisites should be fulfilled.
Prerequisites
As we are installing the minikube on Ubuntu 20.04, the system must have Ubuntu 20.04 running. The sudo privileges need to be enabled for a specific machine user.
Have a look at each step and follow the instructions to smoothly install the minikube.
Step # 1: Update the System
The first step in installing the minikube is to update the system. The “sudo apt-get update” command is used to update the system. Look at the command and its output below:
Step # 2: Upgrade the System
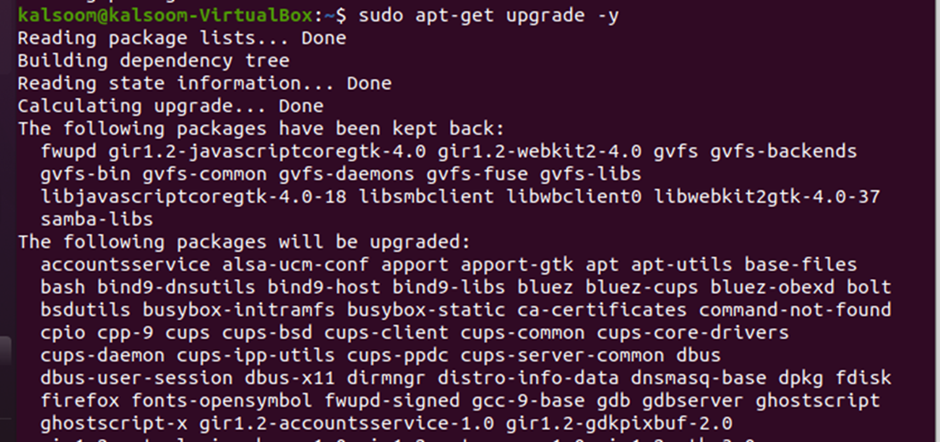
Once the system is updated with all the new and essential updates, upgrade it by using the “sudo apt-get upgrade” command. The “upgrade” command reads the whole package list and builds a dependency tree to upgrade the system for further processing. Here is how you can upgrade your system:
Step # 3: Install Packages
Now that the system is updated and upgraded with all recent updates, it is ready to install the necessary packages. Just make a quick check to ensure that the packages are not already installed.
Let us install “curl”, so we can transfer HTTP, FTP, SFTC, and every other protocol to or from a server. Refer to the execution of the “apt-get install curl” command below:
To install the minikube, we will need access to the repositories via the HTTPS transport protocol. It is by default included in the apt-transport-https. If you look at the output below, it indicates that the updated versions of the packages are already installed:
Step # 4: Install minikube
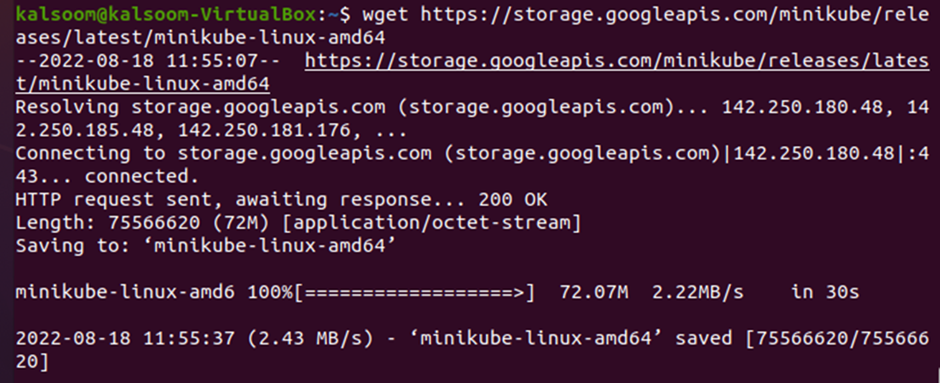
In this tutorial, we are using Docker, so we will not install the virtual machine separately. Assuming Docker is already in place, let us install the minikube on Ubuntu 20.04. Use the “wget” command to download and install the minikube from the web storage. The “wget” is a free utility that allows non-interactive and direct file downloads from the web. The web address is given below, from which you can download and install minikube in Ubuntu 20.04:
Once the download is completed successfully, copy all the files and shift them to a local folder, say the “/usr/local/bin/minikube” folder. Execute the complete command given below on your Ubuntu terminal, and you will have your minikube downloaded files copied to the local folder, /usr/local/bin/minikube:
If the process of copying files was done correctly and was successful, you will not have any output on the terminal. The next thing that you need to do is use the “chmod” command to permit to file executive. Refer to the “chmod” command execution output given below:
Again, if the process is correct and successful, you will not have any output on the terminal. If that is the case, then you have successfully installed the minikube on Ubuntu 20.04. Now, let’s check the version of the minikube to ensure that it is installed successfully. For that, we have the “version” command. The “version” command in Ubuntu or Linux is used to get the version of the software, packages, or anything installed in the system.
As you can see in the previous output, the version of the minikube is returned by the “version” command, and that is “v1.26.1”.
Step # 5: Install kubectl
Now that we have successfully installed minikube on our Ubuntu 20.04 system, our system is ready to test and execute the Kubernetes applications. But, before we begin the testing of Kubernetes, we should install the kubectl. As previously discussed, kubectl allows the user to play with Kubernetes on the Ubuntu platform. Again, use the “curl” command to download the kubectl. The following complete statement is used to download the kubectl command on Ubuntu 20.04:
As you can see in the output that the kubectl is downloaded successfully; the next step is to make an executable binary field. Install the kubectl binary by using the “chmod +x ./kubectl” command. When you execute this command on your Ubuntu terminal, it will install the kubectl binary in your system. Again, if you do not see any error or any other output on the terminal, that means the plugin is installed successfully.
Follow the same process again and copy all the files in your local folder, which is /usr/local/bin/kubectl. For that, use the “sudo mv” command. The “mv” command in the Linux or Unix system is used to move files from one directory or folder to another place. The complete command for moving the files is provided below:
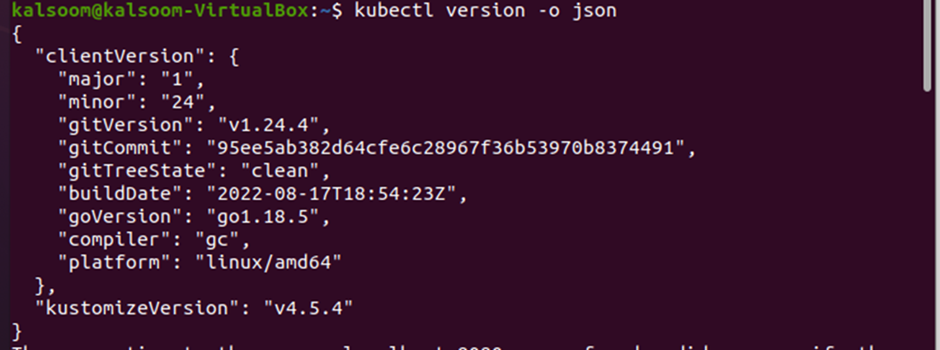
Finally, we can now verify that the kubectl is installed successfully. Use the same “version” command again to check the version of kubectl and verify that it is installed correctly.
The “version” command has returned all the fields, including the version of kubectl, and that is “v4.5.4”. The terminal has indicated that our system is ready, and we can now start working in the minikube.
Step # 6: Start Minikube
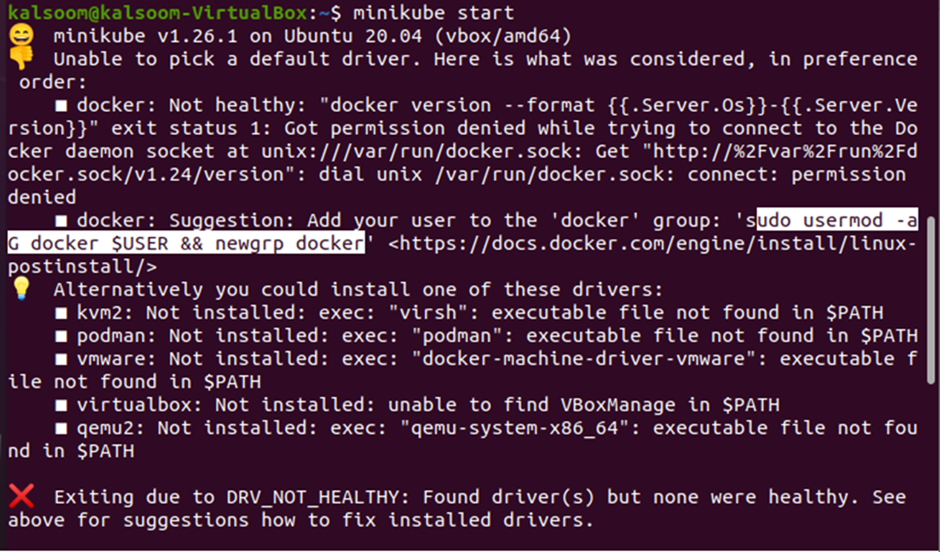
All the prerequisites’ requirements are fulfilled, and every required software and package is installed and set up for the minikube. Now, we can work on it. When you execute the “minikube start” command on your Ubuntu terminal, the system will download the minikube ISO file from a web source and localkube binary. After that, it will connect with the docker for configuration since we are using the docker instead of a virtual machine in a virtual box. Let us start the minikube:
Notice that the command has returned with an error. This happened because the version of minikube and the drivers installed are not perfectly compatible with the version of Docker. However, the system has suggested resolving the error, and that is by adding the user to the docker group. This can be achieved by executing the “usermod” command before starting the minikube again.
The “usermod” command in Ubuntu is used to change or modify the attributes of the current user through CLI. When you run the command “usermod” in your terminal, the command will ask for the current user’s password, username, shell, directory location, etc. The complete “usermod” statement for adding the user is shown below:
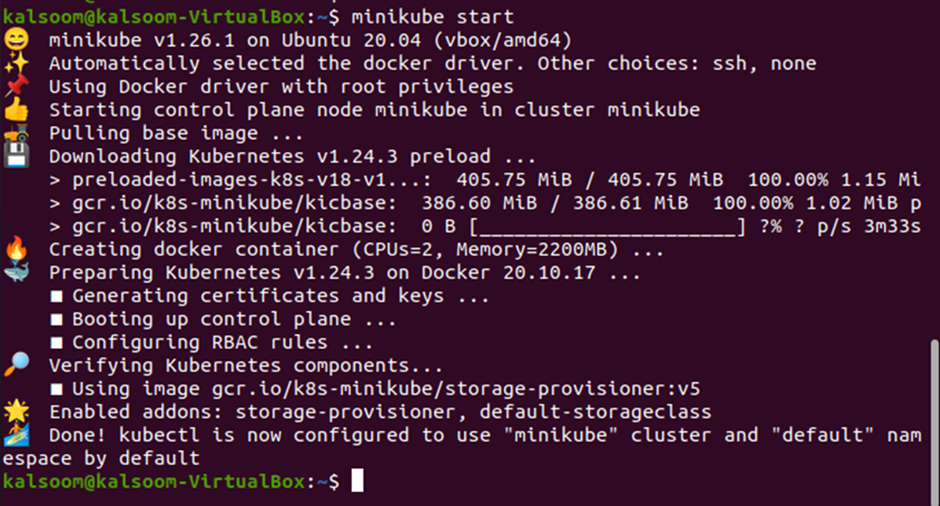
Note that the “usermod” and “newgrp” commands are used together. The “usermod” command is used to modify the details of the current user account, and the “newgrp” command is used to add the user group to docker. If the process was correctly done and the user was added to the docker successfully, there will be no output on the terminal indicating that the system is ready to start the minikube. Type in the same “minikube start” command to start the minikube:
Notice that the minikube started successfully, and the docker driver is being used with the root privileges. The terminal is also showing that kubectl is configured to use the minikube, and we are good to go. We can now implement Kubernetes and kubectl clusters in our minikube and test the commands. But, before we move on to the kubectl commands, let us first create a DaemonSet for Kubernetes.
What Is DaemonSet in Kubernetes?
The DaemonSet in Kubernetes is a feature that ensures that all the system pods are smoothly running and scheduled on every node. So, when we work with Kubernetes, we should create a DaemonSet to ensure that the copy of each pod runs successfully across all nodes. The benefit of creating a DaemonSet is that whenever you create a new node in a Kubernetes cluster, a new pod is automatically added to the newly created node. When you delete the nodes from the cluster, their copy will remain behind in the pod. Only when you remove the DaemonSet, then the created pods will be removed from the system.
What Is the Use of DaemonSet in Kubernetes?
DaemonSet is created in Kubernetes to ensure that every node has a copy of the pod. The pod attached to the node is usually selected by the scheduler, though the DaemonSet controller schedules and manages the pods after the creation of DaemonSet. Moreover, when a new node is added to the cluster, a copy of the pod gets automatically attached to it, and when the node gets removed, the pod copy will also be removed. However, the pods will only be cleaned up if the DaemonSet is removed from the system. The most common uses of a DaemonSet are as follow:
Cluster Storage: Run the cluster storage like Ceph, Gluster, etc. on every node that has been created.
Logs Collection: Run the logs collection like Logstash, Fluentd, etc. on every node that has been created.
Node Monitoring: Run node monitoring like collectd, Node Exporter, etc. on every node that has been created.
Deploy Multiple DaemonSets: For one kind of daemon, deploy multiple DaemonSets via CPU or memory requests of different kinds of flags that support a variety of hardware and configurations.
DaemonSet Creation in the Kubernetes Cluster?
Now, we know what DaemonSet is and what its uses are, let us create a DaemonSet in Ubuntu 20.04. For that, make sure at least one worker node must exist in the Kubernetes cluster. Follow the steps provided below to create a DaemonSet in your Kubernetes cluster:
Step # 1: Verify DaemonSet
The first step to creating a DaemonSet is to ensure that it is not already created in the Kubernetes cluster. List down all the DaemonSets by using the “–all-namespaces” flag with the “get” command. The “get” command is used to extract files, packages, and everything from the Kubernetes cluster, and when the “daemonsets namespace” flag is added to it, it will list down all the DaemonSets from the default namespace. However, to list down all the DaemonSets from all namespaces, add the “all” flag with “namespace”.
Note that all the fields of a DaemonSet are returned by “namespaces”, including namespace, name, desired, current, ready, up to date, available, node selector, and age. There is only one DaemonSet named “kube-proxy” that belongs to the “kube-system” namespace.
Step # 2: Get Pods
Now, we have the list of DaemonSets, let us get the pods that belong to the DaemonSets “kube-system” namespace. The same “get” command is used to get the pods that belong to the “kube-system” namespace. Run the “kubectl get pods -n kube-system” command in the terminal to get the pods that belong to this specific namespace. Refer to the screenshot provided below:
Step # 3: Get Proxy Pods
The “get pods” command has returned the list of pods from the “kube-system” namespace. Now, by using the same “get pods” commands, we can get the proxy pods of the same namespace. Add the “get proxy” command to the “get pods” commands to get the proxy pods of the namespace. The complete command statement is shown below:
Step # 4: Check the Details of DaemonSet
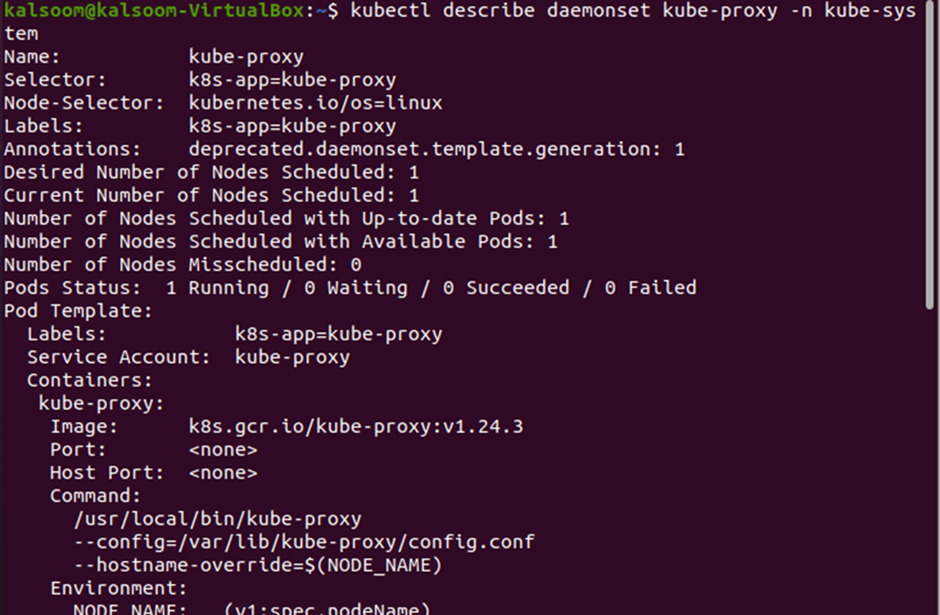
After extracting all the pods and proxy pods, get the details of the DaemonSet that is controlling the proxy pods. The “kubectl describe daemonset” command is used to get the details of the DaemonSet. The “describe” command in Kubernetes is used to describe the resources in Kubernetes. It can be used to define single as well as multiple resources at one time.
When you need to describe a specific resource of Kubernetes, just provide the name of that resource with the “describe” command. In this case, we need the details of our DaemonSet “kube-proxy” from the namespace “kube-system”, so we will provide this namespace name and the name of the DaemonSet to the “describe” command. The output of the “describe” command is shown below:
Note that a complete list of details is returned by the “describe” command. The output contains all the details of the DaemonSet which controls the proxy pods in Kubernetes.
Step # 5: Create a YAML File
The next step is to create an empty YAML file in docker. Use the “touch” command to generate a YAML file. See the complete command statement provided below:
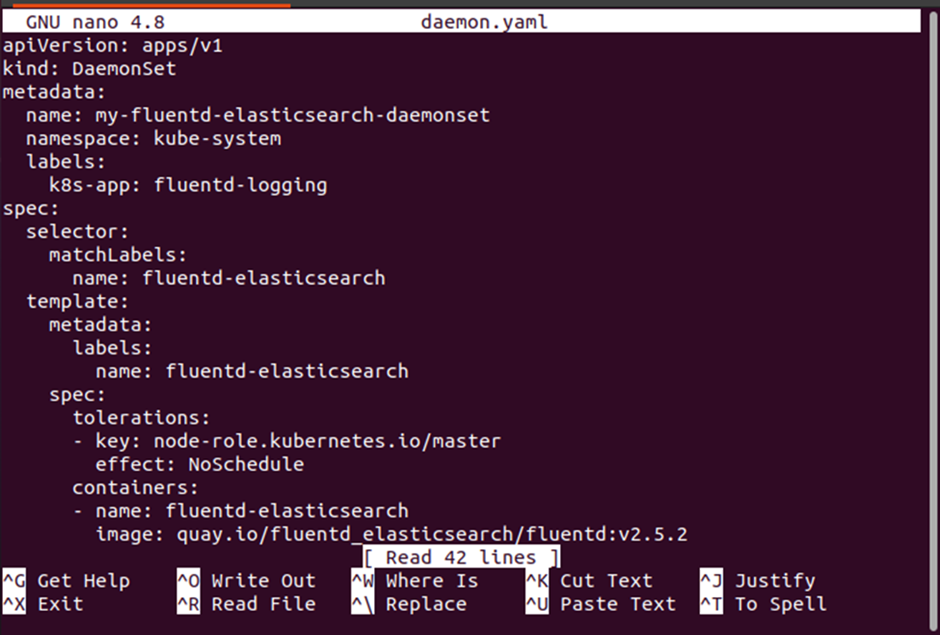
The “touch” is the command to build an empty YAML file, the “daemon” is the name of the file, and “.yaml” is the extension of the file. The complete statement instructs the system to create a YAML file named “daemon”. Now, let us open the YAML file in the desired editor. The “nano” command is used to open the file in the user’s desired editor. Use the “nano” command with the specific file name to open it in the desired editor. See the following code:
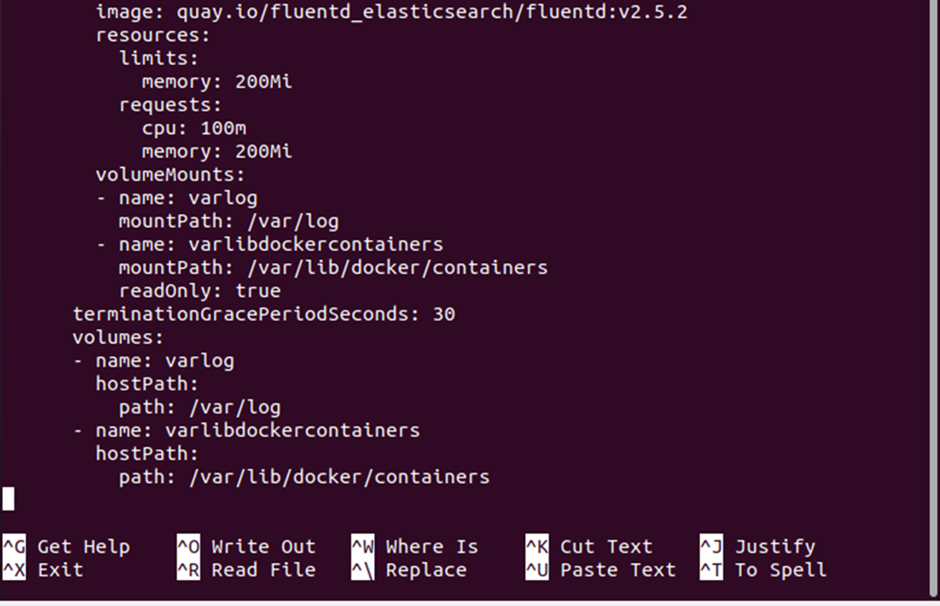
When you execute the previous two commands, a YAML file named “daemon.yaml” will be created. The output provided below shows the complete list of DaemonSet definitions for the daemon.yaml file. You will see the API version, namespace, resources like CPU and memory, etc. in the definition of daemon file.
Step # 6: Create a DaemonSet of the Definition File
Now that we have created a YAML file and acquired its complete definition, we can easily create a DaemonSet out of it. Simply use the “create” command to create the DaemonSet using the definition file which we created in the previous step. Use the “create -f” command to create the DaemonSet from the created definition file. Refer to the complete command provided below:
The DaemonSet named my-fluentd-elasticsearch-daemonset was created successfully. Now, let us get the namespace again to verify that the my-fluentd-elasticsearch-daemonset DaemonSet is added in the “kube-system” namespace. Use the “get” statement again to list down all the DaemonSets from the “kube-system” namespace.
As you can see from the previous output, the new DaemonSet has now been created in the “kube-system” namespace.
Step # 7: Describe the New DaemonSet
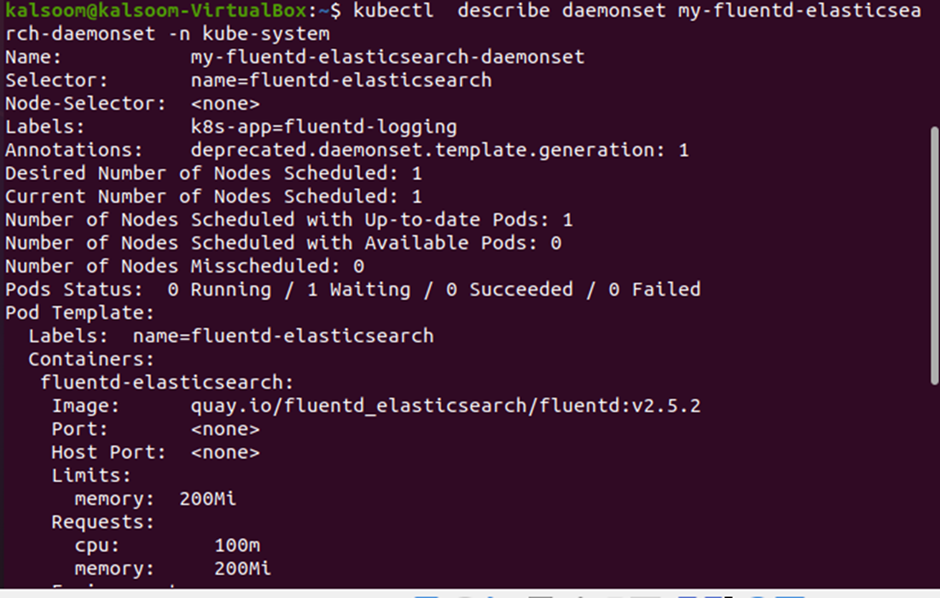
Since we have created a new DaemonSet, it’s time to describe it. As the DaemonSet is created in the “kube-system” namespace, we need to define the DaemonSet in the same namespace. Use the same “describe” command with the DaemonSet name “my-fluentd-elasticsearch-daemonset” and namespace “kube-system” to describe the new DaemonSet. See the complete command in the screenshot provided below:
If you carefully see the previous output, you will notice that 1 pod has been deployed with the nodes. Also, note that the status of the pod is “waiting”.
Step # 8: Get Details of the Deployed Pod
Here, we know how many pods are deployed on the nodes. Let us get the details of the deployed pod by using the same “get pods” and “grep” commands. Have a look at the complete command provided below:
We have successfully created a DaemonSet and learned how the pods get deployed in the newly created DaemonSet on each node in the Kubernetes cluster. We are almost done with all the essential installations, and we created every package required to smoothly run the kubectl commands in the Kubernetes cluster managed by minikube. In the next section, we are going to list down all the basic and most commonly used kubectl commands and will provide simple and easy examples for each command so that you can learn about the codes properly. The sample examples will help you in the implementation process, and you will be able to create your application by using these commands.
Basic kubectl Commands
As we know that the kubectl is an official command line tool to implement, execute, and run the Kubernetes application. The kubectl tool and commands allow you to build, update, inspect, and remove the Kubernetes objects. Here, we will provide some basic commands that can be used with several Kubernetes resources and components. Let us see the kubectl common commands one by one. Remember that the keyword “kubectl” will be used with all the commands. That is essential to execute any kubectl command.
Command # 1: cluster-info
The “cluster-info” command, as the name suggests, will provide the info of the cluster. It provides the endpoint information of the services and the master of the cluster. Check out the output of the “cluster-info” command shown below:
The “cluster-info” provided the information of the cluster running on which port.
Command # 2: version
The “version” command of kubectl is used to get the version of the Kubernetes, which is running on both server and client. Look at the following executed “version” command with its produced output:
Note that the “version” command has returned the “v4.5.4” version of the Kubernetes.
Command # 3: config view
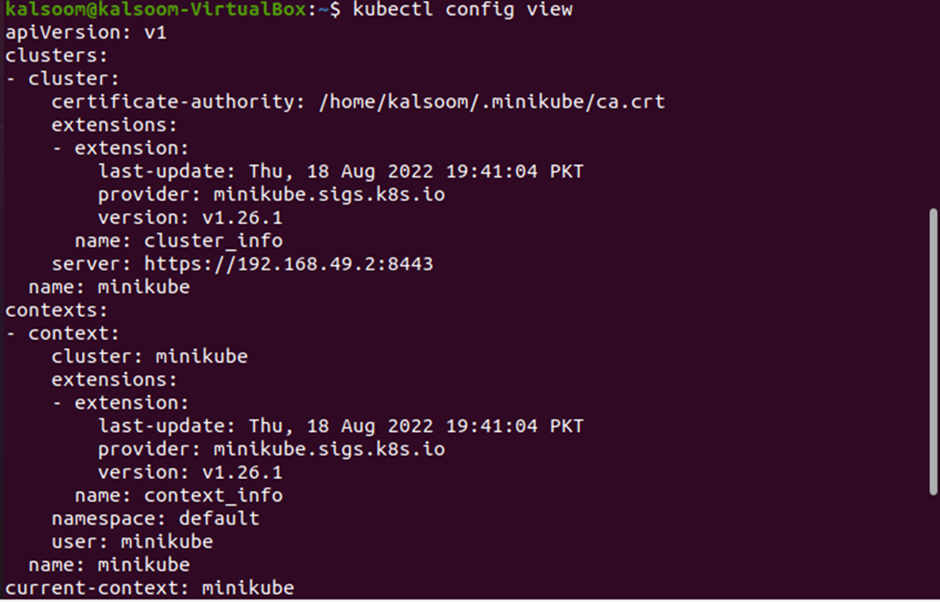
The next command is the “config view”. It is used to configure the cluster in Kubernetes. When you execute the “kubectl config view” command, you will get a complete definition of the cluster configuration. The details contain the last update time, provider information, version of minikube, API version, etc. See the complete list of details in the output given below:
Command # 4: api-resources
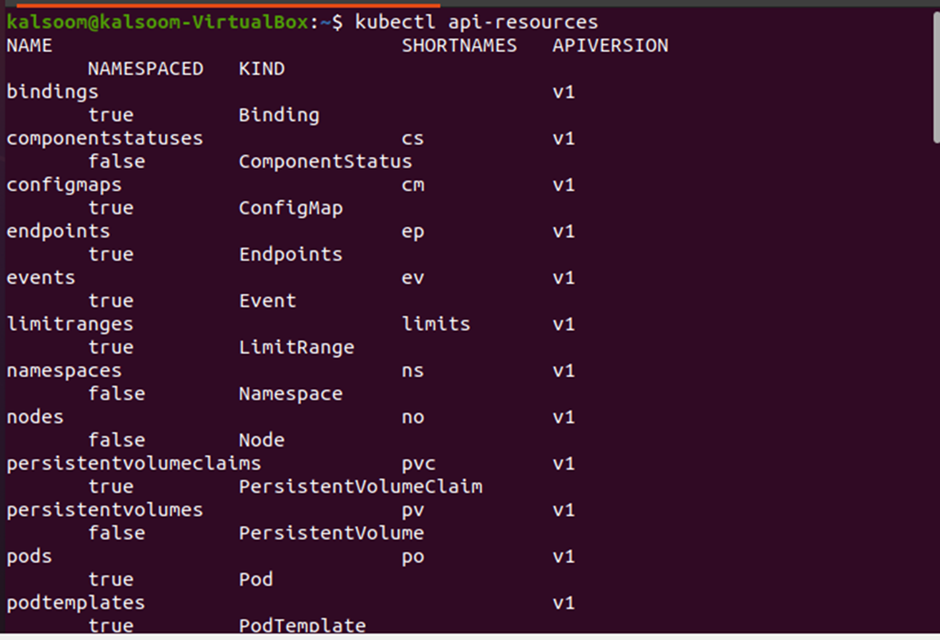
There are many API resources used in Kubernetes; to list all those, we have the “api-resource” command. Have a look at the list of all the active resources provided below:
Command # 5: api-versions
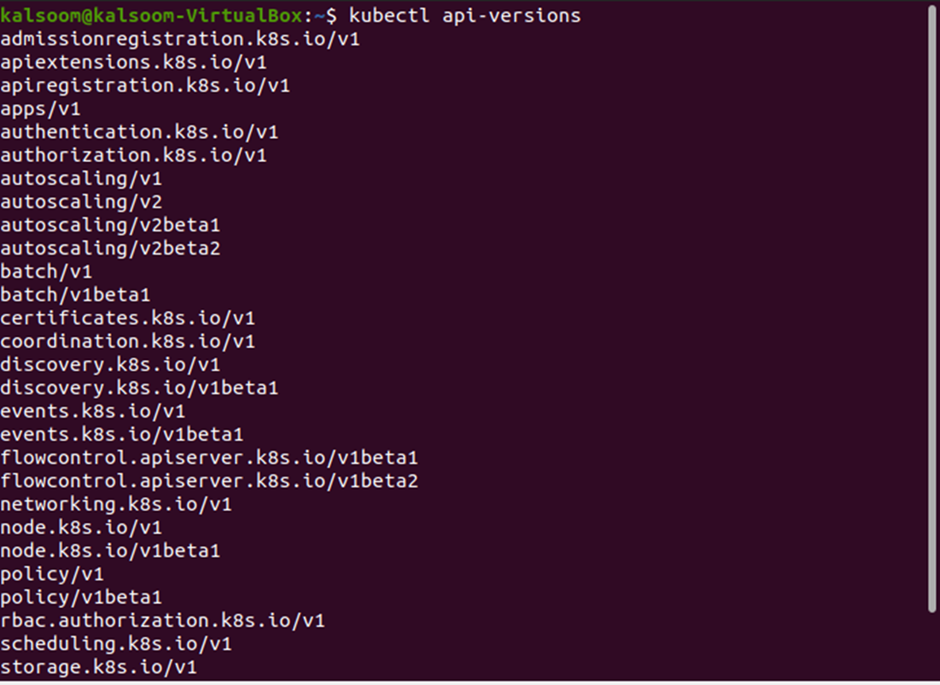
To list all the available versions of API, we have the “api-versions” command available. Just execute “kubectl api-version” in the terminal and get all the versions of API that are available currently. Here are the list of all the available API versions shown below:
Command # 6: Get all namespaces
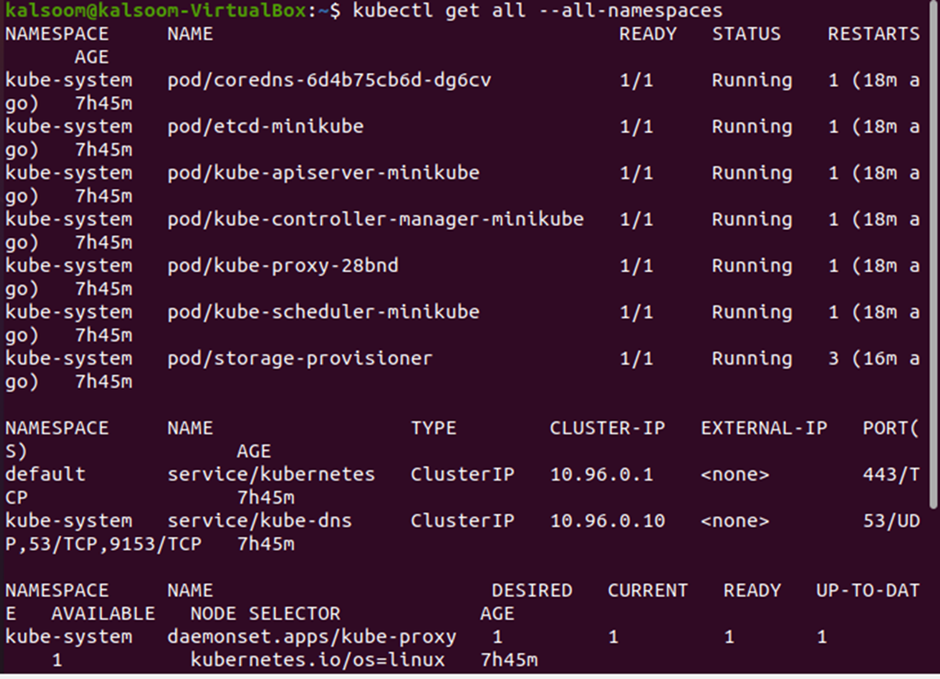
We have already used the namespaces command in the previous section for creating the DaemonSet. However, let us see the general definition of the “all namespaces” command. The –all-namespaces command lists down all the namespaces created in the kubectl. See the list of all the namespaces provided below:
Command # 7: get daemonset
The “get daemonset” command is used to get the list of all the DaemonSets created in the default namespace so far.
Suppose you execute this command before creating any DaemonSet. It will not return anything since no DaemonSet resources have been created in the namespace. However, we have created a DaemonSet in the previous section, and we can see the list of newly created DaemonSet there.
Command # 8: get deployment
The “get deployment” command is used to list down all the deployments that have been done so far in the Kubernetes.
Since there is no deployment done yet, no resource has been found in the namespace.
Command # 9: touch
The “touch” command is used to create a new and blank file to provide the configuration in it. For creating a blank file, simply provide the file name with the desired file extension describing the type of file to the “touch” command. See the following command execution:
Command # 10: nano
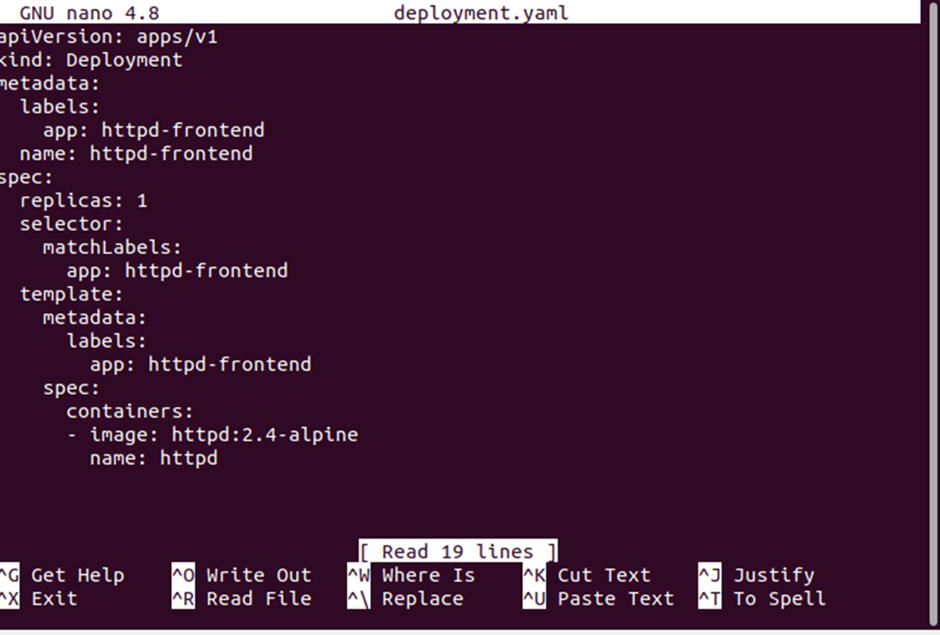
The “nano” command is used to open the files in the desired editor. We have created a YAML by using the “touch” command, so we will provide the same file name to the “nano” command in order to open it.
Here is the output of the “nano” command:
As you can see, the deployment named “httpd-frontend” has been created. The “app” label under the template field tells the label of the pod, and that is “httpd-frontend”. Finally, the “image” label under the template field specifies the image version, which is 2.4-alpine, and the “name” label indicates that the pods are running the “httpd” container.
Command # 11: create -f
The “create -f” command is cast-off to generate a deployment. When you execute the “kubectl create -f deployment.yaml” command on the terminal, the create command will create the deployment. See the new deployment in the following output:
As you can see, a deployment “httpd-frontend” has been created successfully. To see the details of the deployment, run the same “get deployment” command again in the terminal. When you execute the “get deployment” command, it will list all the deployments created so far. See the following list:
Command # 12: get replicaset | grep
The “get replicaset | grep” command is used to display the list of ReplicaSet of the deployments. As we have just created a deployment, we can see the details of it by using the following command:
Command # 13: get pods | grep
When you create a deployment, it will create pods and ReplicaSets. We already listed the ReplicaSet. Now, let us get all the pods created by the ReplicaSet. The “get pods | grep” command is used to list down all the pods created by the ReplicaSet. The list of pods created by the ReplicaSet will be displayed, matching the specified name provided by the user. See the following output:
Command # 14: delete
Let us delete the pod to test the auto-creation of the pod. To delete the existing pod, we have the “delete” command. When you execute the “delete pod <pod name>’ command, the specified pod will be deleted. See the following output:
As you can note, the pod “httpd-frontend-6f67496c45-56vn8” has been deleted successfully. Now, let us check whether the new pod is automatically created after specifically deleting the existing pod. To do that, run the “get pods | grep” command again in the terminal. Here’s the following result:
Note that a new pod has automatically been created after deleting the existing pod. Now, let’s check what happens after deleting the ReplicaSet. First, we will get the list of ReplicaSet by using the same “get replicaset | grep” command. See the following list:
Now, delete the ReplicaSet by using the delete command and specifying the name of the ReplicaSet.
As you can see, the terminal indicates that the ReplicaSet has successfully been deleted. So, let us check whether the deployment had automatically created the ReplicaSet or not when it got deleted. Let us run the same “get replicaset | grep” command to list down all the ReplicaSet created by the deployment. See the following output:
Note that the ReplicaSet has automatically been created by the deployment even after it was forcefully deleted. Check out the next command to get more details about the pod:
Command # 15: -o wide
The “-o wide” command is used to get the details of the pod that has been created recently. Just specify the name of the pod and use the “get” command with the “-o wide” field to get detailed information about the pod. See the output provided below:
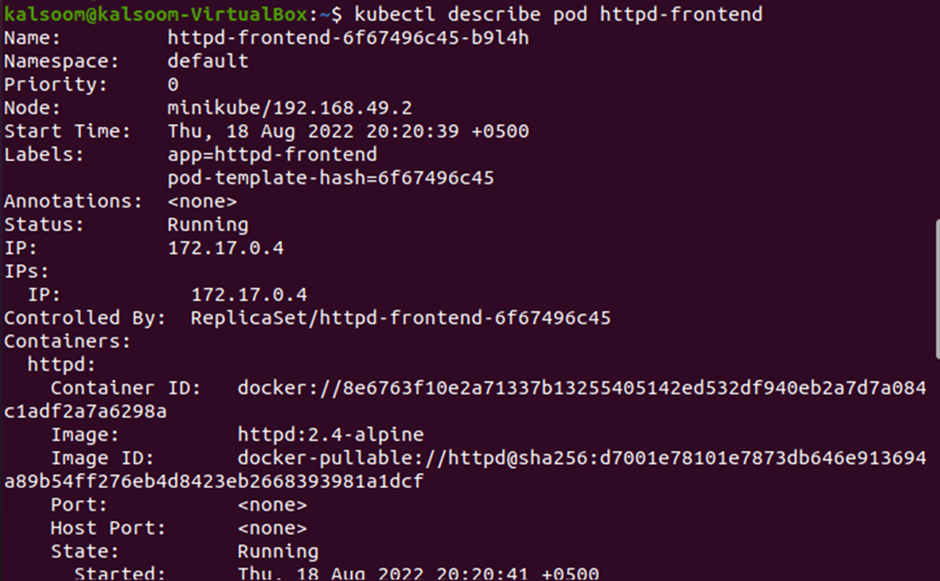
Now, if you need to see the complete details of the pod, you can execute the “describe” command again by specifically providing the pod name.
As you can see, the describe command has returned the complete details of the httpd-frontend pod, including pod name, namespace, start time, node details, status, IP address, container id, etc. Now, if you do not need the deployment anymore, remove it by using the “delete” command. First, get the list of deployments via the “get deployment” command.
The only deployment we have in the Kubernetes cluster is “httpd-frontend”. Execute the “delete” command on the “httpd-frontend” deployment to delete it.
The “httpd-frontend” deployment has been deleted successfully. If you check the deployments now, nothing will be returned. See the output provided below:
Note that when we deleted the deployment, it did not get created again. However, when we deleted the pod and ReplicaSet, they both were created automatically again by the deployment. Since both are a part of the deployment, they will be created again until you delete the deployment itself, even if you forcefully delete them.
Creation of Namespaces in Kubernetes using kubectl Commands?
It allows the administrator to arrange, structure, organize, group, and allocate resources to smoothly function the cluster operation. Multiple namespaces can be found in a single Kubernetes cluster, all logically separated from each other.
Step # 1: Create YAML File
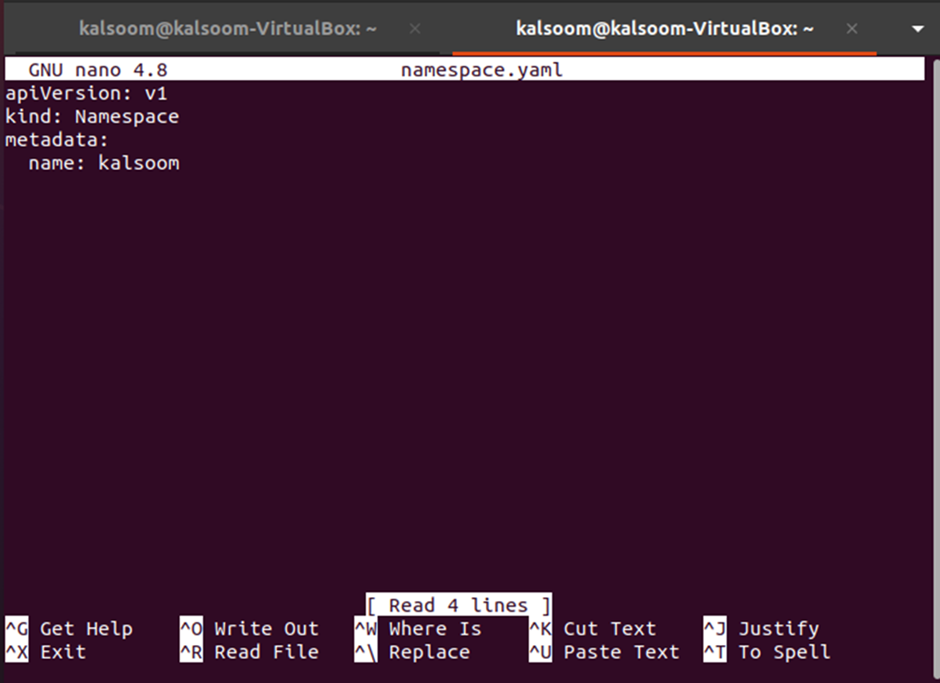
The first step that you need to perform is to create a new YAML file for configuration using the “touch” command. After that, open the newly created file in your desired editor by using the “nano” command.
A YAML file of namespace type has been created. Now add “apiVersion: v1, kind: namespace, metadata: name: kalsoom” in the file and save it. See the open file provided below:
Step # 2: Create Specific YAML With kubectl create -f
Use the “kubectl create -f” command with the name of the namespace followed by the YAML file path to create the namespace of that specific name.
As you can see that the output indicates that the namespace has been created successfully.
Step # 3: List All the namespaces
Use the “kubectl get namespaces” command to list every namespace that is present in the cluster.
The “get namespaces” has returned the name, status, and age of all the namespaces existing in the Kubernetes cluster. If you want to see the detail of one specific namespace, you can do that by using the name of the namespace with the get command, as shown below:
Step # 4: Get the Complete Description of the namespace
If you need to see the complete details of a specific namespace, it can be done using the describe command. See the output provided below:
How To Work With Pods in Kubernetes Using the kubectl Commands?
Let us create some pods in the Kubernetes cluster.
Step # 1: Get all Existing Nodes
Execute the “kubectl get nodes” command in the terminal to see the nodes of the cluster. See the output below:
Step # 2: Create the Pod Using Nginx Image
The pod can be created by using the Nginx image.
The output shows that the Nginx pod has been created running with the Nginx image on the docker hub. Note that the “restart” flag has been set to “never”. This is done to ensure that the Kubernetes creates a single pod instead of a deployment.
Step # 3: List All Pods
To see the pod that was created recently, we can run the “get pods” command. The “kubectl run pods” command displays the status of the pod.
Step # 4: Get All the Details of the Pods
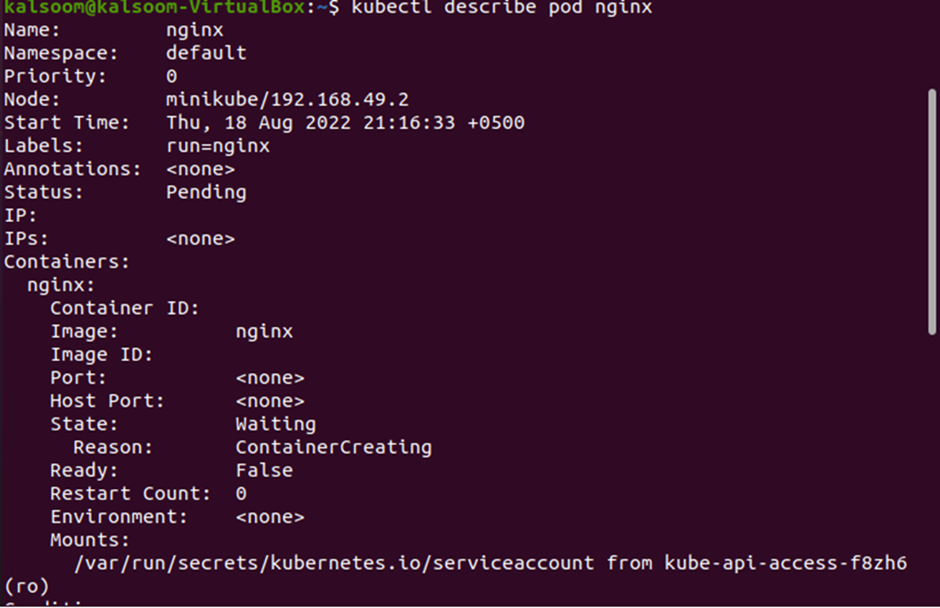
If you need to see the complete detail and entire configuration of the pods, use the same “describe” command again with the pod name. The complete command is shown below:
You can see the YAML for the pod that was created recently. The configuration includes the name, namespace, start time, labels, status, image type, etc. This also contains the complete details of the Nginx container.
Step # 5: Delete Pod
The pod created in the previous sections can be deleted by simply using the “delete” command with the pod name.
The execution of the “delete” command was successful, so the pod was deleted.
Conclusion
As you begin your Kubernetes journey, you will have to deal with all kinds of kubectl commands. This complete article will help you understand the kubectl commands and how you can use them to create different packages, namespaces, pods, nodes, etc. These commands help you perform the basic operations on all Kubernetes cluster objects.


