Example 1:
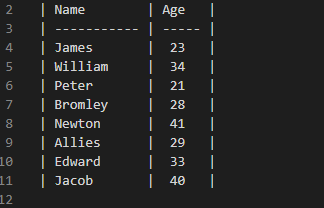
We utilize the Visual Studio Code where we create the tables in the “Markdown”. We type the code in its text editor. To obtain its output, we open the preview window by pressing the icon which is present in the right corner of this text editor. Now, we create the table. For this purpose, we utilize two symbols which are pipes “|” and hyphens “—-”. The “hyphens” are utilized to create the header of each column. The “pipes” are utilized to separate each column of the table.
Here, we add the “|” pipe first and then place the “Name”. We add a “|” pipe again. It means that we created one cell of the table. After this, we add the “Age” and then place the “|” again. Now, it is the second cell of this table. Below the “Name”, we add the “hyphens” between two more “pipes” which means that the previous “Name” which we added here is the column name of the table. We also add these hyphens below the “Age” inside the “pipes” which makes the “Age” column name of the table.
After this, we insert some names and ages in these columns which we created. We add “James” in between two pipes. We add “23” in the “Age” column which is also inserted between two pipes. Below, we add “William” by placing one pipe before “William” and one pipe after “William”.
Then, we added “34” in the same way as we did in the Age column. After this, we insert “Peter” and “21” by placing the pipes at the start and at the end. We also separate both “Peter” and “21” by placing the “pipe” in between them. Now, we add “Bromley” and “28” which appear in the next row. “Bromley” appears in the “Name” column and “28” appears in the “Age” column. Then, we add “Newton” and “41” which appear in the next row of this table. We also add “Allies” and “29” below the “Newton” and “41”. Then, we add “Edward” and “33” in the next row. We also add “Jacob” and “40” in the last row. We don’t need to debug that code because the output of this code is rendered on the “preview” window which we open here.
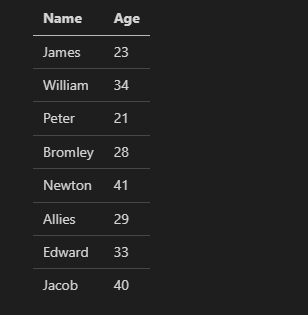
This is the “preview” window in which the output of this code is displayed. The table which we previously created is shown here. You can see that the “Name” and “Age” are highlighted because both are the column names of these two columns which we added to the table. Then, the vertical line is present below these names which are also bold. All the data is inserted in these columns accordingly as we previously added in the table format.
Example 2:
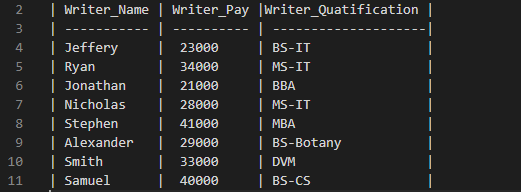
In this example, we add three columns and place a pipe “|” after each column name. We first add the column names which are “Writer_Name, Writer_Pay, and Writer_Qualification”. We insert the “hyphens” below, so the above names are separated from the below data which we add here. The given names are the names of these columns and appears bold on the preview. In the following illustration, we add “Jeffery, 23000, and BS-IT”. We also separate each value by placing “pipes” between them.
Also, we add the pipes at the start and at the end. These three values appear in one row and three columns. Then, we add “Ryan, 34000, and MS-IT” by separating them using “|”. After this, we add “Jonathan, 21000, and BBA” which is added in the third row. Likewise, we add six more rows to this table by separating each value of the row with the help of “pipes” as shown in the following image:
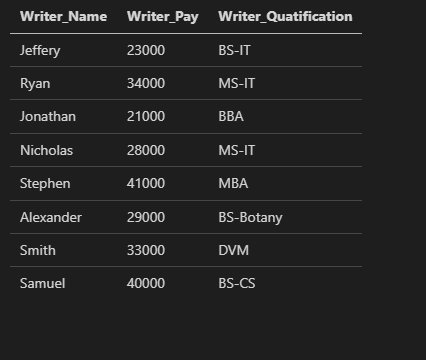
Here is the table that we made previously. As you can see, the words “Writer_Name”, “Writer_Pay”, and “Writer_Qualification” are in bold as these are the names of the three columns that we added to the table. All the data is appropriately entered in these columns as we previously inserted.
Example 3:
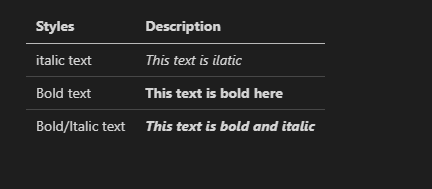
Here, we create a table but this time, we make the text bold and italic which is inserted into the table. We create two columns for this table. The column names which we add here are “Styles” and “Description”. We then place the three hyphens below the names of each column inside the “pipes”. After this, we add the “italic text” in the first column. Then, we place some text in the next column by placing “|” there.
We add the text inside the “*”. We place one “*” before the text and one “*” after the text. We then put the “|” pipe. This text is now shown in italic format because we added this text inside the two “*” asterisks. Below it, we add the “Bold text” in the “Styles” column. We place two “**” asterisks in the “Description” column. We then write some text and then place the “**” two asterisks again. Now, the text that is written in between them is shown in bold.
Now, we want to make the text bold and italic at the same time. For this, we place three asterisks “***” before the text and three asterisks “***”after the text. The text appears in bold and in italic format at the same time.
The text presented in the “Description” column of the first row appears in italic format. Then, below the text which is present in the second row of the “Description” column appears in bold. The text which is present in the last row of the “Description” column appears in “bold” and “italic”.
Example 4:
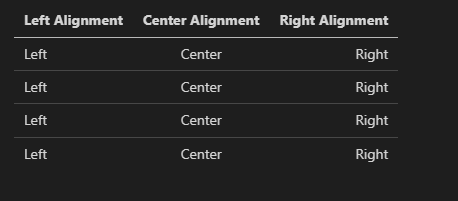
We can also set the alignment of the text which is written inside the table using the colons “:” with the hyphens “—”. The “:—-” shows the left alignment, the “:—–:” shows the center alignment, and the “—-:” is utilized for the right alignment. We add the column names of the table which are “Left Alignment, Center Alignment, and Right Alignment”. We add “:—-” below the “Left Alignment” column.
Now, the text which is added to the “Left Alignment” column appears on the left side. In the “Center Alignment” column, we add the “:—–:” below the column name so that all the data which is entered in this column appear in the center of this column or cells. In the “Right Alignment” column, we add “—-:” so the text which is added in this column appears on the right side.
The values which are present in the “Left Alignment” column are shown on the left side. The values which are present in the “Center Alignment” column are shown at the center of this column. The values which are here in the “Right Alignment” column appear on the “Right” side. This is because we adjusted these alignments in the previous code.
Conclusion
The “Markdown table” concept is explained in this tutorial. We explained how this “Markdown” language helps in creating the tables. We explained how to create the tables and how to adjust the column names of the tables. We also discussed how to apply the formatting to the text which we added inside the columns of the table. We also explained how to adjust the alignment of the text of the table’s column. We discussed all the “Markdown tables” notions in this tutorial in detail.

