What are Deployments in Kubernetes?
Deployments are made up of a large number of identical Pods with really no differentiating features. A deployment creates many copies of your application and automatically replaces those that fail or become unresponsive. The deployment of your application ensures that at least one instance is prepared to give a response to user queries. The Kubernetes Deployment controller is in charge of managing deployments.
One of the essential parts of Deployments is how it manages application changes. When you update the Deployment manifest in Kubernetes, the application is updated on a rolling basis by default. In this manner, the prior version of the deployment will continue to run while the new one is being set up.
In deployments, a Pod template is used to specify a requirement for its Pods. Each Pod’s appearance is defined by the Pod specification, which includes which services should operate within its containers, which volume the Pods should mount, and other aspects.
When the Pod template of a Deployment is updated, new Pods are produced.
Prerequisite:
To use kubectl for executing commands, you must first set up a Minikube cluster on our system. Ubuntu 20.04 was used to implement the commands in this topic. You can also utilize our preferred operating system since we already have kubectl installed. It must be installed before the commands can be run.
To start a terminal, we can take one of two techniques. One option is to use our operating system’s application bar to reach the terminal. Another way is to use the keyboard shortcut “Ctrl + Alt + T.” To start a terminal, select one of these options.
First, we must boot a Minikube cluster previously deployed on Ubuntu 20.04. Now we’ll launch Minikube by typing the following command into the terminal. The instruction and its output can be comprehended in the affixed screenshot.
Creating Deployments
Most service-style applications in Kubernetes use Deployments to operate their applications. Deployments define how your application container will be deployed and the number of instances to be run in the Kubernetes. After that, Kubernetes will handle running the required number of replicas. The kubectl apply and kubectl create commands can be used to build a Deployment.
After it is built, the Deployment guarantees that the number of Pods that you have specified is working. The Deployment will replace pods that fail or are ejected from their nodes.
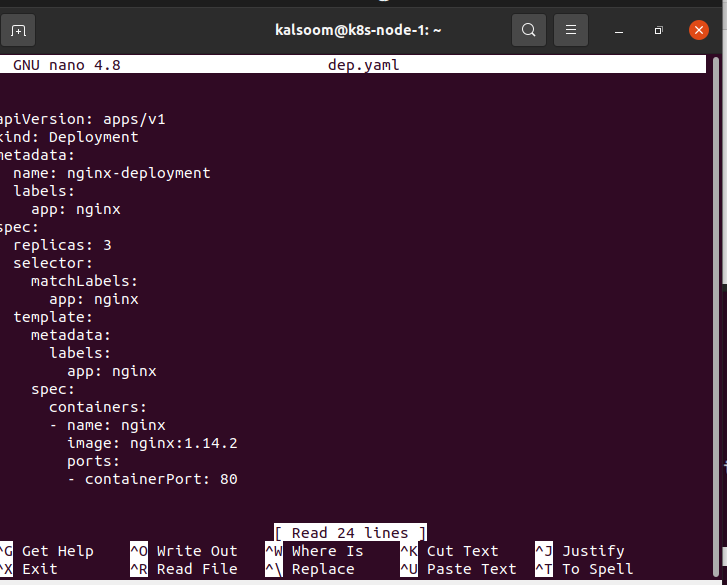
An example of a Deployment manifest file in YAML format is as follows:
The whole configuration file can be found below. The metadata: name field indicates that a Deployment named nginx is created. According to the replicas column, the Deployment generates three replicated Pods.
The Pod template, or the field ‘spec: template,’ shows the app: nginx label. The template: spec parameter in the Pod template specifies that the Pods only run one container, nginx, which uses the nginx Docker Hub image version 1.14.2. The Deployment makes port 80 available for the Pods to use.
Before proceeding and following the further steps, make sure your Kubernetes cluster is up and operating. To construct the aforementioned Deployment, follow the procedures outlined below.
We have used the command ‘kubectl apply’ in this case. The deployment has been successfully configured, as evidenced by the output. The instruction and its output can be grasped in the affixed screenshot.
Now run the ‘kubectl get deployments’ commands in order to see if the Deployment is created or not. The result will resemble this (see below) if the Deployment is still being created. The number of intended copies, according to the.spec.replicas field is three. The instruction and its output can be grasped in the affixed screenshot.
The rollout command in kubectl comes in helpful here! We can utilize it to monitor the progress of our deployment.
The command will, by default, wait until all of the Pods have started properly. The command departs with a zero return code when the deployment is completed successfully.
Now you can run kubectl rollout status deployment/nginx-deployment in order to examine the deployment rollout status. The instruction and its output can be grasped in the affixed screenshot.
After a few seconds, run ‘kubectl get deployments again. This is what the output looks like. You can see that the Deployment has built all three replicas and that all replicas are up-to-date (they have the most recent Pod template) and ready to use. The instruction and its output can be grasped in the affixed screenshot.
After that, we will be using the ‘kubectl get rs’ command. This will help you see the ReplicaSet (rs) that the Deployment has specifically created. The instruction and its output can be grasped in the affixed screenshot.
The following fields are produced from the ‘kubectl get rs’ command. The below section shows what purpose they serve.
- NAME: This field shows the names of the ReplicaSets.
- DESIRED: It displays the number of application replicas specified when the Deployment was built.
- CURRENT: It shows how many replicas are active at any given time.
- READY: It displays the number of copies of the application that your users have access to.
- AGE: It indicates how long the application has already been running.
It is worth noting that the ReplicaSet’s name is always [DEPLOYMENT-NAME]-[RANDOM-STRING]. The random string is created at random using the seed pod-template-hash.
Conclusion:
We discussed kubectl list deployments in this article. The normal Kubernetes deployment flow for service model apps and how they work. We have shown how to add status checks and an automated rollback method to the deployment sequence.


